Adorable Crochet Bull Amigurumi Pattern: A Beginner-Friendly DIY Tutorial
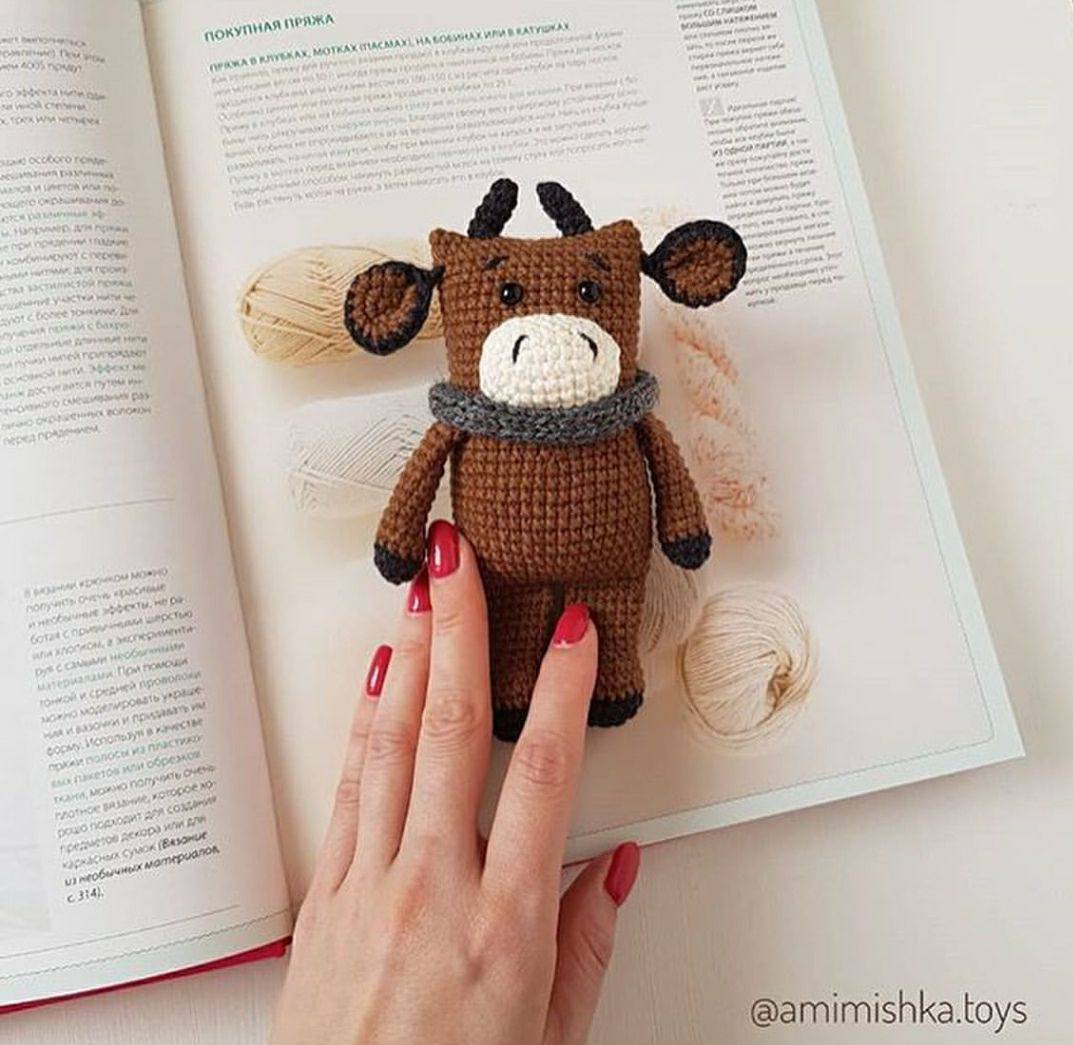
Are you looking for a charming, small-scale project to add to your crochet collection? This adorable little crochet bull is the perfect addition to any nursery, a wonderful gift for animal lovers, or a sweet companion for your desk. This amigurumi project is designed to be approachable for beginners while still offering enough detail to create a character with tons of personality.
Once finished, this little ox measures approximately 6 inches tall, making it the ideal size for small hands to hold or to sit tucked away on a bookshelf. In this tutorial, we will walk you through every single step—from crafting the tiny paws to knitting a cozy little yellow scarf. Grab your hook, find a comfy spot, and let’s get started!
Materials & Abbreviations
To ensure your bull turns out just like the one in the photos, it is helpful to have the right supplies on hand. While you can substitute yarns, using a DK weight (light worsted) yarn will help you achieve the best results for this specific size.
What You Will Need
- Yarn: DK weight cotton or acrylic yarn. You will need:
- Main color: Brown
- Secondary color: A darker brown or black for accents
- Snout color: White or cream
- Scarf color: Yellow
- Small amount of Black: For the nose and eyebrows
- Crochet Hook: 2.0mm (or the size recommended for your yarn to ensure tight stitches).
- Knitting Needles: 2.5mm (for the small knitted scarf).
- Safety Eyes: 6mm (2 pieces).
- Stuffing: Polyester fiberfill (hollofiber).
- Tools: A yarn needle (tapestry needle), scissors, and stitch markers.
US Crochet Abbreviations
This pattern uses standard US terminology. Please ensure you are using US terms to avoid confusion with UK terminology.
- MR: Magic Ring (Amigurumi Ring)
- sc: Single crochet
- ch: Chain
- inc: Increase (2 sc in the same stitch)
- dec: Decrease (sc 2 together)
- st: Stitch
Step-by-Step Instructions
The Paws (Make 2)
We begin the paws using your secondary/accent color. This creates a cute, dark-tipped look for the feet.
- MR, 6 sc in ring (6)
- 6 inc (12)
- 12 sc (12)
Switch to your main brown yarn.
- 4-5. 12 sc (12)
- 6. 3 sc, 3 dec, 3 sc (9)
- 7-14. 9 sc (9)
Stuff the bottom part of the paw lightly. Fold the paw in half (so the open end is closed) and crochet 4 sc through both layers to seal it. Fasten off, leaving a tail for sewing.
The Ears (Make 4)
You will make two ears using the accent color and two ears using the main brown color. We will then “sandwich” them together.
Accent Color Ears (Make 2)
- MR, 6 sc in ring (6)
- 6 inc (12)
- (1 sc, inc) x 6 (18)
Fasten off.
Main Color Ears (Make 2)
- MR, 6 sc in ring (6)
- 6 inc (12)
- (1 sc, inc) x 6 (18)
Fasten off.
Assembly for Ears: Place one accent ear and one main color ear together with the wrong sides facing each other (the “pretty” sides should be on the outside). Crochet 18 sc through both layers around the entire edge. Once finished, fold the ear in half and crochet 2 sc through both layers to close it. Fasten off and hide the yarn tail.
The Legs (Make 2)
Start with your accent color to create the “toes” of the legs.
- MR, 6 sc in ring (6)
- 6 inc (12)
- (1 sc, inc) x 6 (18)
- (2 sc, inc) x 6 (24)
Switch to your main brown yarn.
- 5-6. 24 sc (24)
- 7. 6 sc, 6 dec, 6 sc (18)
- 8. 6 sc, 3 dec, 6 sc (15)
- 9-12. 15 sc (15)
Stuff the bottom part of the leg. To create the shape, work 4 sc (ensure your decreases are placed toward the front of the leg), fold the leg in half, and crochet 7 sc through both layers to close. Fasten off and hide the tail.
The Body
The body is worked in one continuous piece, starting from the connection of the legs.
- Joining the legs: Attach your brown yarn to the first leg (ensure the leg is facing forward). Crochet 7 sc around the first leg, then 3 ch (this acts as a bridge), then 7 sc around the second leg.
- Creating the base: To create a continuous round, we will work around the legs and the chain link. Work 7 sc into the front loops of the first leg, 3 sc into the chain, 7 sc into the front loops of the second leg, 3 sc into the chain, 7 sc into the front loops of the first leg again, 3 sc into the chain, and 7 sc into the front loops of the second leg again. (34)
Place a stitch marker to track your rounds.
- 16 sc, inc, 16 sc, inc (36)
- (5 sc, inc) x 6 (42)
- 24 sc, (inc, 6 sc) x 2, inc, 3 sc (45)
- 5-12. 45 sc (45)
- 13. 24 sc, (dec, 6 sc) x 2, dec, 3 sc (42)
- 14. 42 sc (42)
- 15. Attaching the arms: We will now crochet the arms directly into the body. 20 sc, 4 sc (incorporate the arm/paw here), 14 sc, 4 sc (incorporate the second arm/paw here) (42).
- 16-28. 42 sc (42)
Eyes: Insert the 6mm safety eyes between rounds 24 and 25, ensuring they are about 6 stitches apart.
- Attaching the ears: 2 sc (incorporate the ear here), 22 sc, 2 sc (incorporate the ear here), 16 sc (42).
- 30-31. 42 sc (42)
Finishing the body: The final round should be worked carefully so that when you fold the body in half, it lies flat and straight. Fasten off, stuff the body firmly and evenly, then fold it in half and sew the two sides together through both layers of stitches. Fasten off and hide the tail.
The Snout
Using your light/white yarn, we will create an oval snout.
- Ch 7. Starting in the 2nd ch from the hook: 5 sc, 3 sc in the very last ch. Now, working along the opposite side of the chain: 4 sc, 1 inc (12).
- inc, 4 sc, 3 inc, 4 sc, 2 inc (18)
- 1 sc, inc, 4 sc, (1 sc, inc) x 3, 4 sc, (1 sc, inc) x 2 (24)
- 24 sc (24)
Fasten off, leaving a long tail for sewing.
The Horns (Make 2)
Using black yarn:
- MR, 5 sc in ring (5)
- 2-5. 5 sc (5)
Fasten off, leaving a tail for sewing.
The Knitted Scarf (Snood)
This part is actually knitted! It adds a wonderful texture to the finished toy.
- Cast on 6 stitches.
- Work in Stockinette stitch (knit one row, purl one row) until the scarf reaches your desired length.
- Bind off. Fasten off, leaving a small tail to sew the ends together.
Finishing & Assembly
Now comes the most magical part—bringing your bull to life!
- The Snout: Position the white snout between rounds 16 and 23. Make sure it is centered perfectly between the eyes. Sew it in place, and as you sew, add a little extra stuffing into the snout to help it hold its shape.
- The Face: Using your black yarn and a fine needle, embroider two small nostrils on the snout and two simple, cute eyebrows above the eyes.
- The Horns: Sew the horns onto the top of the head at the seam. For a more natural look, slightly bend the tips of the horns inward.
- The Scarf: Wrap the knitted yellow scarf around the bull’s neck and sew it in place.
Tips for Success
Amigurumi can be tricky if your tension isn’t consistent. Here are a few tips to help you succeed:
- Use Stitch Markers: In amigurumi, it is very easy to lose track of where a round begins. Always use a marker!
- Watch Your Tension: Aim for tight, consistent stitches. This prevents the stuffing from peeking through the holes.
- Stuffing Technique: When stuffing, push the fiberfill into the corners (like the tips of the feet and the snout) using your crochet hook to ensure there are no lumps.
- The “Magic” of the Snout: When working the snout, working into both sides of the foundation chain is what gives it that perfect oval, 3D shape. Don’t rush this part!
Congratulations! Your little crochet bull is finished and ready to meet the world!