Cute Crochet Rooster Pattern: A Step-by-Step Amigurumi Tutorial
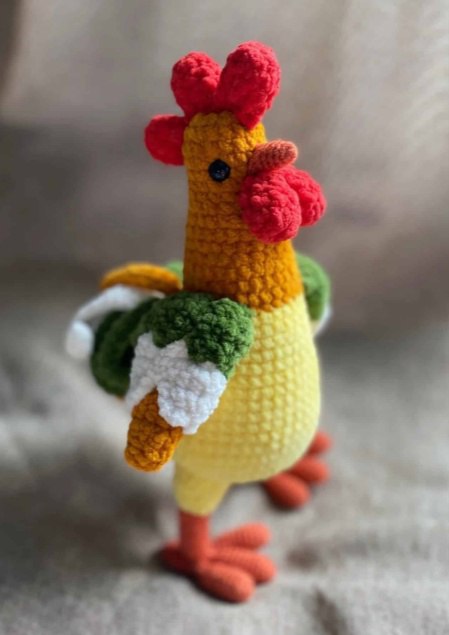
There is nothing quite as charming as a tiny, handmade farm animal to brighten up a nursery, a kitchen shelf, or a craft collection. If you are looking for your next crochet project, this adorable amigurumi rooster is the perfect choice! With its bright colors, fuzzy textures, and expressive little face, this rooster is a joy to make and even more fun to display.
This pattern is designed to be beginner-friendly, utilizing standard crochet techniques like the magic ring, increases, and decreases. While it uses a mix of textures—including soft velvet/chenille yarn for a premium feel—the logic behind the stitches is straightforward. Whether you are making this as a gift or a personal project, this tutorial will guide you through every single stitch to ensure your little rooster turns out perfectly.
Materials and Abbreviations
Before you pick up your hook, gather all your supplies. To achieve the look in the photos, I recommend using a combination of standard cotton or acrylic yarn for the body and “plush” or “chenille” yarn for the specialized parts like the beak and legs.
Supplies Needed:
- Yarn: Medium weight (worsted) yarn in Yellow, Orange, Red, Green, and White. I also suggest a soft Chenille/Velvet yarn in Orange and Yellow for the beak and legs.
- Hook: A crochet hook suitable for your yarn weight (typically 3.5mm or 4.0mm for the body, and a slightly larger hook for the plush yarn).
- Safety Eyes: Small black plastic safety eyes.
- Stuffing: Polyester fiberfill.
- Tools: A tapestry needle for sewing, scissors, and stitch markers.
- Yardage Note: You will need approximately 150-200 yards of assorted yarn.
Abbreviations (US Terms):
- MR: Magic Ring
- sc: Single crochet
- inc: Increase (2 sc in one stitch)
- dec: Decrease (sc 2 stitches together)
- ch: Chain
- st(s): Stitch(es)
- sp: Space
Step-by-Step Instructions
The Body and Head
We will work the body and the head as one continuous piece, changing colors to create the transition from the yellow body to the orange head.
Start with Yellow Yarn:
- Row 1: 6 sc in a MR (6)
- Row 2: 6 inc (12)
- Row 3: (1 sc, 1 inc) * 6 (18)
- Row 4: (2 sc, 1 inc) * 6 (24)
- Row 5: (3 sc, 1 inc) * 6 (30)
- Stop here to begin stuffing the bottom of the body firmly.
- Row 6: (4 sc, 1 inc) * 6 (36)
- Row 7: (5 sc, 1 inc) * 6 (42)
- Row 8: (6 sc, 1 inc) * 6 (48)
- Row 9: 6 inc, 42 sc (54)
- Row 10: 54 sc
- Row 11: 12 sc, (5 sc, 1 dec) * 6 (48)
- Rows 12-16: 48 sc (5 rows total)
- Row 17: 6 dec, 36 sc (42)
- Row 18: 3 dec, 36 sc (39)
- Row 19: 2 dec, 33 sc, 1 dec (36)
- Row 20: (4 sc, 1 dec) * 6 (30)
- Stuff the body firmly.
Switch to Orange Yarn:
- Rows 21-26: 30 sc (6 rows)
- Row 27: (3 sc, 1 dec) * 6 (24)
- Rows 28-30: 24 sc (3 rows)
- Row 31: (2 sc, 1 dec) * 6 (18)
- Rows 32-37: 18 sc (6 rows)
- Eye Placement: Insert your safety eyes into Row 35. Ensure there are 5 stitches of space between the eyes.
- Row 38: (1 sc, 1 dec) * 6 (12)
- Row 39: 6 dec. Fasten off and weave in ends.
The Beak
For a cute, textured look, use your Orange Chenille/Velvet yarn.
- Row 1: 4 sc in a MR (4)
- Row 2: 4 sc
- Row 3: (1 sc, 1 inc) * 2 (6)
- Row 4: 6 sc
- Row 5: (2 sc, 1 inc) * 2 (8)
- Row 6: 8 sc
- Row 7: (1 sc, 1 inc) * 4 (12)
- Row 8: (1 sc, 1 inc) * 6 (18)
- Row 9: 18 sc. Fasten off, leaving a long tail for sewing.
The Comb and Wattles
These add that iconic rooster personality! Use Red yarn.
- Row 1: 7 sc in a MR (7)
- Rows 2-5: 7 sc (4 rows)
- Row 6: Work 3 sc through both loops (front and back) to flatten the piece. Fasten off, leaving a tail for sewing.
- Repeat this process to make 5 total pieces (for the top comb and the side wattles).
The Feathered Wings
To create the layered wing look, we will crochet several small “feathers” and sew them together.
The Feather Pattern:
- Row 1: 5 ch
- Row 2: 4 sc in the 2nd ch from the hook (4)
- Rows 3-4: 4 sc
- Row 5: 2 dec (2)
- Row 6: 1 dec. Fasten off.
Assembly:
You will need to make a total of 24 feathers: 12 Green, 8 White, and 4 Orange. Sew the feathers together in clusters to create two large, multi-colored wings, then sew the wings to the sides of the body.
The Tail Feathers
These long, elegant pieces give the rooster its flair. Make 12 feathers total: 4 Green, 4 Orange, and 4 White.
- Row 1: 20 ch
- Row 2: 19 sc starting from the 2nd ch from the hook (19). Fasten off.
Sew these to the back of the body, hiding the yarn ends inside the stuffing.
Legs and Toes
The legs provide the stability our rooster needs to stand tall!
The Legs:
Use Orange Chenille yarn for the bottom and Yellow Plush yarn for the top.
- Row 1: 6 sc in a MR (6)
- Row 2: 6 inc (12)
- Rows 3-12: 12 sc (10 rows)
- Switch to Yellow Plush yarn.
- Row 13: (1 sc, 1 inc) * 6 (18)
- Row 14: 18 sc. Stuff firmly and sew to the bottom of the body.
The Toes:
Make 3 of these per leg using Orange Chenille yarn.
- Row 1: 6 sc in a MR (6)
- Row 2: 6 inc (12)
- Rows 3-10: 12 sc (8 rows). Stuff firmly.
- Row 11: 6 dec (6)
- Row 12: This row creates the three-toed shape. Work: 3 sc in the 1st toe, 3 sc in the 2nd toe, 6 sc in the 3rd (center) toe, 3 sc in the 2nd toe, and 3 sc in the 1st toe (18 sts total). Place a marker.
- Row 13: (1 sc, 1 dec) * 6 (12)
- Rows 14-20: 12 sc (7 rows). Stuff firmly.
- Row 21: 6 dec. Fasten off and sew to the bottom of each leg.
Finishing
Now for the most rewarding part: assembly! Using a tapestry needle and the tails left from your work, carefully sew the following components onto the body:
- Attach the beak to the center of the head, just below the eyes.
- Sew the comb and wattles to the top and sides of the head to give him his signature look.
- Attach the layered wings to the sides of the body.
- Secure the tail feathers to the back.
- Ensure the legs and toes are sewn securely to the bottom so the rooster can stand upright.
Tips for Success
- Tension is Key: When working with plush or chenille yarn, try not to pull too tight, as it can be difficult to see your stitches. However, keep your tension tight enough so that the stuffing doesn’t peek through the holes.
- Use Stitch Markers: Amigurumi is worked in continuous spirals. Always use a stitch marker to keep track of the start of your rounds to avoid losing your place.
- Stuffing Technique: When stuffing the body and legs, work in small clumps. This helps you push the stuffing into the corners, creating a smooth, professional shape.
- Hide Your Ends: When you finish a piece, weave the yarn tail through the upcoming stitches to hide it effectively. This prevents the stuffing from leaking out later.