Adorable Amigurumi Sheep Crochet Pattern: A Step-by-Step Guide
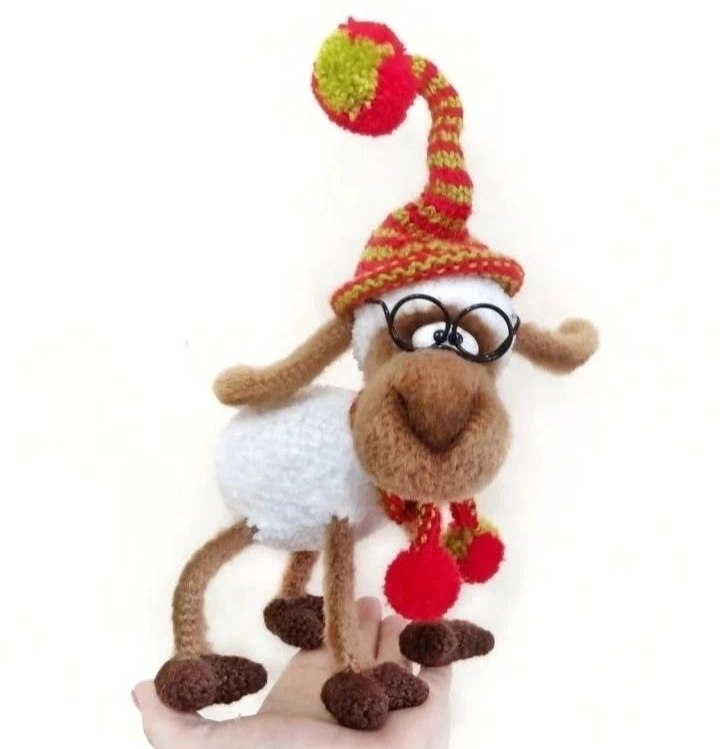
There is nothing quite as charming as a handcrafted amigurumi animal to brighten up a nursery, a bookshelf, or a collector’s display. If you are looking for your next crochet project, this adorable, whimsical sheep is the perfect choice! With its fluffy, cloud-like body and quirky, expressive face, this little sheep is sure to become a favorite. Whether you are a beginner looking to practice your shaping skills or an intermediate crocheter wanting to try something unique with wire armatures, this tutorial will walk you through every single stitch.
This pattern creates a characterful sheep that features a textured, “woolly” body and a smooth, sculpted face. We will even go a step further by using a wire frame to give our sheep the ability to pose! Let’s grab our hooks and get started on this delightful project.
Materials & Abbreviations
Before we dive into the stitches, let’s make sure you have everything you need on your workstation. Because this project uses different textures—from smooth cotton-style yarn for the face to extremely fluffy yarn for the body—having the right materials is key to achieving that professional, high-end look.
Required Materials
- Main Body Yarn: A very fluffy, white velvet or bouclé yarn (similar to Alize Softi). This gives the sheep its “cloud” appearance.
- Face and Limbs Yarn: A smooth, beige or tan yarn (worsted weight works well). You may want to hold a strand of beige mohair together with this for extra softness.
- Hoof Yarn: A dark brown cotton or acrylic yarn (similar to Yarn Art Jeans).
- Wire Armature: Four pieces of craft wire, approximately 8 inches long each.
- Wire Protection: Electrical tape or medical tape to wrap the ends of the wire.
- Stuffing: High-quality polyester fiberfill.
- Eyes: White and black polymer clay (or alternatively, black safety eyes).
- Adhesives: Super glue and a clear varnish/gloss.
- Tools: A crochet hook (approximately 1.75mm or a size that provides tight tension), a tapestry needle, pins, and soft pastels for shading.
- Extras: A lint remover or soft brush to fluff the wool, and optional wire for making tiny glasses!
Crochet Abbreviations (US Terms)
Please note that all counts are per round unless otherwise stated.
- MR: Magic Ring
- sc: Single Crochet
- inc: Increase (2 sc in one stitch)
- dec: Decrease (sc 2 together)
- ch: Chain
- sl st: Slip Stitch
Step-by-Step Instructions
The Legs and Hooves
We begin by creating the hooves. You will need to make four identical legs. Each leg is worked in two parts that are eventually joined together to create a hollow space for the wire.
Part 1: The First Half of the Hoof
Using your brown yarn:
- MR, 6 sc (6)
- 6 sc (6)
- (1 sc, inc) repeat 3 times (9)
- (2 sc, inc) repeat 3 times (12)
Fasten off and leave a tail.
Part 2: The Second Half of the Hoof
- MR, 6 sc (6)
- 6 sc (6)
- (1 sc, inc) repeat 3 times (9)
- (2 sc, inc) repeat 3 times (12)
Assembling the Leg with Wire
Do not cut the yarn from the second part. Instead, join the first part to the second part using a slip stitch. Now, work around both pieces to create a single tube:
- 12 sc in the first part, 12 sc in the second part (24)
Place a stitch marker in the middle of the join (the bottom of the hoof). It is vital to keep this marker straight!
- (6 sc, dec) repeat 3 times (21)
- (5 sc, dec) repeat 3 times (18)
Pro Tip: This is the stage to insert your wire frame. Take an 8-inch piece of wire, bend the ends slightly, and wrap them in tape so they don’t poke through. Push the wire all the way into the hoof.
Continue crocheting to close the leg:
- 7 sc, ch 2, (insert wire through the ch-2 space into the leg, then continue) 7 sc (16)
- 7 sc, 2 sc in the ch-2 space, 7 sc (16)
- 8 dec (8)
- 4 dec (4)
Fasten off tightly. Repeat this entire process to create four legs. Once finished, switch to your beige/mohair blend and work 14 rounds of 6 sc to create the upper leg portion. Do not stuff these yet!
The Tail
Using your white fluffy yarn:
- MR, 6 sc (6)
- (1 sc, inc) repeat 3 times (9)
- 9 sc (9)
- (1 sc, dec) repeat 3 times (6)
Fasten off. Do not stuff it heavily; just a tiny bit of fiberfill is enough.
The Body
Using your white fluffy yarn. Remember to keep your marker at the “belly” of the sheep.
- MR, 6 sc (6)
- 6 inc (12)
- 12 inc (24)
- (3 sc, inc) repeat 6 times (30)
- (4 sc, inc) repeat 6 times (36)
- (5 sc, inc) repeat 6 times (42)
- (6 sc, inc) repeat 6 times (48)
Attaching the Limbs and Tail
This is a crucial step to ensure your sheep can stand. You will be crocheting through both the body and the limbs at the same time.
- 6 sc, insert first leg and work 3 sc through both body and leg, 13 sc, insert tail and work 4 sc through both body and tail, 13 sc, insert second leg and work 3 sc through both body and leg, 6 sc (48)
- 6 sc, 3 sc (leg), 13 sc, 2 sc (tail), 13 sc, 3 sc (leg), 6 sc (46)
- Work 8 rounds of 46 sc.
Attaching the Front Legs
After completing the previous rounds, you will attach the two front legs:
- 6 sc, insert front leg and work 3 sc through both, 28 sc, insert second front leg and work 3 sc through both, 6 sc (46)
- 6 sc, 3 sc (leg), 28 sc, 3 sc (leg), 6 sc (46)
- (1 sc, dec) repeat 2 times, 34 sc, (dec, 1 sc) repeat 2 times (42)
- (1 sc, dec) repeat 3 times, 24 sc, (dec, 1 sc) repeat 3 times (36)
- 3 dec, 24 sc, 3 dec (30)
Wire Assembly: If you haven’t already, insert the four wire pieces into the legs. Connect the four wire ends together in the center of the body using tape to create a sturdy, poseable skeleton.
Continue the body with your beige/mohair blend to create the lower torso/neck area:
- 24 sc (24)
- 2 dec, 7 sc, 2 inc, 7 sc, 2 dec (22)
- 2 dec, 6 sc, 2 inc, 6 sc, 2 dec (20)
- 20 sc (20)
- 2 dec, 5 sc, 2 inc, 5 sc, 2 dec (18)
- Work 3 rounds of 18 sc.
- (4 sc, dec) repeat 3 times (15)
- (3 sc, dec) repeat 3 times (12)
Fasten off and stuff the body firmly.
The Head and Muzzle
The head is worked in two parts: the muzzle (the snout) and the main head structure. This creates the distinct shape seen in the photos.
The Muzzle (Snout)
Using beige/mohair yarn:
- MR, 6 sc (6)
- 6 inc (12)
- Work 2 rounds of 12 sc (12)
Fasten off.
The Main Head
Using beige/mohair yarn. The marker should be at the top-center of the head.
- MR, 6 sc (6)
- 6 inc (12)
- (1 sc, inc) repeat 6 times (18)
- (2 sc, inc) repeat 6 times (24)
- (3 sc, inc) repeat 6 times (30)
- (4 sc, inc) repeat 6 times (36)
- Work 4 rounds of 36 sc (36)
- (10 sc, dec) repeat 3 times (33)
- (9 sc, dec) repeat 3 times (30)
- 30 sc (30)
- (8 sc, dec) repeat 3 times (27)
- (7 sc, dec) repeat 3 times (24)
- 24 sc (24)
Joining the Muzzle and Creating the Opening
- 9 sc, insert the muzzle and work 6 sc through both the head and muzzle, 9 sc (24)
- (inc, 1 sc) repeat 2 times, inc, 4 sc, 6 sc (through muzzle), 4 sc, (inc, 1 sc) repeat 2 times, inc (30)
- Work 2 rounds of 30 sc (30)
Now, we create the opening for the wire frame:
- 13 sc, ch 4, skip 4 stitches, 13 sc (30)
- 13 sc, 4 sc in the ch-4 space, 13 sc (30)
- (1 sc, inc) repeat 15 times (45)
- Work 3 rounds of 45 sc (45)
- (13 sc, dec) repeat 3 times (42)
- Stuff the head firmly, but not too hard.
- (5 sc, dec) repeat 6 times (36)
- 36 sc (36)
- (4 sc, dec) repeat 6 times (30)
- (3 sc, dec) repeat 6 times (24)
- (2 sc, dec) repeat 6 times (18)
- (1 sc, dec) repeat 6 times (12)
- 6 dec (6)
Fasten off. Thread the wire from the body through the head opening to complete the internal structure.
Sculpting the Face
To give your sheep its character, you must “sculpt” the snout and the eye area using the pinning method.
Sculpting the Nose
- Place three pins on the muzzle: one at the very tip (the starting point of the MR) and two others placed 7 rows up, about 4 stitches away from the marker on either side.
- Using a needle and thread, pass the needle from the wire opening through pin 2, then straight through the top to pin 1.
- Continue a “zig-zag” pattern through the pins (from 1 to 3, 3 to 2, etc.), pulling the thread slightly to tighten the fabric and create a snout shape.
- Repeat this process to ensure the nose is even and firm.
Sculpting the Eye Area
- Count 16 rows from the start of the head. Place a pin in the center on the marker line.
- Place two more pins on either side of the center pin, 3 stitches away.
- Using the same threading method (through the wire opening, to pin 1, then zig-zagging through 2 and 3), pull the thread to create indentations where the eyes will sit.
Finishing
The Eyes and Ears
Eyes: Using white polymer clay, roll two small balls (about 1/3 inch in diameter). Flatten them slightly into a triangular shape and join them together. Add tiny black dots for pupils (you can use black clay or paint). Coat with clear varnish for a lifelike shine. Glue them onto the sculpted eye indentations using super glue.
Ears: Using your beige/mohair yarn, work the ears into a teardrop shape. (The pattern follows a standard increase/decrease tapering: MR, 12 sc, 3 rounds of 12 sc, then alternating decreases and sc to taper). Sew them to the sides of the head.
Final Touches
- Shading: Use soft pastels to add a bit of shadow around the nose and under the eyes to give the face depth.
- Fluffing: Use a lint remover or a soft brush to gently fluff the white body yarn. This will hide your stitches and make the sheep look incredibly soft.
- Trimming: Carefully trim any stray long fibers on the face to keep the features clean.
- Optional Accessories: For extra personality, you can bend thin wire into tiny glasses or crochet a tiny colorful hat!
Tips for Success
- Use Markers: Always use a stitch marker. In amigurumi, losing your place by even one stitch can change the entire shape of the toy.
- Tight Tension: When working with the face and limbs, ensure your stitches are tight so that the stuffing doesn’t show through.
- Wire Safety: Always be careful with wire. Ensure the ends are well-wrapped in tape so they don’t poke through the crochet fabric and hurt anyone.
- The “Pulling” Technique: When sculpting the face, don’t pull the thread too hard, or you might tear the stitches. Aim for a gentle, firm shape.