DIY Adorable Crochet Ghost Pattern: A Cute Halloween Amigurumi Tutorial
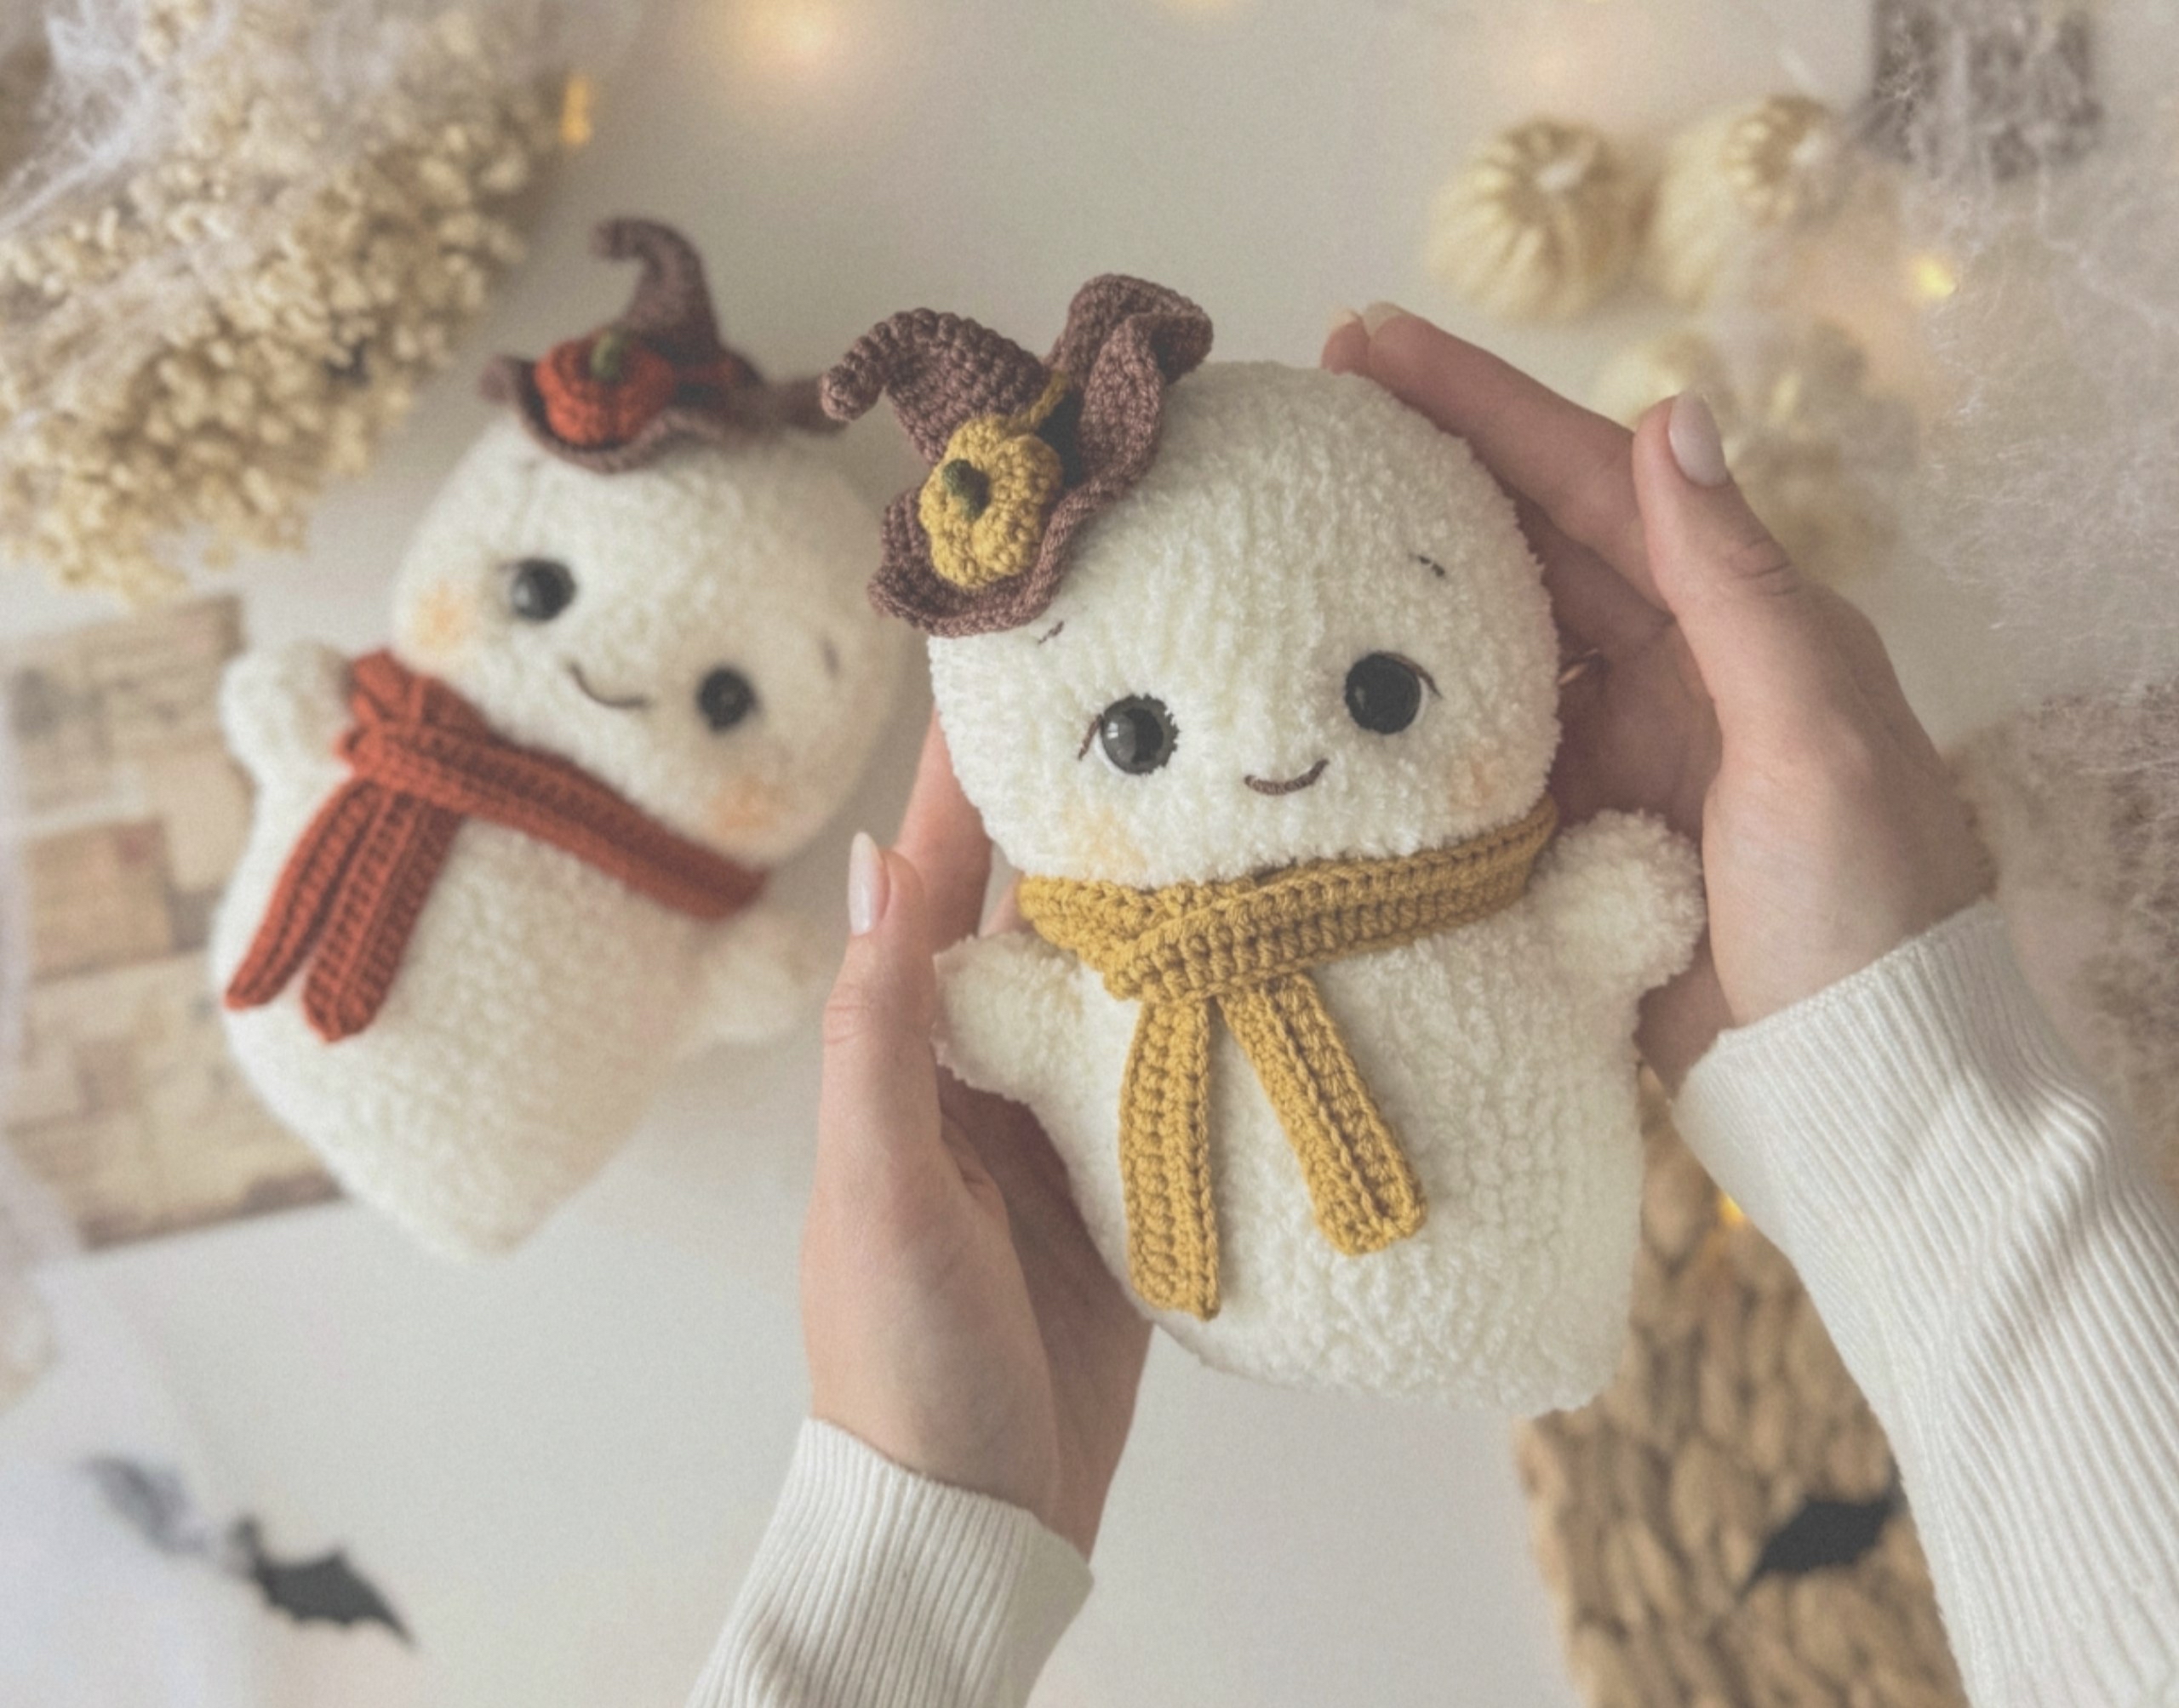
Are you looking for the perfect spooky-season project? Whether you are decorating for Halloween or looking for a sweet, handmade gift, this adorable crochet ghost pattern is a must-try! This little ghost, featuring a tiny pumpkin hat and a cozy scarf, is the ultimate “spooky-cute” amigurumi. This tutorial is designed to be beginner-friendly, walking you through every step to create a finished character that stands about 8 inches tall.
Grab your favorite hook and some soft yarn, and let’s get started on making your very own Boo the Ghost!
Materials & Abbreviations
To ensure your ghost turns out as soft and huggable as the one in the photos, I recommend using a variety of yarn weights. This creates a beautiful contrast between the plush body and the detailed accessories.
Yarn Requirements
- Main Body: Bulky/Chunky velvet-style yarn (approximately 120 yards/100g) in an off-white or milky color.
- Accessories (Sport or DK weight yarn):
- Brown: For the hat and facial embroidery.
- Mustard/Gold: For the scarf and the tiny pumpkin.
- Green: For the pumpkin stem.
- Milky/Off-white: For the eye details.
- White: For the eye whites.
Tools & Notions
- Crochet Hook (Body): 3.5mm (approx. US size E/4)
- Crochet Hook (Accessories): 2.0mm (approx. US size D/3)
- Safety Eyes: 14mm (approx. 0.55 inches)
- Stuffing: Polyester fiberfill or similar
- Other: Yarn needle, scissors, stitch marker, and dry pastel with a brush (for adding a cute rosy blush to the cheeks).
Abbreviations (US Terms)
- MR: Magic Ring
- ch: Chain
- sc: Single Crochet
- inc: Increase (2 sc in one stitch)
- dec: Decrease (sc 2 together)
- sl st: Slip Stitch
- hdc: Half Double Crochet
- dc: Double Crochet
- BLO: Back Loop Only
- FLO: Front Loop Only
Step-by-Step Instructions
The Head and Body
We will work the head and the body as one continuous piece to give our ghost that iconic, seamless shape. Please remember to stuff the ghost with fiberfill as you work your way up.
Using bulky off-white velvet yarn and a 3.5mm hook:
- MR, 6 sc (6)
- 6 inc (12)
- 12 inc (24)
- (3 sc, inc) * 6 (30)
- (4 sc, inc) * 6 (36)
- (5 sc, inc) * 6 (42)
- (6 sc, inc) * 6 (48)
- (15 sc, inc) * 3 (51)
- Rounds 9-12: 51 sc (4 rounds)
- In Round 13, place a stitch marker between stitches 25 and 26 using a contrasting color.
- Rounds 13-19: 51 sc (7 rounds)
Inserting the Eyes
Before continuing, we need to set the eyes. Place your 14mm safety eyes between rounds 12 and 13. To get the perfect placement, count 5 sc to the right of your marker and 4 sc to the left. The visible distance between the eyes should be approximately 7 sc.
- (15 sc, dec) * 3 (48)
- 24 dec (24)
- 24 inc (48)
- (23 sc, inc) * 2 (50)
- Rounds 24-34: 50 sc (11 rounds)
- (23 sc, dec) * 2 (48)
- (6 sc, dec) * 6 (42)
- (5 sc, dec) * 6 (36)
Shaping the Tail
Now, we need to move the marker to the center of the ghost’s back to create the bottom taper. You may need to add or remove a few stitches to ensure the marker is perfectly centered.
- (4 sc, dec) * 4, 1 sc, 4 inc, 5 sc, dec (35)
- (3 sc, dec) * 4, 4 hdc, 2 dc, 4 hdc, 3 sc, dec (30)
Stuff the bottom portion firmly, paying extra attention to the tail area.
- (1 sc, dec) * 10 (20)
- 10 dec (10)
- 5 dec (5)
Fasten off, weave the tail through the remaining stitches to close the hole, and hide the yarn tail inside the body.
The Arms
Using bulky off-white velvet yarn and a 3.5mm hook:
- MR, 5 sc (5)
- 5 inc (10)
- Rounds 3-4: 10 sc (2 rounds)
- 8 sc, 2 inc (12)
- 8 sc, 4 inc (16)
- 1 sc, sl st (work in a partial round)
Stuff lightly, fasten off, and leave a long tail for sewing.
The Accessories
The Tiny Pumpkin
Using mustard yarn and a 2.0mm hook:
- MR, 6 sc (6)
- 6 inc (12)
- (1 sc, inc) * 6 (18)
- Rounds 4-6: 18 sc (3 rounds)
- (1 sc, dec) * 6 (12)
- 6 dec (6)
Fasten off, leaving a long tail. To create the pumpkin segments, pull the yarn tail through the center of the sphere 5 times, pulling tight each time to create indents. Fasten off and leave a tail for sewing.
The Pumpkin Stem
Using green yarn and a 2.0mm hook:
Leave a short tail (about 2 inches) at the start. Chain 5. Starting from the second chain from the hook, work 4 sc. Fasten off, leaving a 2-inch tail for sewing.
The Witchy Hat
Using brown yarn and a 2.0mm hook:
- MR, 6 sc (6)
- 6 sc (6)
- (inc, 2 sc) * 2 (8)
- 8 sc (8)
- (inc, 3 sc) * 2 (10)
- 10 sc (10)
- (inc, 4 sc) * 2 (12)
- 12 sc (12)
- (inc, 5 sc) * 2 (14)
- 14 sc (14)
- (inc, 6 sc) * 2 (16)
- 16 sc (16)
- (inc, 7 sc) * 2 (18)
- Round 14 (BLO): 18 sc
- (inc, 8 sc) * 2 (20)
- 20 sc (20)
- Round 17 (FLO): (inc, 1 sc) * 10 (30)
- (inc, 2 sc) * 10 (40)
- (inc, 3 sc) * 10 (50)
- (inc, 4 sc) * 10 (60)
- (inc, 5 sc) * 10 (70)
- 70 sc (70)
Fasten off and hide the yarn.
The Scarf
Using mustard yarn and a 2.0mm hook:
- Chain 177. Starting from the 3rd chain from hook, work 175 hdc (175)
- Round 2 (BLO): 2 ch, turn, 175 hdc (175)
Fasten off and hide the yarn.
Finishing
Face Details and Assembly
1. Eye Recessing (The “Pulling” Technique)
To give the eyes that cute, deep-set look, follow these steps using off-white yarn:
- Insert your needle into the body at point 1 (between rounds 21 and 22, 1 sc away from the eye), pull through to point 2.
- Insert the needle into point 3, then pull through to point 6.
- Pull the thread tight to create a small indentation under the eye. Repeat for the second eye and hide the yarn.
2. Embroidery
Using brown yarn (split in half for finer detail):
- Eyebrows: Embroider on round 9, approximately 0.6 inches above the eyes. Each eyebrow should be about 12 sc wide (roughly 2.5 inches apart).
- Lashes: Add small, delicate strokes above the eyes.
- Mouth: Between rounds 14 and 15, make two horizontal stitches. Do not pull too tight; instead, wrap the thread from the top of the stitches to the bottom to create a soft, smiling curve.
3. Final Assembly
- Blush: Use a brush and dry pastel to gently apply pinkish tones to the cheeks.
- Arms: Sew the arms onto the body, starting 1 row below the head, ensuring the increase section of the arm faces downward.
- Hat: Sew the hat to the top of the head by the half-loops. Bend the tip of the hat slightly and secure it with a few stitches to give it a “worn” look.
- Pumpkin: Sew the pumpkin stem through the center of the pumpkin, then sew the pumpkin onto the hat.
- Scarf: Wrap the scarf around the ghost’s neck and tie it into a cute knot.
Tips
- Tension is Key: When working with velvet yarn, try to maintain consistent tension. If you pull too hard, the stitches can become difficult to see.
- Eye Placement: If you find the eyes are tilting, use a bit of extra stuffing around the eye area to hold them in place before securing them.
- Stitch Markers: Never crochet without a stitch marker! It is very easy to lose count when working in continuous rounds.
- Customization: Don’t be afraid to get creative! You can change the color of the scarf or the pumpkin to match your Halloween decor.