Quirky Amigurumi Goat Crochet Pattern: A Step-by-Step Tutorial
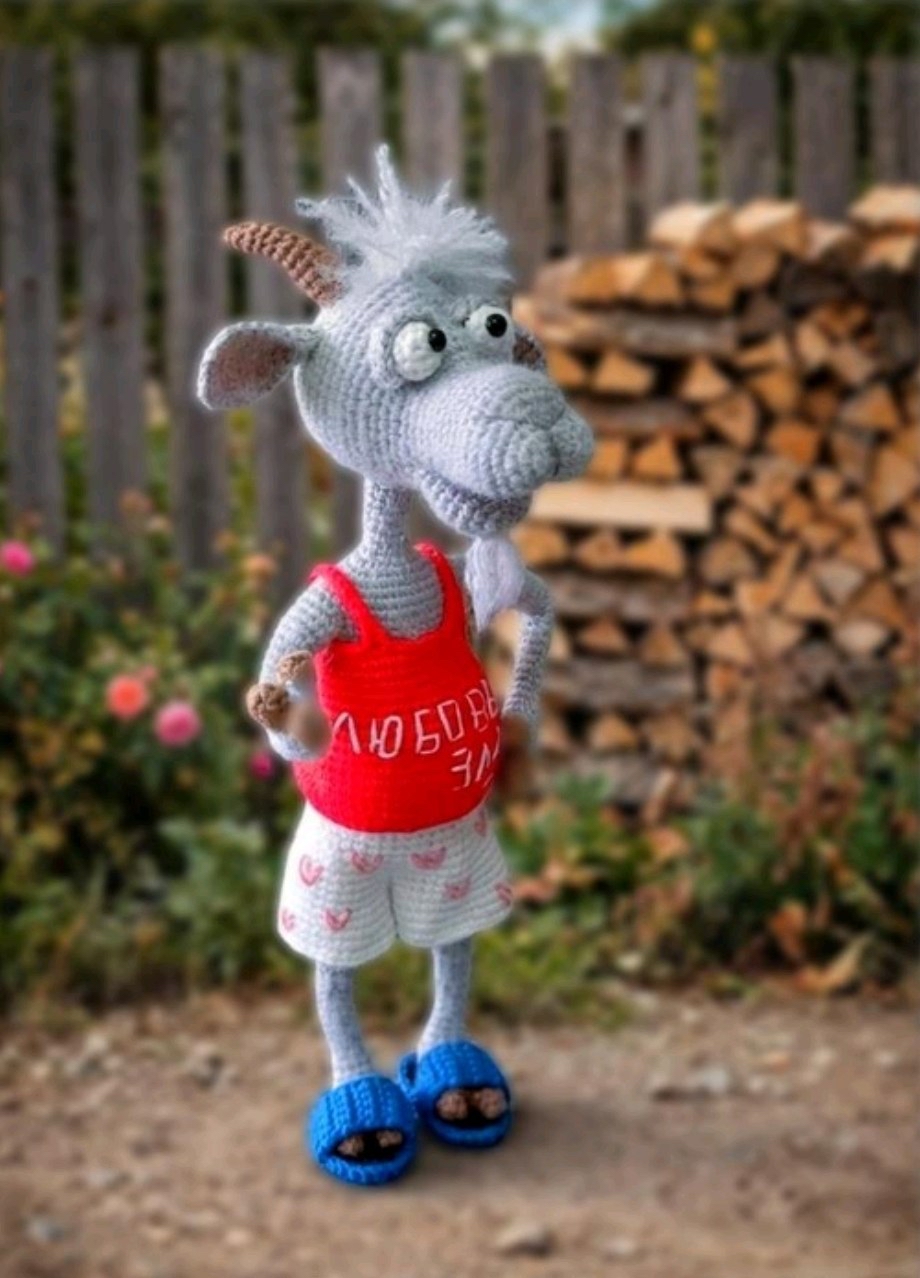
Are you looking for a crochet project with a bit of personality? This quirky, stylish amigurumi goat is the perfect blend of cute and characterful. With his tiny red tank top, adorable white shorts, and even a little blue jacket, this goat is ready to strut down the crochet runway! Whether you are making him as a unique gift or adding him to your own collection of handmade friends, this tutorial will guide you through every stitch.
This pattern is designed to be beginner-friendly, though you will need to be comfortable with basic amigurumi techniques like working in the round, increases, and decreases. We will also be using some wire to ensure your little goat can stand tall and strike his best poses.
Materials & Abbreviations
To get started, gather the following supplies. Since this is an amigurumi project, using a smaller hook than recommended on your yarn label will help create the tight tension needed to keep your stuffing from peeking through.
Yarn Requirements
- Main Body Yarn: Mohair/Acrylic blend (10% wool, 85% acrylic, 5% mohair). Color: Grey. You will be working with two strands held together.
- Clothing Yarn: Cotton/Acrylic blend (55% cotton, 45% acrylic). Colors needed: Red, Blue, White, Graphite, and Brown.
- Embroidery Floss: Beige, White, Dark Grey, and Pink.
Tools & Notions
- Crochet Hooks: 1.75mm (main project) and 2mm (for clothing items).
- Wire: 1.2mm floral wire (approx. 2 yards total) or 1.7 meters of wire.
- Stuffing: High-quality fiberfill.
- Other: Cardboard or plastic (approx. 4×4 inches) for shoe insoles, adhesive bandage (to wrap wire), sewing needle, embroidery needle, scissors, and stitch markers.
US Crochet Abbreviations
- MR: Magic Ring
- ch: Chain
- sc: Single crochet
- hdc: Half double crochet
- dc: Double crochet
- sl st: Slip stitch
- inc: Increase (2 sc in one stitch)
- dec: Decrease (sc 2 together)
- BLO: Back loop only
- FLO: Front loop only
- st(s): Stitch(es)
- rep: Repeat
Step-by-Step Instructions
Arms (Make 2)
We begin by making the thumbs in brown, then transition to grey for the rest of the arm.
The Thumb:
1. 5 sc in MR.
2. 4 sc, inc (6).
Switch to grey yarn and fasten off the brown.
3. 6 sc. Fasten off.
The Rest of the Arm:
1. 5 sc in MR.
2. 4 sc, inc (6).
3. 6 sc.
Switch to grey yarn on the second strand, fasten off brown on the first.
4. 3 sc, 6 sc on the first finger, 3 sc on the second finger (12).
5. 12 sc.
Attaching the Thumb:
For the left arm:
6. 3 sc on one side of the finger and arm, 9 sc (12).
7. 3 sc on the other side of the finger, 9 sc (12).
For the right arm:
6. 3 sc, 3 sc on one side of the finger and arm, 6 sc (12).
7. 3 sc, 3 sc on the other side of the finger, 6 sc (12).
Completing the Arm:
Both arms: Bend a 8-10 inch piece of wire to fit two fingers and wrap it in adhesive bandage. Insert into the arm and stuff as you go.
8. 4 sc, dec, 4 sc, dec (10).
9. 10 sc.
10. 3 sc, dec, 3 sc, dec (8).
11-20. 8 sc (10 rows).
21. 5 sc, 2 inc, 1 sc (10).
22-23. 10 sc (2 rows).
24. 5 sc, 2 dec, 1 sc (8).
25. 3 sc, inc, 3 sc, inc (10).
26-28. 10 sc (3 rows).
29. 4 sc, inc, 4 sc, inc (12).
30-33. 12 sc (4 rows). Fasten off.
Legs (Make 2)
The Hooves:
1. 5 sc in MR.
2. 4 sc, inc (6).
3. (2 sc, inc) * 2 (8).
Switch to grey yarn on one strand, grey on the other for the leg part.
4. 4 sc, 8 sc on the second part of the hoof, 4 sc on the first part (16).
5. 16 sc.
6. (6 sc, dec) * 2 (14).
7. 14 sc.
8. (2 sc, dec) * 2, 6 sc (12). Turn, ch 1, start in 2nd stitch from hook.
9. Partial row: 6 sc (do not finish the row).
Turn, ch 1, do not turn, start in 2nd stitch from hook (Rows 10-11).
10. 5 sc.
11. 4 sc.
12. Partial row: ch 1, 2 sc (do not finish the row).
Move your marker.
13. Continue in the round: 2 sc on the heel, 3 sc on the side, 6 sc on the front, 3 sc on the second side, 2 sc on the heel (16).
Completing the Leg:
Insert a 14-inch piece of wire with the end bent like a hoof.
14. dec, 2 sc, dec, 4 sc, dec, 2 sc, dec (12).
15. 12 sc.
16. dec, 1 sc, dec, 2 sc, dec, 1 sc, dec (8).
17. 8 sc.
18. inc, 6 sc, inc (10).
19-25. 10 sc (7 rows).
26. 3 sc, 4 inc, 3 sc (14).
27-28. 14 sc (2 rows).
29. 3 sc, 4 dec, 3 sc (10).
30. 10 sc.
31. inc, 8 sc, inc (12).
32-34. 12 sc (3 rows).
35. 1 sc, inc, 8 sc, inc, 1 sc (14).
36. 14 sc. Fasten off on one leg; on the second leg, do not fasten off, work 4-5 sc to join them.
Body
Join the two legs using a 4 ch slip stitch. The toes should point forward. We will work around the legs and up the torso.
1. 14 sc, 4 sc on ch, 14 sc on the right leg, 4 sc on ch (36).
Place a marker at the back of the body.
2. inc, 3 sc, inc, 22 sc, inc, 3 sc, inc, 4 sc (40).
3. Partial row: 38 sc (leave 2 stitches unworked to move the marker to the center of the back).
4-10. 40 sc (7 rows).
Switch to white (R11).
Switch to red (R12, BLO).
Switch to grey (R13, BLO).
14. 8 sc, (1 sc, inc, 1 sc) * 8, 8 sc (48).
15. 48 sc.
16. 2 sc, dec, 3 sc, dec, (2 sc, inc, 2 sc) * 6, dec, 3 sc, dec, 2 sc (50).
17-23. 50 sc (7 rows).
24. 7 sc, (2 sc, dec, 2 sc) * 6, 7 sc (44).
25-26. 44 sc (2 rows).
27. 7 sc, (1 sc, dec, 2 sc) * 6, 7 sc (38).
28-32. 38 sc (5 rows).
33. 14 sc, dec, 6 sc, dec, 14 sc (36).
34. 36 sc.
Attaching Arms:
35. 7 sc, 4 sc on the inner side of the left arm, 14 sc, 4 sc on the inner side of the right arm, 7 sc (36).
36. 7 sc, 8 sc on the top of the left arm, 14 sc, 8 sc on the top of the right arm, 7 sc (44).
Finishing the Torso:
Stuff the body and arms firmly. Run the wires from the arms and legs through the neck and trim them, leaving 2 inches of wire.
37. 6 sc, dec, 6 sc, dec, 12 sc, dec, 6 sc, dec, 6 sc (40).
38. 5 sc, 5 dec, 10 sc, 5 dec, 5 sc (30).
39. 30 sc.
40. (3 sc, dec) * 6 (24).
41. (2 sc, dec) * 6 (18).
42. (1 sc, dec) * 6 (12).
43-47. 12 sc (5 rows). Fasten off, leaving a tail for sewing.
Shorts
Work from the top down using white yarn.
1-2. 40 sc.
3. (9 sc, inc) * 4 (44).
4. (5 sc, inc, 5 sc) * 4 (48).
5. 48 sc.
6. (11 sc, inc) * 4 (52).
7-8. 52 sc (2 rows).
Move marker to the center back.
Begin legs:
1. Partial row: 26 sc (do not finish).
Right Leg:
2. 26 sc and 4 sc on ch (30). Work in the round.
3-4. 30 sc (2 rows).
5. (9 sc, inc) * 3 (33).
6-7. 33 sc (2 rows). Fasten off.
Left Leg:
1. 4 sc on ch, 26 sc on shorts (30).
2-3. 30 sc (2 rows).
4. (9 sc, inc) * 3 (33).
5-7. 33 sc (3 rows). Fasten off.
Tank Top
Work from the bottom up using red yarn.
1. 8 sc, (1 sc, inc, 1 sc) * 8, 8 sc (48).
2. 48 sc.
3. 2 sc, dec, 3 sc, dec, (2 sc, inc, 2 sc) * 6, dec, 3 sc, dec, 2 sc (50).
4-10. 50 sc (7 rows).
11. 7 sc, (2 sc, dec, 2 sc) * 6, 7 sc (44).
12. 8 sc, dec, 24 sc, dec, 8 sc (42).
13. 8 sc, dec, 22 sc, dec, 8 sc (40).
14. 6 sc, dec, 2 sc, dec, 16 sc, dec, 2 sc, dec, 6 sc (36).
15-19. 36 sc (5 rows).
Straps:
20. 4 sc, 8 dc, 2 sc, ch 15, work in 2nd ch from hook: 2 sc, 10 dc, 2 sc, join to first ch: 1 sc, 6 dc, 1 sc, ch 15, work in 2nd ch from hook: 2 sc, 10 dc, 2 sc, join to first ch: 2 sc, 8 dc, 4 sc (36). Fasten off and sew straps to the back of the top.
Head & Lower Jaw
Lower Jaw:
1. 2 sc, 3 sc in 1 st, work on other side of chain: 1 sc, inc (8).
2. inc, 1 sc, 3 inc, 1 sc, 2 inc (14).
3. 1 sc, inc, 1 sc, (1 sc, inc) * 3, 1 sc, (1 sc, inc) * 2 (20).
4. (4 sc, inc) * 4 (24).
5. 10 sc, dec, 10 sc, dec (22).
6-8. 22 sc (3 rows). Fasten off.
Head:
1. 3 sc, 3 sc in 1 st, work on other side of chain: 2 sc, inc (10).
2. 10 sc (20).
3. (4 sc, inc) * 4 (24).
4. (inc, 1 sc) * 6, 12 sc (30).
5. 4 sc, (1 sc, inc) * 4, 18 sc (34).
6. 34 sc.
7. dec, 18 sc, dec, 12 sc (32).
8. 32 sc.
9. dec, 16 sc, dec, 12 sc (30).
10-11. 30 sc (2 rows).
12. dec, 14 sc, dec, 12 sc (28).
13. 28 sc.
Find the center of the snout and move your marker there.
14. 9 sc, 10 sc across the top and jaw, 9 sc (28).
15. 1 sc, inc, 2 sc, inc, 4 sc, across the other side of the jaw: 12 sc; across the top: 4 sc, inc, 2 sc, inc, 1 sc (34).
Stuff the head firmly, but do not stuff the jaw.
16. 10 sc, inc, 12 sc, inc, 10 sc (36).
17. (1 sc, inc, 1 sc) * 3, 18 sc, (1 sc, inc, 1 sc) * 3 (42).
18. 42 sc.
19. (3 sc, inc) * 6 (48).
20. (7 sc, inc) * 6 (54).
21-22. 54 sc (2 rows).
23. 25 sc, 4 ch, skip 4 sc, 25 sc (54).
24. 25 sc, 4 sc on ch, 25 sc (54).
25-28. 54 sc (4 rows).
29. (7 sc, dec) * 6 (48).
30. (3 sc, dec, 3 sc) * 6 (42).
31. (5 sc, dec) * 6 (36).
32. (2 sc, dec, 2 sc) * 6 (30).
33. (3 sc, dec) * 6 (24).
34. (1 sc, dec, 1 sc) * 6 (18).
35. (1 sc, dec) * 6 (12).
36. bobble stitch (or slip stitch close), pull tight to close the opening. Fasten off.
Accessories (Ears, Eyes, Eyelids, Tail, Horns)
Ears (Make 2):
Using grey yarn, ch 2, work in 2nd ch from hook.
1. inc (2).
2. 2 inc (4).
3. inc, 2 sc, inc (6).
4-7. 6 sc (4 rows).
8. 5 sc (skip ch).
9. 4 sc (skip ch).
10. 2 sc, inc, then along the side: 8 sc, at the corner: (1 sc, 2 ch, 1 sc), then the other side: 9 sc.
Sew the edges together to create the ear shape.
Eyes (Make 2):
Using white yarn.
1. 6 sc in MR.
2. 6 inc (12).
3. 12 sc.
4. (2 sc, dec) * 3 (9). Fasten off, leaving a tail for sewing.
Eyelids (Make 2):
Using grey yarn, ch 6, work in 2nd ch from hook.
1. inc, 1 sc, inc, 1 sc, inc (8).
2. 8 sc. Fasten off.
Tail:
Using grey yarn.
1. 6 sc in MR.
2. 6 inc (12).
3-4. 12 sc (2 rows).
5. 2 dec, 8 sc (10).
6. 3 sc, 2 dec, 3 sc (8).
7. 4 dec. Pull tight and fasten off.
Horns (Make 2):
Using brown yarn.
1. 9 sc in MR.
2. 9 sc BLO (9).
3-4. 9 sc (2 rows).
5. dec, 7 sc (8).
6. 8 sc.
7. dec, 6 sc (7).
Insert a 4-5 inch piece of wire wrapped in bandage.
8. 7 sc.
9. dec, 5 sc (6).
10. 6 sc.
11. dec, 4 sc (5).
12. dec, 3 sc (4). Fasten off.
Clothing (Jacket, Collar, Sleeves, Pocket, Sandals)
Jacket:
Using blue yarn, ch 41, turn, work in 2nd ch from hook.
1. 40 sc.
2. 6 sc, 3 inc in 1 st, 6 sc, 3 inc in 1 st, 12 sc, 3 inc in 1 st, 6 sc, 3 inc in 1 st, 6 sc (48).
3. 48 sc.
4. 7 sc, 3 inc in 1 st, 8 sc, 3 inc in 1 st, 14 sc, 3 inc in 1 st, 8 sc, 3 inc in 1 st, 7 sc (56).
5. 56 sc.
6. 8 sc, 3 inc in 1 st, 10 sc, 3 inc in 1 st, 16 sc, 3 inc in 1 st, 10 sc, 3 inc in 1 st, 8 sc (64).
7. 64 sc.
8. 10 sc, skip 12 sc, ch 6, 20 sc, skip 12 sc, ch 6, 10 sc (52).
9. 10 sc, 6 sc on ch, 20 sc, 6 sc on ch, 10 sc (52).
10-15. 52 sc (6 rows).
16. (6 sc, inc) * 4 (56).
17-18. 56 sc (2 rows).
19. 55 sc.
20. 54 sc.
21. 53 sc.
22. 52 sc.
23. 51 sc.
24. 50 sc. Fasten off.
Collar:
Join blue yarn to the neckline at the 5th stitch.
1. 32 sc.
2. inc, 30 sc, inc (34).
3. 34 sc.
4. inc, 32 sc, inc (36).
5. 35 sc, 2 sc in 1 st, then work around the entire perimeter of the jacket, doing 2 sc in 1 st at the corners. Fasten off.
Sleeves (Make 2):
Join blue yarn to the jacket armhole.
1. Right arm: 1 sc on side, 12 sc on top, 1 sc on side, 6 sc on bottom (20).
Left arm: 1 sc on side, 6 sc on bottom, 1 sc on side, 12 sc on top (20).
2-13. 20 hdc (12 rows).
14. 20 sc.
15. 20 sc BLO.
16. 20 sc. Fasten off and turn inside out for the cuff.
Pocket:
Using blue yarn, ch 7, turn, work in 2nd ch from hook.
1. 6 sc.
2-5. 6 sc (4 rows).
6. 5 sc, inc, and continue around 3 sides, adding an inc at the corners. Fasten off.
Sandals (Make 2):
Using graphite yarn, ch 10, turn, work in 2nd ch from hook.
1. 8 sc, 3 sc in 1 st, work on other side of ch: 7 sc, inc (20).
2. inc, 7 sc, 3 inc, 7 sc, 2 inc (26).
3. 1 sc, inc, 7 sc, (1 sc, inc) * 3, 7 sc, (1 sc, inc) * 2 (32).
Cut cardboard/plastic to fit and insert.
4. 2 sc, inc, 7 sc, (2 sc, inc) * 3, 7 sc, (2 sc, inc) * 2 (38).
Find center of front, mark 6 sc to the side. Join blue yarn and work around the sole:
1. 5 sc.
2-12. 5 sc (11 rows).
Fasten off and sew to the bottom of the legs.
Finishing
Assembly is where your goat really comes to life! Follow these steps carefully:
Face & Head Details
- Texture: Use a wool comb or pet brush to gently brush the head for a fuzzy look.
- Nose: Using dark grey embroidery floss, mark the nose position. Count 3 rows up from the first row, then another 4 rows up. Mark 4-5 stitches to the sides. Count 3 rows down from the first row. Embroider the nose through these points.
- Eyes: Locate the center of the face, approximately 17-18 rows up from the bottom. Mark points 3-4 stitches to each side. Pull the thread tightly to create eye sockets (eye tensioning). Sew the white eyes into the sockets and top them with the grey eyelids. Glue black half-beads on top for pupils.
- Horns & Ears: Attach the horns at the level of the ears, about 2-3 rows down from the top. Sew the ears 10 rows up from the bottom of the head.
- Hair: Attach small tufts of grey yarn to the top of the head and the chin. Trim to about 1 inch and brush out.
Clothing & Final Touches
- Body Assembly: Stuff the body and head. Insert the wires from the legs and arms through the head and trim, leaving 2 inches of wire for stability. Sew the head to the body.
- Outfit: Dress your goat in the shorts, tank top, and jacket.
- Embroidery: Sew tiny pink hearts onto the shorts using pink floss. Use white floss to embroider the text “Любовь зла…” (Love is blind) on the tank top.
- Final Step: Attach the tail and the sandals.
Tips
- Tension is Key: When working with amigurumi, keep your stitches tight to ensure no stuffing shows through the holes.
- Wire Safety: Always wrap your wire in adhesive bandage or tape before inserting it into the crochet piece to prevent the sharp ends from poking through the fabric.
- Stuffing: Stuff the head and body firmly, but be careful not to overstuff the jaw area, as it needs to remain somewhat flexible for the snout shape.
- Color Changes: When switching colors, try to do so at the end of a stitch to keep the color transitions looking clean.