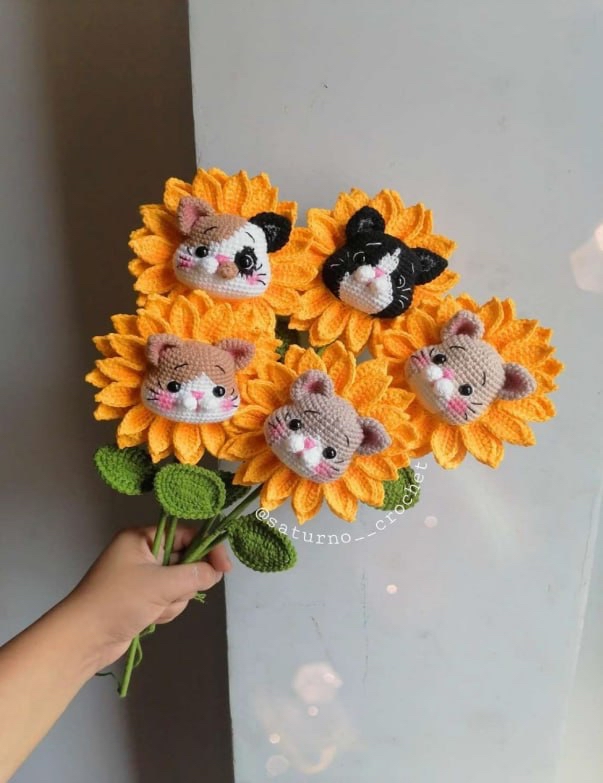
How to Crochet Adorable Cat Sunflower Bouquets: A Step-by-Step Amigurumi Guide
If you are looking for the ultimate “cute” crochet project, you have found it! These adorable cat-in-a-sunflower crochet bouquets are the perfect combination of amigurumi charm and floral beauty. Whether you want to create a unique gift for a cat lover, a whimsical piece of home decor, or a stunning centerpiece for a spring table, these little kitty flowers are sure to brighten any room. In this tutorial, I will walk you through everything you need to know to create your own bouquet of these whimsical feline blooms.
This project is beginner-friendly, provided you are comfortable with basic amigurumi techniques like working in the magic ring, increasing, and decreasing. Because each flower features a different colored cat, you can customize your bouquet with a variety of “personalities”—from classic black and white cats to soft beige or earthy brown kitties. Let’s dive in and get stitching!
Materials & Abbreviations
To ensure your flowers look professional and hold their shape, I recommend using a high-quality cotton or cotton-blend yarn. Cotton provides excellent stitch definition, which is vital for the intricate color changes on the cats’ faces.
Materials Needed:
- Yarn: Medium weight (worsted) cotton yarn in various colors:
- For Cats: Black, White, Light Gray, Dark Gray, Brown, and Beige.
- For Petals: Bright Yellow.
- For Leaves/Stem: Leaf Green.
- Crochet Hook: A size appropriate for your yarn (typically 3.25mm to 3.5mm for amigurumi to ensure tight stitches).
- Safety Eyes: Small black plastic safety eyes (approx. 6mm–8mm).
- Stuffing: Polyester fiberfill.
- Stem: A wooden skewer or a sturdy floral wire.
- Tools: Tapestry needle, scissors, and stitch markers.
US Crochet Abbreviations:
- MR: Magic Ring
- sc: Single crochet
- inc: Increase (2 sc in one stitch)
- dec: Decrease (sc 2 together)
- ch: Chain
- hdc: Half double crochet
- dc: Double crochet
- tr: Treble crochet
- sl st: Slip stitch
- st(s): Stitch(es)
- [ ] or ( ): Repeat the instructions within the brackets
Step-by-Step Instructions
This pattern can be made in several colorways. For this guide, I will provide the detailed instructions for the Black and White Cat. You can easily adapt this for the Gray, Brown, or Beige versions by following the same logic for the face color changes.
The Cat Head
The head is worked in continuous rounds. Remember to use a stitch marker to keep track of your rounds.
Colorway 1: Black & White Cat
Start with Black Yarn:
- Rnd 1: 6 sc in MR (6)
- Rnd 2: 6 inc (12)
- Rnd 3: (1 sc, 1 inc) x6 (18)
- Rnd 4: (1 sc, 1 inc, 1 sc) x6 (24)
- Rnd 5: (3 sc, 1 inc) x6 (30)
- Rnd 6: (2 sc, 1 inc, 2 sc) x6 (36)
Switch to White Yarn for the Face Pattern:
- Rnd 7: (1 inc, 5 sc) x2, 1 inc, 4 sc, 1 sc white, (1 inc, 5 sc) x3 (42)
- Rnd 8: 20 sc, 1 sc white, 21 sc (42)
- Rnd 9-12: 19 sc, 3 sc white, 20 sc (4 rounds) (42)
- Rnd 13: 11 sc, 6 inc, 1 sc, 5 sc white, 1 sc, 6 inc, 12 sc (54)
- Rnd 14: 23 sc, 7 sc white, 24 sc (54)
- Rnd 15: 22 sc, 9 sc white, 23 sc (54)
- Rnd 16-19: 21 sc, 11 sc white, 22 sc (4 rounds) (54)
Switch back to Black Yarn for the base:
- Rnd 20: 11 sc, 5 dec, (1 dec, 7 sc, 1 dec white), 5 dec, 12 sc (42)
- Rnd 21: (5 sc, 1 dec) x2, 2 sc, (3 sc, 1 dec, 4 sc white), 1 sc, 1 dec, (5 sc, 1 dec) x2 (36)
- Rnd 22: (4 sc, 1 dec) x2, 2 sc, (2 sc, 1 dec, 4 sc white), 1 dec, (4 sc, 1 dec) x2 (30)
Begin stuffing the head firmly with fiberfill.
- Rnd 23: 1 dec, (3 sc, 1 dec, 1 sc) x2, (3 sc, 1 dec, 2 sc white), 1 sc, (1 dec, 3 sc) x2 (24)
- Rnd 24: (1 sc, 1 dec, 1 sc) x2, 1 sc, (1 dec, 2 sc, 1 dec white), 1 sc, (1 sc, 1 dec, 1 sc) x2 (18)
- Rnd 25: (1 sc, 1 dec) x6 (12)
- Rnd 26: 2 dec (10)
Fasten off, leaving a long tail for sewing the head closed.
Adapting for Other Colors
To make a Gray Cat, follow the same steps but start with Light Gray. During the face rounds, use Dark Gray and White to create the patches. For the Brown Cat, use Brown and White, and for the Beige Cat, use Beige and White.
Ears and Cheeks
You will need to make two of each.
Ears (Make 2)
Using Black or Brown yarn:
- Rnd 1: 4 sc in MR (4)
- Rnd 2: 4 inc (8)
- Rnd 3: (1 sc, 1 inc) x4 (12)
- Rnd 4: (1 sc, 1 inc, 1 sc) x4 (16)
- Rnd 5: (3 sc, 1 inc) x4 (20)
- Rnd 6-7: 20 sc (2 rounds)
Fasten off, leaving a tail for sewing.
Cheeks (Make 2)
Using White yarn:
- Rnd 1: 6 sc in MR (6)
- Rnd 2: (2 sc, 1 inc) x2 (8)
Fasten off, leaving a tail for sewing.
The Sunflower Petals
The flower is made of two layers of petals to give it a full, lush appearance. Use bright yellow yarn.
Layer 1 (Inner Petals)
- Chain 46 (45 + 1 to join). Join with a sl st to the first chain to form a ring.
- In the next chain, work 8 ch.
- Work 7 sc back along the chain toward the base. Skip 2 chains.
- Repeat these steps until you have 15 petal bases.
Petal Pattern (Upward): 1 sc, 1 hdc, 3 dc, 1 hdc, 1 sc, 1 picot stitch.
Layer 2 (Outer Petals)
- Chain 46. Join to form a ring.
- In the next chain, work 10 ch.
- Work 9 sc back along the chain toward the base. Skip 2 chains.
- Repeat for 15 petal bases.
Petal Pattern (Downward): 1 sc, 1 hdc, 5 dc, 1 hdc, 1 sc. (Note: For a more textured look, you can follow the upward pattern for both layers.)
Pro Tip: To make the petals stand out more, you can insert a thin piece of wire inside the petal while crocheting.
Leaves and Stem
Leaves (Make 2)
Using Green yarn:
Leaf 1: Chain 11. In the 2nd chain from the hook: 1 sc, 1 hdc, 6 dc, 1 hdc, 3 sc in the same stitch, 1 hdc, 6 dc, 1 sc. Work sc around the entire edge of the leaf. Fasten off.
Leaf 2: Chain 11. In the 2nd chain from the hook: 1 hdc, 5 dc, 2 hdc, 2 sc, 3 sc in the same stitch, 2 sc, 2 hdc, 5 dc, 1 hdc. Work sc around the entire edge of the leaf. Fasten off.
The Stem
Take a wooden skewer and wrap it tightly with green yarn until the entire stick is covered. This will serve as the sturdy support for your flower.
Finishing & Assembly
This is where the magic happens! Assembly is key to making your cat look “alive” and cute.
- Eye Placement: Place your safety eyes on the head between rounds 12 and 13. Ensure they are evenly spaced to give the cat a symmetrical, adorable look.
- The Nose: Using a pink or black thread, embroider a small inverted triangle nose (approximately 2 stitches wide) just below the eyes.
- The Face: Sew the ears to the top of the head. Sew the white cheeks just below the eye area to add a “blushing” effect.
- The Stem: Insert the wrapped skewer into the bottom of the cat’s head. Pull the yarn tight and sew the bottom of the head closed around the skewer to secure it.
- The Flower: Sew the first layer of petals to the head, then sew the second layer of petals on top, slightly offset to create volume. Finally, sew your green leaves onto the stem.
Tips for Success
- Tension is Everything: For amigurumi, keep your tension tight. If your stitches are too loose, the stuffing will peek through the holes.
- Color Changes: When changing colors, pull the new color through the final loop of the last stitch of the previous color to ensure a clean transition.
- Symmetry: When sewing eyes and ears, take a moment to look at the face from different angles. Symmetry is what makes amigurumi look professional.
- Customization: Don’t be afraid to experiment! You can add tiny whiskers with black thread or even crochet a little collar for your kitty flowers.