How to Crochet a Cute Thieving Cat Refrigerator Magnet: A Step-by-Step Amigurumi Tutorial
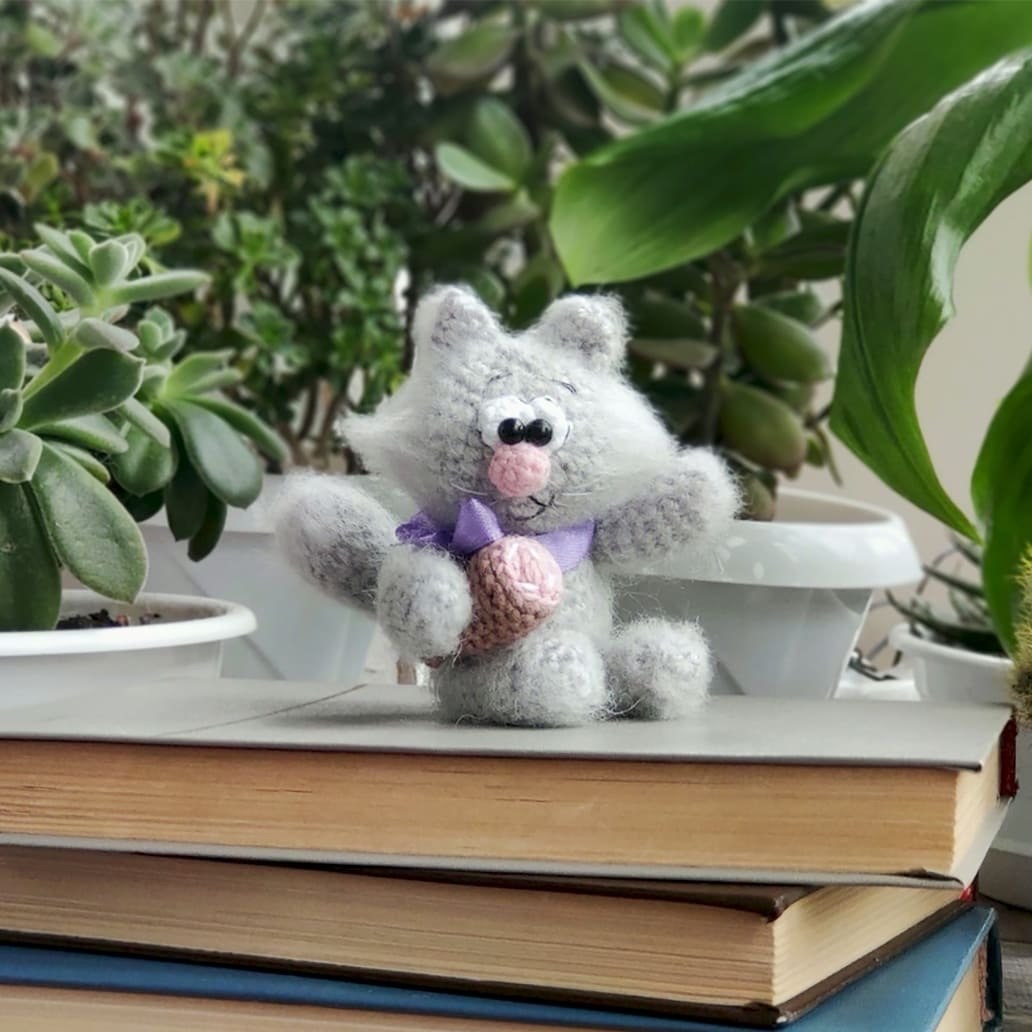
Looking for a unique, tiny project to brighten up your kitchen? This “Thieving Cat” crochet refrigerator magnet is the perfect blend of adorable and mischievous. Imagine a tiny, ultra-fluffy kitten, complete with a little backpack and a stolen sausage, clinging to your fridge! This project is a fantastic way to practice your amigurumi skills while creating something truly whimsical.
Because this pattern uses mohair-style yarn and a specialized brushing technique, the finished cat has a wonderfully fuzzy, realistic texture that makes it look like a tiny living creature. Whether you are making this as a gift for a friend or a little treat for yourself, this miniature amigurumi is sure to bring a smile to everyone’s face.
Materials & Abbreviations
To achieve that signature fuzzy look, we will be working with mohair yarn and holding it in multiple strands. This creates a dense, plush fabric that is perfect for small toys.
What You Will Need
- Yarn: Mohair-style yarn (e.g., NAKO Mohair Delicat). You will work with 2 strands held together for the main body. You will also need a small amount of pink yarn (for the nose), brown and pink yarn (for the sausage), and blue yarn (for the backpack).
- Crochet Hooks:
- 2 mm (B-1) hook for the main body and limbs.
- 1 mm hook for the tiny sausage and backpack details.
- Stuffing: Polyester fiberfill.
- Eyes: 5/16″ (approx. 8 mm) or 1/4″ (approx. 6 mm) black safety eyes, or black rhinestones.
- Joints: 3/4″ (approx. 20 mm) plastic safety joints with long stems (optional, but recommended for poseability).
- Magnets: 1/2″ (approx. 12 mm) magnets to attach the cat to the fridge.
- Notions: Yarn needle, embroidery thread (white), and a pet slicker brush or fine-tooth comb for brushing the yarn.
Abbreviations (US Terms)
- MR: Magic Ring
- sc: Single crochet
- inc: Increase (2 sc in one stitch)
- dec: Decrease (sc 2 together)
- ch: Chain
- hdc: Half double crochet
- dc: Double crochet
- st(s): Stitch(es)
- [ ] * 6: Repeat the instructions inside the brackets 6 times
Step-by-Step Instructions
Note: For the main body parts, always hold two strands of mohair together while crocheting.
Limbs (Arms and Legs)
Make 4 of these. These will serve as both the arms and the legs.
- MR, 6 sc (6)
- 6 inc (12)
- Rounds 3-4: 12 sc (12)
- Round 5: 3 sc, 3 dec, 3 sc (9)
- Rounds 6-11: 9 sc (9)
- Round 12: Sc through both loops of the final round to flatten the opening.
The Fluffing Secret: Once the limbs are finished, use your pet brush to brush the mohair fibers outward. Trim away any long, stray ends with scissors, then brush again to create a uniform, fuzzy texture.
The Tail
- MR, 6 sc (6)
- 6 inc (12)
- Round 3: (1 sc, inc) * 6 (18)
- Rounds 4-5: 18 sc (18)
- Round 6: (1 sc, dec) * 6 (12)
- Rounds 7-11: 12 sc (12)
- Round 12: 6 dec (6)
- Flatten the tail and sc through both sides to close the end. Brush the tail thoroughly to make it look fluffy.
The Ears
Make 2.
- MR, 6 sc (6)
- 6 sc (6)
- 6 inc (12)
- 12 sc (12)
- Flatten the ears and sc through both sides to close (6 sc). Brush only the outer side of the ears to give them a soft edge.
The Body
- MR, 6 sc (6)
- 6 inc (12)
- Round 3: (1 sc, inc) * 6 (18)
- Round 4: (2 sc, inc) * 6 (24)
- Round 5: (3 sc, inc) * 6 (30)
- Rounds 6-9: 30 sc (30)
- Round 10: (3 sc, dec) * 6 (24)
- Round 11: 24 sc (24)
- Round 12: (2 sc, dec) * 6 (18)
- Round 13: 18 sc (18)
- Round 14: (1 sc, dec) * 6 (12)
Inserting the Joint: Before closing the body, insert your plastic safety joint through the bottom of the piece. Continue working decreases until the hole is small enough to close tightly around the joint. Secure the thread and fasten off.
The Head
- MR, 6 sc (6)
- 6 inc (12)
- Round 3: (1 sc, inc) * 6 (18)
- Round 4: (2 sc, inc) * 6 (24)
- Round 5: (3 sc, inc) * 6 (30)
- Round 6: (4 sc, inc) * 6 (36)
- Rounds 7-11: 36 sc (36)
- Round 12: (4 sc, dec) * 6 (30)
- Rounds 13-18: (3 sc, dec) * 6 (24)
- Round 19: (2 sc, dec) * 6 (18)
- Round 20: (1 sc, dec) * 6 (12)
Flatten the head and close. Brush the entire head to make it fuzzy, but do not brush the area where you will later sew the nose and eyes. You want that area to remain smooth so the features sit correctly.
The Eyes and Nose
Eyes
- MR, 6 sc (6)
- Round 2: (1 sc, inc) * 3 (9)
Insert or glue your black safety eyes into these white eye patches. For a more expressive look, place them slightly overlapping.
Nose
- MR, 6 sc (6)
- 6 inc (12)
- Rounds 3-4: 12 sc (12)
- Round 5: 6 dec (6)
Accessories (Use 1mm Hook)
The Sausage
Work in pink and brown yarn.
- Pink part: MR, 6 sc (6), 6 inc (12).
- Brown part: Rounds 3-12: 12 sc (12), Round 13: 6 dec (6), Round 14: 6 inc (12).
Fasten off. Tie the end of the sausage with a piece of string to look like a butcher’s tie. Use white embroidery thread to stitch “fat” details onto the pink section.
The Backpack
- Chain 7. From the second chain from the hook: 5 sc, then 2 sc in the last chain. On the opposite side of the chain, work 4 sc, then 2 sc in the last chain. Mark the start of the row.
- Rounds 2-7: 12 sc (12).
- Rows: Work in rows using the pattern: 4 sc, ch, 4 sc, ch, 4 sc, ch, 4 sc.
- Straps: Chain 15 for each strap.
Finishing
Assembly is where your little thief truly comes to life! Follow these placement tips for the best look:
- Facial Features: Sew the eyes onto the head, overlapping them slightly for a “kawaii” look. Sew the nose in the center, then use white thread to embroider a tiny mouth and whiskers.
- Tail: Sew the tail to the body between rounds 4 and 6.
- Lower Limbs: Sew the bottom legs to the sides of the body between rounds 3 and 5.
- Upper Limbs: Sew the upper arms/legs to the body between rounds 10 and 12.
- Magnets: Glue your 1/2″ magnets to the paws (at least three magnets are recommended to ensure it stays upright on the fridge).
- The Theft: Place the sausage inside one of the limbs or tuck it inside the little backpack.
Tips for Success
- Tension Matters: Since you are using mohair, your tension might feel different. Keep your stitches tight so the stuffing doesn’t peek through the fuzz.
- The Brushing Technique: Do not over-brush the entire toy. Only brush the parts that are meant to look furry. If you brush the nose area, it will become difficult to attach the features.
- Magnet Placement: If your cat is top-heavy, place an extra magnet on the lower part of the body to help it balance on your refrigerator.
- Safety First: If you are making this for a child, ensure all safety eyes and magnets are sewn or glued extremely securely to prevent choking hazards.