Whimsical Crochet Clown Girl Doll Pattern: A Complete Amigurumi Tutorial
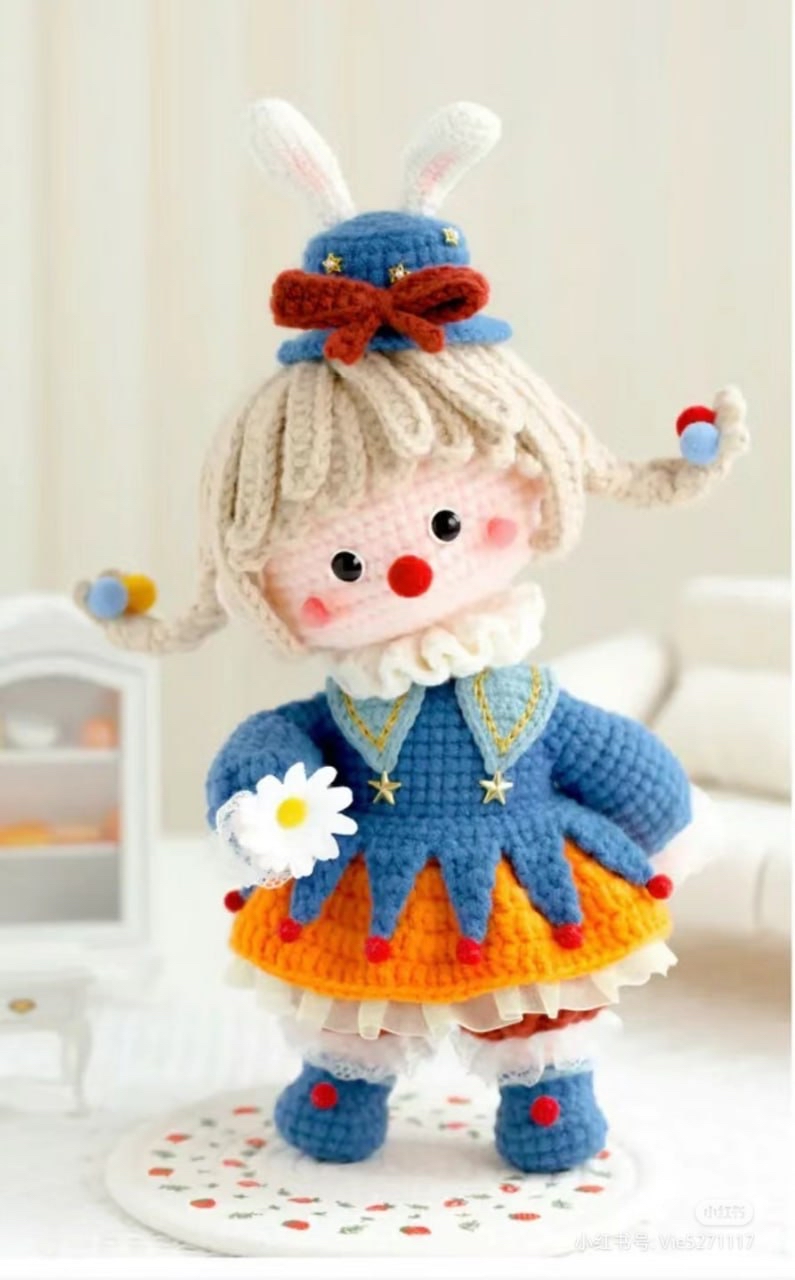
If you are looking for your next adorable amigurumi project, look no further! This whimsical crochet clown girl doll is the perfect blend of charm and character. With her puffy skirts, adorable bunny-eared hat, and expressive face, she makes a wonderful nursery decoration, a unique gift for children, or a standout piece for your own crochet collection. While she might look complex, this detailed tutorial breaks everything down step-by-step, making it accessible for intermediate crocheters and motivated beginners.
Introduction
This pattern creates a stylized clown doll with a highly textured look, thanks to her layered hair and ruffled clothing. We will be working with wire in the arms and legs to ensure she is poseable and can stand proudly on her own. The project involves several distinct parts: the limbs, the torso, a double-layered skirt, a detailed head, and a signature hat. Grab your favorite yarn and your crochet hook, and let’s bring this little performer to life!
Materials & Abbreviations
Materials List
- Yarn: Medium weight (worsted) yarn in the following colors:
- Flesh/Skin tone (for head, arms, and legs)
- Blue (for body, hat, and shoes)
- Orange (for the bottom skirt layer)
- Burgundy (for the body and hat bow)
- Beige (for the hair)
- White (for the collar, lace, and bunny ears)
- Gold (for decorative trim)
- Crochet Hook: A size suitable for your yarn (typically 3.0mm or 3.5mm for amigurumi to ensure tight stitches).
- Stuffing: High-quality polyester fiberfill.
- Wire:
- Approximately 16.5 inches for the arms.
- Approximately 22.5 inches for the legs.
- Approximately 7 inches for the hat ears.
- Safety Eyes: Or black beads/embroidery thread for the eyes.
- Extras: Red beads or small pom-poms for the nose and feet, small star decorations for the hat, lace trim for the collar/skirt, and a tapestry needle.
US Crochet Abbreviations
Please ensure you are using US terms throughout this pattern:
- MR: Magic Ring
- ch: Chain
- sl st: Slip stitch
- sc: Single crochet
- inc: Increase (2 sc in one stitch)
- dec: Decrease (sc 2 together)
- hdc: Half double crochet
- dc: Double crochet
- BLO: Back loop only
- FLO: Front loop only
Step-by-Step Instructions
Arms (Make 2)
Start with flesh-colored yarn.
- MR, 6 sc (6)
- (sc, inc) * 3 (6)
- 3-5. 9 sc (9)
- Switch to blue yarn, FLO 9 inc (18)
- 7. 18 inc (36)
- 8. 2 sc, skip 3 sts, (4 sc, skip 2 sts, 3 sc, skip 3 sts) * 2, 4 sc, skip 2 sts, 1 sc (21)
- 9-10. 21 sc (21)
Note: Fold your 16.5-inch wire in half and insert it into the arm now. Begin stuffing the arm firmly.
- 1 dec, 19 sc (20)
- 12. 20 sc (20)
- 13. (4 sc, 1 dec, 4 sc) * 2 (18)
- 14. 18 sc (18)
- 15. (2 sc, 1 dec, 2 sc) * 3 (15)
- 16. FLO 15 sc (15)
- 17. (3 sc, 1 dec) * 3 (12)
Fasten off, leaving a ~4-inch tail. You may choose to sew a small lace cuff to the wrist.
Legs (Make 2)
Left Leg: Start with blue yarn.
- Ch 4, from the 2nd ch from hook: 2 sc, 3 sc in one stitch, 1 sc, 1 inc (8)
- inc, sc, 3 inc, sc, 2 inc (15)
- sc, inc, sc, (sc, inc) * 3, sc, (sc, inc) * 2 (20)
- 4-5. 20 sc (20)
- 6. (This row creates the foot shape): Join blue yarn. Count 12 sc left from the last stitch of row 5 and join there. Ch, 5 sc, 7 ch. Count 10 sc from the last stitch of row 5 and work: dec, 5 sc, dec, 7 ch, (count 9 sc from row 5), sc, dec, 3 sc, dec, 10 sc.
- Using blue yarn, work a row of sc in the FLO of row 7. Fasten off and join light blue yarn to the edge to work a final row of slip stitches.
Note: Insert your 22.5-inch wire into the leg and begin stuffing.
- Switch to flesh color: 7 sc, 1 dec, 6 sc, 1 inc (16)
- 12. 16 sc (16)
- Switch to burgundy yarn, FLO 16 inc (32)
- 14. 32 inc (64)
- 15. (sc, inc) * 32 (96)
- 16. 2 sc, skip 5 sts, (5 sc, skip 6 sts) * 2, (5 sc, skip 5 sts, (5 sc, skip 6 sts) * 2) * 2, 3 sc (45)
- 17. (3 sc, 1 dec) * 9 (36)
- 18. 36 sc (36)
- 19. (1 dec, 7 sc) * 4 (32)
- 20-21. 32 sc (32)
Fasten off, leaving a tail for sewing. You can attach lace to the ankles if desired.
Right Leg: Repeat the Left Leg instructions for rows 1-6. For row 7, work: 8 sc, 1 inc, 5 sc, 1 dec (16). Using blue yarn, work the FLO sc and the light blue slip stitch edge as described above. Switch to flesh color for row 11: 8 sc, 1 inc, 5 sc, 1 dec (16). Work rows 12-21 following the Left Leg pattern.
Body
Attach burgundy yarn to the left leg, 4 stitches to the left of the last stitch worked. Continue to the right leg, skipping 6 stitches, and work 26 sc along the right leg, then skip 6 stitches (52). Fasten off and sew the opening closed.
- 12 sc, 1 dec, 24 sc, 1 dec, 12 sc (50)
- 3. 50 sc (50)
- 4. 11 sc, 1 dec, 24 sc, 1 dec, 11 sc (48)
- 5. 48 sc (48)
- 6. 11 sc, 1 dec, 22 sc, 1 dec, 11 sc (46)
- 7. 46 sc (46)
- 8. 10 sc, 1 dec, 22 sc, 1 dec, 10 sc (44)
- 9. Switch to blue yarn, BLO 44 sc (44)
- 10. BLO 10 sc, 1 dec, 20 sc, 1 dec, 10 sc (42)
- 11. 42 sc (42)
- 12. 9 sc, 1 dec, 20 sc, 1 dec, 9 sc (40)
- 13. Attach Arm 1 (2 sts away from last st), 4 sc on arm, 16 sc on body, attach Arm 2 (2 sts away from last st), 4 sc on arm, 8 sc (40)
- 14. 8 sc, 8 sc on Arm 1, 16 sc on body, 8 sc on Arm 2, 8 sc (48)
- 15. 7 sc, 1 dec, 6 sc, 1 dec, 14 sc, 1 dec, 6 sc, 1 dec, 7 sc (44)
- 16. 5 sc, 1 dec, 8 sc, 1 dec, 10 sc, 1 dec, 8 sc, 1 dec, 5 sc (40)
- 17. 4 sc, (sc, 1 dec) * 4, 8 sc, (1 dec, sc) * 4, 4 sc (32)
- 18. 4 sc, 4 dec, 8 sc, 4 dec, 4 sc (24)
- 19. 2 sc, 4 dec, 4 sc, 4 dec, 2 sc (16)
- 20. 2 sc, 2 dec, 4 sc, 2 dec, 2 sc (12)
- 21. (sc, 1 dec, sc) * 3 (9)
- 22. sc, 1 dec, 3 sc, 1 dec, sc (7)
- 23-35. 7 sc (7)
Fasten off. Ensure the wire reaches the end of the neck for support.
The Skirts
Orange Skirt (Under-layer)
Turn the body upside down (neck down) and attach orange yarn to the back of row 9. Work in continuous rounds:
- 3 ch, 9 dc, 1 dc inc, (10 dc, 1 dc inc) * 3 (48)
- 3 ch, 2 dc, 1 dc inc, (3 dc, 1 dc inc) * 11 (60)
- 3 ch, 1 dc inc, dc, (dc, 1 dc inc, dc) * 19 (80)
- 3 ch, 79 dc (80)
- 5. 3 ch, 8 dc, 1 dc inc, (9 dc, 1 dc inc) * 7 (88)
Fasten off and hide the yarn. You will later sew a tulle/lace layer underneath this.
Blue Skirt (Top layer)
Attach blue yarn to the back of row 10 of the body. Work in rounds:
- (10 sc, 1 inc) * 4 (48)
- 2. 48 sc (48)
Now, work in turning rows to create individual petals. Repeat this process around the skirt:
- 4 sc (4)
- 4. ch, turn, sc, skip 1 st, 2 sc (3)
- 5-6. ch, turn, 3 sc (3)
- 7. ch, turn, sc, skip 1 st, sc (2)
- 8. ch, turn, 2 sc (2)
- 9. ch, turn, skip 1 st, sc (1)
Fasten off. Glue a small decoration to the tip of each petal.
The Head
Start with flesh-colored yarn.
- MR, 6 sc (6)
- 6 inc (12)
- (sc, inc) * 6 (18)
- (sc, inc, sc) * 6 (24)
- (3 sc, inc) * 6 (30)
- (2 sc, inc, 2 sc) * 6 (36)
- (5 sc, inc) * 6 (42)
- (inc, 5 sc) * 7 (49)
- 49 sc (49)
- (3 sc, inc, 3 sc) * 7 (56)
- 56 sc (56)
- (7 sc, inc) * 7 (63)
- 13-16. 63 sc (63)
- 17. (7 sc, 1 dec) * 2, 5 sc, 1 dec, sc, 1 dec, 8 sc, 1 dec, sc, 1 dec, 4 sc, (7 sc, 1 dec) * 2 (55)
- 18. 19 sc, 5 inc, 8 sc, 5 inc, 18 sc (65)
- 19. (3 sc, 1 dec, 3 sc) * 2, 33 sc, (3 sc, 1 dec, 3 sc) * 2 (61)
- 20. 61 sc (61)
- 21. 7 sc, 1 dec, 8 sc, 5 dec, 8 sc, 5 dec, 7 sc, 1 dec, 7 sc (49)
- 22. (5 sc, 1 dec) * 7 (42)
- 23. (2 sc, 1 dec, 2 sc) * 7 (35). Stuff the head firmly.
- 24. (3 sc, 1 dec) * 7 (28)
- 25. (sc, 1 dec, sc) * 7 (21)
- 26. (sc, 1 dec) * 7 (14)
- 27. (3 sc, 1 dec, 2 sc) * 2 (12)
- 28. BLO 12 sc
- 29-32. 12 sc
Fasten off. To create eye sockets, use a needle to pull the stuffing inward at rows 16-17, leaving about 5 stitches of space between where the eyes will be placed.
Hair (Base & Strands)
The Base
Use beige yarn.
- MR, 8 sc (8)
- 8 inc (16)
- BLO (sc, inc) * 8 (24)
Do not cut the yarn. We will now work the strands directly into the edges of row 3.
Layer 1 Strands
Work strands into the edges of the base. Use the following counts for the lengths of your strands (ch, work back into base):
- Strands 1, 2-8: 21 ch, from 3rd ch: 17 hdc, sc, sl st, sl st into base.
- Strands 9-10: 15 ch, from 2nd ch: 2 sc, 10 hdc, sc, sl st, sl st into base.
- Strands 11: 13 ch, from 2nd ch: sc, 9 hdc, sc, sl st, sl st into base.
- Strands 12-13: 12 ch, from 2nd ch: sc, 8 hdc, sc, sl st, sl st into base.
- Strands 14: 13 ch, from 2nd ch: sc, 9 hdc, sc, sl st, sl st into base.
- Strands 15-16: 15 ch, from 2nd ch: 2 sc, 10 hdc, sc, sl st, sl st into base.
- Strands 17-24: 21 ch, from 3rd ch: 17 hdc, sc, sl st, sl st into base.
Layer 2 Strands
Work these into the BLO of the base. Note: For strands 5-7 and 14-16, insert thin wire into the strand to give it shape.
- 23 ch, from 3rd ch: 19 hdc, sc, sl st, sl st into base.
- 2-4. sl st, 23 ch, from 3rd ch: 19 hdc, sl st, sl st into base.
- 5-7. sl st, 38 ch, from 2nd ch: 4 dc, 32 sc, sl st, sl st into base.
- 8. sl st, 25 ch, from 3rd ch: sc, 21 hdc, sc, sl st, sl st into base.
- 9. sl st, 16 ch, from 2nd ch: sc, 12 hdc, sc, sl st, sl st into base.
- 10-11. sl st, 14 ch, from 2nd ch: sc, 10 hdc, sc, sl st, sl st into base.
- 12. sl st, 16 ch, from 2nd ch: sc, 12 hdc, sc, sl st, sl st into base.
- 13. sl st, 25 ch, from 3rd ch: sc, 21 hdc, sc, sl st, sl st into base.
- 14-16. sl st, 38 ch, from 2nd ch: 4 dc, 32 sc, sl st, sl st into base.
- 17-20. sl st, 23 ch, from 3rd ch: 19 hdc, sc, sl st, sl st into base.
Accessories
Ears (Make 2)
Use flesh color.
- 2 ch, in 2nd ch: 4 sc (4)
- ch, turn, sc, 2 inc hdc, sc (6)
Insert 7-inch wire into the ear and sew to rows 16-17 of the head, 5 stitches away from the eyes.
Shirt Collar
Use blue yarn, working in turning rows.
- 2 ch, in 2nd ch: 1 sc (1)
- ch, turn, 3 sc in one stitch (3)
- ch, turn, 2 sc, inc (4)
- ch, turn, 3 sc, inc (5)
- ch, turn, 4 sc, inc (6)
- ch, turn, 5 sc, inc (7)
- ch, turn, 5 sc, skip 1 st, sc (6)
- ch, turn, skip 1 st, 5 sc (5)
- ch, turn, 3 sc, skip 1 st, sc (4)
- ch, turn, 4 sc (4)
Second Part: ch, turn, 4 sc, 8 ch, join to the first part, 4 sc (16). Rows 2-7: 16 sc (16). Row 8: 15 sc, 3 sc in one stitch, 16 sc, inc, 5 sc, inc, 4 sc, dec, 6 sc, dec, 4 sc inc, 5 sc, inc, 16 sc, inc (86). Finish with gold yarn around the edge using slip stitches.
Jabot
Use white yarn.
- 84 ch, from 3rd ch: 82 dc (82)
- 3 ch, turn, inc dc, (dc, inc dc) * 40 (123)
- 3 ch, turn, 122 dc (123)
Use a ~8-inch piece of thread to lace the jabot around the neck and secure it.
Hat
Start with blue yarn.
- MR, 8 sc (8)
- 8 inc (16)
- (sc, inc) * 8 (24)
- (sc, inc, sc) * 8 (32)
- BLO 32 sc (32)
- 32 sc (32)
- (3 sc, dec, 3 sc) * 4 (28)
- 8-9. 28 sc (28)
- FLO (3 sc, inc) * 7 (35)
- 11. (2 sc, inc, 2 sc) * 7 (42)
- 12. (inc, 5 sc) * 7 (49)
Hat Bow: Use burgundy yarn. Top part: 28 ch, join in ring, (sl st, 12 sc, sl st) * 2 (28). Bottom part: 11 ch, from 2nd ch: 4 sc, 2 dc, 4 sc (10). Join them together and sew to the hat.
Bunny Ears: Use white yarn. 4 ch, from 2nd ch: 2 sc, 3 sc in one stitch, sc, inc (8). (sc, inc) * 4 (12). 3-7. 12 sc (12). 8. dec, 10 sc (11). 9-10. 11 sc (11). 11. 4 sc, dec, 5 sc (10). Insert 7-inch wire and sew to the hat.
Finishing
Once all components are crocheted, it is time for assembly!
- Face: Secure the safety eyes in the indentations you made in the head. Glue or sew the red nose in the center and add pink blush to the cheeks using makeup or fabric markers.
- Assembly: Sew the head to the body. Attach the arms to the sides of the torso. Sew the legs to the bottom of the body.
- Clothing: Layer the orange skirt under the blue skirt. Attach the collar and the jabot around the neck. Finally, place the hat on the head, securing it into the hair.
- Details: Add the tiny stars to the hat and any remaining decorations to complete the look.
Tips
- Tension is Key: For amigurumi, try to keep your tension tight to prevent the stuffing from showing through your stitches.
- Wire Safety: When using wire for limbs, ensure the ends are tucked deeply into the stuffing or covered with a bit of extra fiberfill to prevent them from poking through the fabric.
- Color Changes: To get clean color changes, work your last stitch of the old color in the last stitch of the previous row, and start the new color in the first stitch of the new row.
- Customization: Don’t be afraid to experiment! You can change the hair color, the skirt colors, or even the hat style to create a completely unique character.