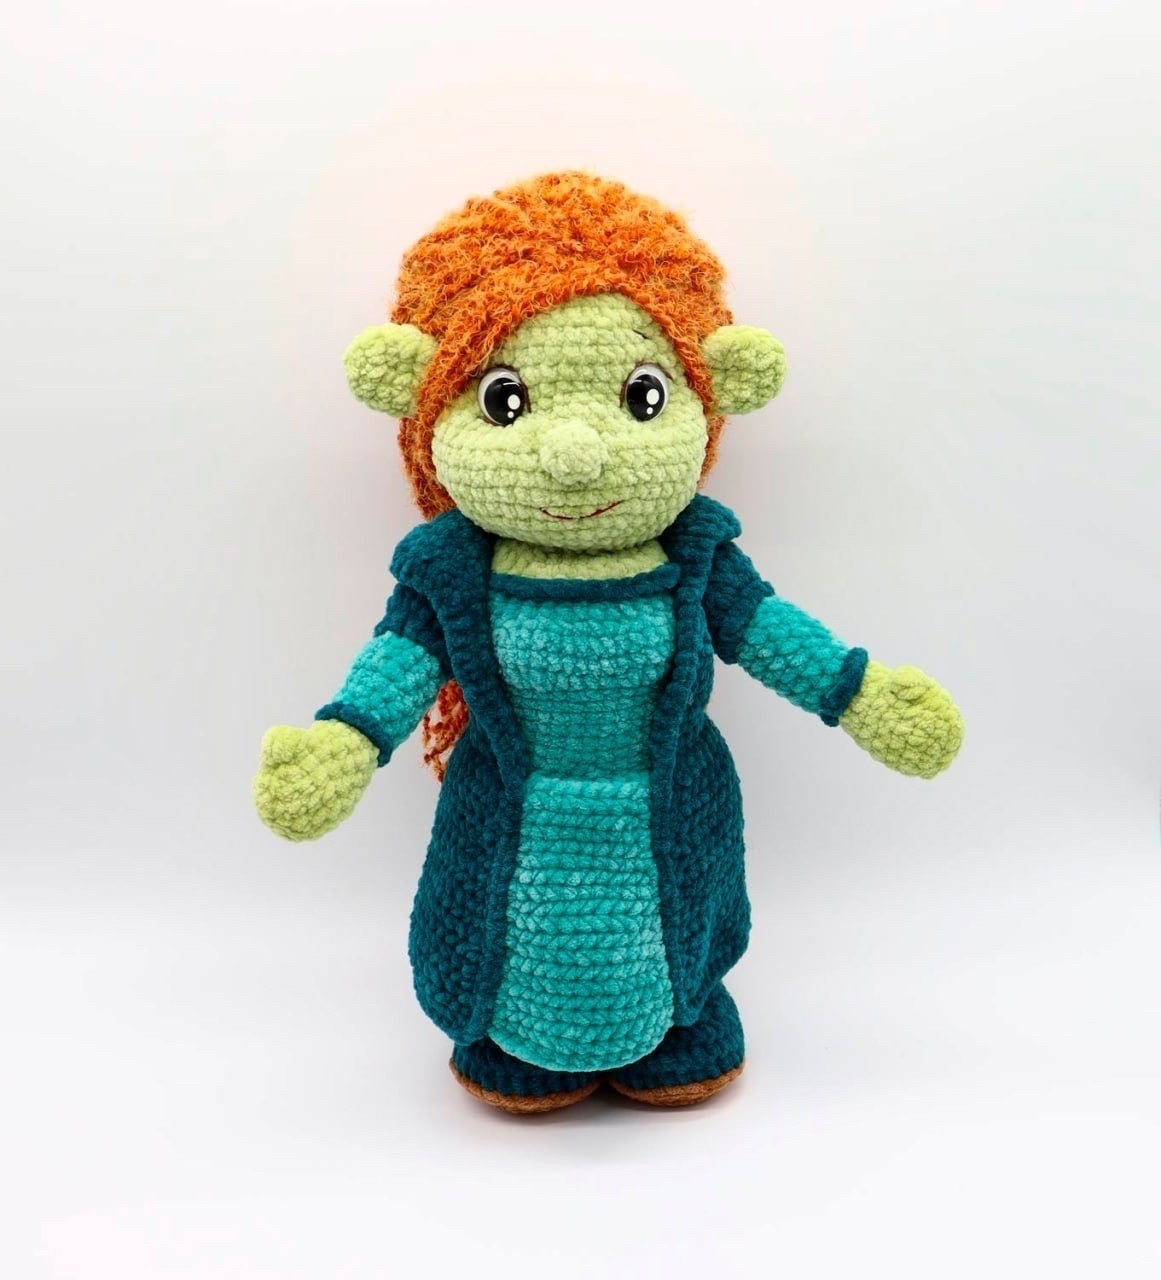
Crochet Princess Fiona Pattern: A Complete Amigurumi Tutorial
Are you looking to create your own fairytale-inspired character? This adorable, customizable crochet princess pattern is perfect for adding a bit of magic to your amigurumi collection. Whether you are making a gift or a new companion for your shelf, this princess—with her signature ginger hair and royal attire—is sure to charm.
This project is rated as medium difficulty. While it uses beginner-friendly stitches like single crochet, it does involve some advanced techniques such as wire framing for posability, sculpting the face with thread, and working in rows for the dress. If you have a basic understanding of crochet, you will find this tutorial very rewarding!
Materials & Abbreviations
To achieve the look shown in the photos, I recommend using a plush or chenille-style yarn. This gives the character that soft, high-quality look.
Required Materials
- Plush/Chenille Yarn: Approximately 100g (3.5 oz) of each of the following colors:
- Lime Green (for skin)
- Dark Turquoise (for the dress/outer layer)
- Light Turquoise (for the dress/inner layer)
- Brown (for the boot soles)
- Hair Yarn: 2 skeins of orange or ginger “grass” style yarn (e.g., Lotus Stretch).
- Hooks: 3.5mm (approx. 5/32″) for the main body, and a 2.5mm (approx. 1/32″) hook for attaching hair.
- Stuffing: 300g (approx. 10.5 oz) of polyester fiberfill.
- Safety Eyes: 20mm (approx. 0.78″).
- Wire Frame: 2 pieces of 2mm (approx. 0.08″) insulated copper wire, each about 17.7 inches long.
- Assembly Tools:
- Mercerized cotton yarn (for pulling and shaping).
- Sewing thread (for embroidery).
- A long tapestry needle (at least 8 inches/20 cm long).
- Clear adhesive (like Moment Crystal).
- Plastic for soles: Two 3×3 inch (8×8 cm) squares (a thick food container lid works great).
- Plastic joints or discs with bolts (3.5cm/1.37″) for attaching the arms.
US Crochet Abbreviations
- MR: Magic Ring
- ch: Chain
- st: Stitch
- sc: Single crochet
- hdc: Half double crochet
- dc: Double crochet
- inc: Increase (2 sc in one stitch)
- dec: Decrease (sc 2 together)
- sl st: Slip stitch
- sc3tog: Single crochet 3 together
- bl: Back loop only
- fl: Front loop only
- ch-sp: Chain space
Step-by-Step Instructions
The Arms (Make 2)
Note: To keep the arms aligned, use a stitch marker. For the finger, we will use a “fluffy stitch” (4 hdc in one stitch, worked together at the top).
Lime Green Color:
- 6 sc in MR
- 6 inc = 12
- (3 sc, inc) x 3 = 15
- 4-5. 15 sc (2 rounds)
- The Finger: 4 hdc in one stitch (the fluffy stitch), 14 sc = 15
- (dec, 3 sc) x 3 = 12
- 8. 12 sc
- Fasten off lime yarn.
Light Turquoise Color:
- 9. 12 sc = 12
- 10. 12 sc in bl = 12
- 11-15. 12 sc (5 rounds)
- Fasten off light turquoise yarn.
Dark Turquoise Color:
- 16. 12 sc = 12
- 17. (1 sc, inc) x 6 = 18
- 18-20. 18 sc (3 rounds)
Creating the Joint Hole:
For one arm:
- 4 sc, 2 ch (skip 2 stitches), 12 sc = 18
- 22. 18 sc
- 23. (1 sc, dec) x 6 = 12
- 24. 6 dec
For the second arm, reverse the order of the hole: 12 sc, 2 ch (skip 2), 4 sc.
Fasten off and leave long tails for sewing. Use the dark turquoise color to work 12 sl st into the unworked front loops of rounds 9 and 16 to clean up the color transitions.
The Legs and Boots (Make 2)
Brown Color (The Boots):
- Ch 6, starting in 2nd ch from hook:
- 4 sc, sc3tog, 3 sc, inc = 12
- 3. inc, 3 sc, 3 inc, 3 sc, 2 inc = 18
- 4. (1 sc, inc, 4 sc, (inc, 1 sc) x 2, inc, 1 sc, inc) = 24
- Based on the size, cut a plastic sole from your plastic sheet.
- 5. (2 sc, inc, 5 sc, (inc, 2 sc) x 2, inc, 5 sc, inc, 2 sc, inc) = 30
- 6. 30 sl st in fl = 30. Fasten off.
Dark Turquoise Color:
- 7-8. 30 sc (2 rounds)
- 9. 9 sc, 6 dec, 9 sc = 24
- Crochet into the unworked back loops of the previous round to create the leg: 30 sc.
- 10-12. 30 sc (3 rounds)
- 13. 9 sc, 6 dec, 9 sc = 24
- Fasten off.
Lime Green Color:
- 14. 6 sc in bl = 18
- 15. (4 sc, dec) x 3 = 15
- 16-18. 15 sc (3 rounds)
- 19. (4 sc, dec) x 3 = 12
- 20. 6 dec = 6. Fasten off.
Adding the Frame: Bend the ends of your 17.7-inch wire (about 0.8 inches) and cover them with tape for safety. Attach the wire to the plastic sole with tape. Stuff the leg firmly, adding more fiberfill as you go.
Connecting the Legs: Once both legs are made, align them. Use a chain of 2 ch to connect them: 4 sc on one leg, 2 ch, 18 sc on the other leg, 2 sc on the chain, 14 sc on the first leg = 40 stitches total. Complete a partial round of 4 sc, 1 ch, 1 sc on the chain to stabilize, then place a new marker.
The Torso
Light Turquoise Color:
- 1. 40 sc in MR = 40
- 2. 3 sc, inc, 32 sc, inc, 3 sc = 42
- 3. (6 sc, inc) x 6 = 48
- 4-10. 48 sc (7 rounds)
- 11. (dec, 1 sc) x 2, dec, 31 sc, (dec, 1 sc) x 3 = 42
- 12. 17 sc in bl, additional marker 1, 8 sc, additional marker 2, 17 sc = 42
- 13. 6 sc, dec, (12 sc, dec) x 2, 6 sc = 39
- 14. (11 sc, dec) x 3 = 36
- 15-19. 36 sc (5 rounds)
- 20. 13 sc, 3 dec-hdc (dec in hdc), 4 sc, 3 dec-hdc, 13 sc = 42
- 21-22. 42 sc (2 rounds)
- 23. 13 sc, 4 dec, 13 sc = 36
Arm Holes:
- 7 sc, 2 ch (skip 2), 18 sc, 2 ch (skip 2), 7 sc = 36
- 25. (7 sc, dec) x 4 = 32. Fasten off.
Connect the leg frames together with tape inside the torso and stuff firmly.
The Dress
The dress is worked in rows (turning work). Use a chain-space (ch-sp) at the end of each row.
Dark Turquoise (Skirt):
- Attach yarn at marker 1 on the waist. 34 sc around the torso to marker 2. Turn.
- 10 sc, inc, 12 sc, inc, 10 sc = 36. Turn.
- (11 sc, inc) x 3 = 39. Turn.
- 39 sc. Turn.
- (inc, 12 sc) x 3 = 42. Turn.
- 42 sc. Turn.
- (13 sc, inc) x 3 = 45. Turn.
- 45 sc. Turn.
- (inc, 14 sc) x 3 = 48. Turn.
- 48 sc. Turn.
- (15 sc, inc) x 3 = 51. Turn.
- 51 sc. Turn.
- (inc, 16 sc) x 3 = 54. Turn.
- 54 sc (5 rounds). Fasten off.
Dark Turquoise (Bodice/Upper Part):
- Turn doll so legs face you. Attach yarn at marker 2. 34 sc around to marker 1. Turn.
- 34 sc (5 rounds). Turn.
- 7. dec, 30 sc, dec = 32. Turn.
- 8-10. 32 sc (3 rounds). Turn.
- 11. dec, 4 sc, 2 ch (skip 2), 16 sc, 2 ch (skip 2), 4 sc, dec = 30. Turn.
- 12. 30 sc. Turn.
- 13. dec, 26 sc, dec = 28. Turn.
- 14-19. 28 sc (6 rounds). Fasten off.
The Collar: Turn work horizontally. Work sl st around the entire edge of the dress (bodice, skirt, and around the bottom) to create a finished edge.
The Neck, Head & Face
Neck (Lime):
- 32 sc in bl = 32
- 12 sc, dec, 4 sc, dec, 12 sc = 30
- 30 sc (2 rounds). Fasten off.
Head (Lime):
- 18 inc = 36
- 36 sc
- (5 sc, inc) x 6 = 42
- 42 sc
- 3 sc, inc, (6 sc, inc) x 5, 3 sc = 48
- 48 sc (6 rounds)
- 24 sc, marker (nose), 24 sc = 48
Sculpting the Face: This is a crucial step for the “princess” look. Use a long needle and mercerized cotton thread. Mark points for the eyes (t1-t4) and nose (t5). Thread the needle between the legs, bring it up through the head at point 1, then down through point 2. Pull tight to create an eye socket. Repeat symmetrically on the other side. Finally, pull the thread through point 5 to secure the nose.
- Attach 20mm safety eyes.
- Embroider the Smile: Using red or burgundy thread, stitch from one side of the mouth to the other.
- Embroider Brows: Use any remaining brown yarn to stitch eyebrows above the eyes.
Nose & Ears:
- Nose: 6 sc in MR, 6 sc. Fasten off. Sew to point 5.
- Ears (Make 2): 6 sc in MR, (1 sc, inc) x 3 = 9, (2 sc, inc) x 3 = 12, 12 sc (2 rounds), (sc3tog) x 3, 3 sc = 6. Fold in half and sew the edges together. Sew to the sides of the head.
The Hair
- Cut your orange yarn into 20-24 inch (50-60 cm) strips.
- Use a contrast thread to mark the hairline on the head.
- Using a 2.5mm hook, pull a folded strand of hair through each stitch along the hairline to create a loop. Pull the ends through the loop and tighten.
Finishing
To finish, assemble the doll by inserting the arm joints through the holes in the dress and then into the torso. Ensure the “fingers” are pointing forward. Secure all loose ends and enjoy your beautiful, posable crochet princess!
Tips for Success
- Tension is Key: When working with plush yarn, try to keep your tension consistent to avoid large gaps where stuffing might show.
- Marker Management: In spiral crochet, markers can drift. Every few rows, adjust your marker to keep your rounds even.
- Safety First: When using wire, always ensure the ends are tucked deep into the stuffing and covered with tape so they don’t poke through the crochet.
- Sculpting: Don’t be afraid to pull the thread firmly when sculpting the eyes; this creates the character’s expression!