DIY Crochet Fly Pattern: A Quirky Amigurumi Tutorial
Introduction
Are you looking for a crochet project that is a little bit different? While most amigurumi patterns focus on cuddly bunnies or sweet kittens, there is something incredibly charming about the “creepy-crawly” side of nature. Today, we are diving into a fun, unique project: a tiny, stylized crochet fly!
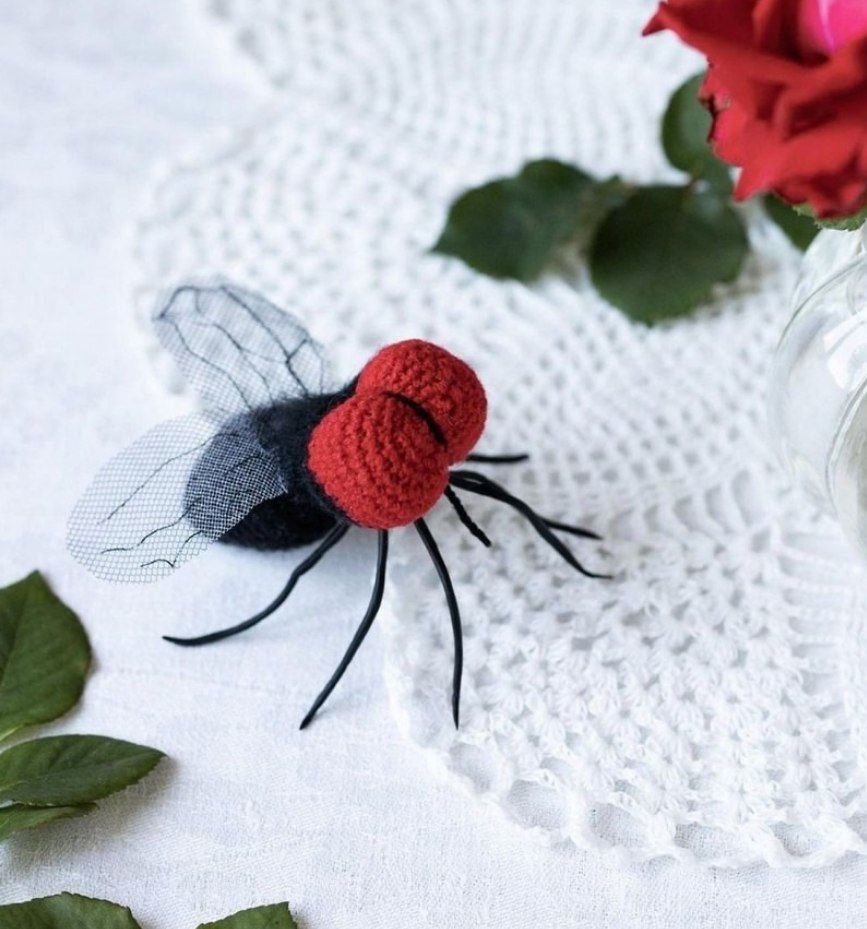
This little fly is perfect for those who love character-driven amigurumi. With its oversized, bright red eyes and spindly legs, it has a personality all its own. It makes for a fantastic desk companion, a quirky addition to a terrarium display, or even a unique charm for a bag. This pattern is designed to be beginner-friendly, though you will need to be comfortable with basic stitches and working in the round. Because the fly is worked as a single continuous piece, you won’t have to worry about sewing a head to a body—just a few finishing touches to bring it to life!
Grab your smallest crochet hook and your favorite black and red yarns, and let’s get started on this tiny aviator!
Materials & Abbreviations
Materials Needed
To achieve the tight, clean look required for amigurumi, you will want to use a smaller hook than usual for your yarn weight. This ensures that your stuffing doesn’t peek through the stitches.
- Yarn: Medium weight (worsted) or fine weight cotton/acrylic yarn in two colors: Black (for the body) and Red (for the eyes).
- Crochet Hook: A small hook, approximately 1.5mm to 2.0mm (depending on your yarn tension).
- Stuffing: Polyester fiberfill or polyfill.
- Wings: White tulle or fine netting.
- Legs: Polymer clay (black).
- Thread: Fine black sewing thread (for the wing veins and eyes).
- Adhesive: Super glue for attaching the clay legs.
- Other: A tapestry needle, scissors, and a baking sheet for the clay.
Crochet Abbreviations
This pattern uses standard US crochet terminology. Please ensure you are using US terms to avoid confusion with stitch heights.
- MR: Magic Ring (or Magic Circle)
- sc: Single crochet
- inc: Increase (work 2 single crochets into the same stitch)
- dec: Decrease (work 2 stitches together)
Step-by-Step Instructions
This entire project is worked in one continuous piece. We will start with the black yarn to form the body and then transition to the red yarn to create the head and eyes.
Part 1: The Body (Black Yarn)
Start by making a magic ring and working your first round of stitches.
- Round 1: 6 sc in the MR (6)
- Round 2: 6 inc (12)
- Round 3: (3 sc, inc) repeat 3 times (15)
- Round 4: 15 sc (15)
- Round 5: (4 sc, inc) repeat 3 times (18)
- Round 6: (2 sc, inc) repeat 6 times (24)
- Rounds 7-11: 24 sc for each round (5 rounds total) (24)
- Round 12: 12 dec (12)
- Round 13: (1 sc, inc) repeat 6 times (18)
- Rounds 14-17: 18 sc for each round (4 rounds total) (18)
- Round 18: 2 inc, 5 sc, 4 inc, 5 sc, 2 inc (26)
- Rounds 19-20: 26 sc for each round (2 rounds total) (26)
Stop here and stuff the body firmly with fiberfill before moving to the next section.
Part 2: The Head and Eyes (Red Yarn)
Switch your yarn from black to red. You will now be working the head section, which will eventually become the eyes.
- Round 21: (inc, 4 sc) repeat 3 times, inc, (inc, 4 sc) repeat 3 times (32)
- Round 22: (7 sc, inc) repeat 4 times (36)
- Rounds 22-24: 36 sc for each round (3 rounds total) (36)
- Round 25: (4 sc, dec) repeat 6 times (30)
- Round 26: (3 sc, dec) repeat 6 times (24)
- Round 27: (2 sc, dec) repeat 6 times (18)
- Round 28: (1 sc, dec) repeat 6 times (12)
- Round 29: 6 dec (6)
Fasten off your yarn, leaving a long tail. Use your tapestry needle to weave the tail through the remaining stitches and pull tight to close the head. Weave in your ends securely.
Finishing & Assembly
Now that the crochet part is complete, it’s time to add the character-defining details: the eyes, the legs, and the wings.
Sculpting the Eyes
To give the fly its signature “bug-eyed” look, we will use black thread to create a depression in the center of the red head. Using a needle and black sewing thread, insert the needle into the bottom of the red head and bring it out through the top center. Lay the thread across the red section and push the needle back down through the bottom. Repeat this process again to deepen the indentation. When you finish, tie a knot at the bottom and leave a small tail of thread (about 3/4 inch) protruding from the bottom—this will serve as the fly’s little nose!
Crafting the Legs
The legs add a sense of movement to your fly. Take your black polymer clay and roll it into 6 thin, long strands. Gently bend them so they look like natural insect legs. Place them on a baking sheet and bake them in the oven at 250°F (120°C) for approximately 20 minutes. Once they are completely cooled and hard, use super glue to attach the legs to the underside of the black body.
Creating the Wings
For the wings, take your white tulle or netting and cut out two wing-shaped pieces. To add detail, use black sewing thread to stitch small “veins” onto the tulle. Once your veins are stitched, sew the wings onto the top of the black body, just behind where the head meets the torso.
Tips for Success
Creating amigurumi requires a bit of patience and precision. Here are a few tips to ensure your fly turns out perfectly:
- Watch Your Tension: Amigurumi should be worked with relatively tight tension. If your stitches are too loose, the stuffing will show, making the toy look messy. If you find yourself struggling, try using a slightly smaller hook.
- Consistent Decreases: When working decreases, try to use the “invisible decrease” method (inserting the hook into the front loops only of the next two stitches). This prevents unsightly gaps in your work.
- Stuffing Technique: When stuffing the body, push the fiberfill into the corners and ends to ensure there are no lumps. A well-stuffed amigurumi holds its shape much better over time.
- Clay Safety: Always follow the specific temperature instructions on your polymer clay packaging, as different brands may require slightly different baking times or temperatures.
Congratulations! You have just completed a unique, handcrafted crochet fly. Whether you display it on a bookshelf or gift it to a friend, this little character is sure to bring a smile to anyone’s face.