Free Crochet Easter Egg Bunny Pattern: Easy Spring Amigurumi
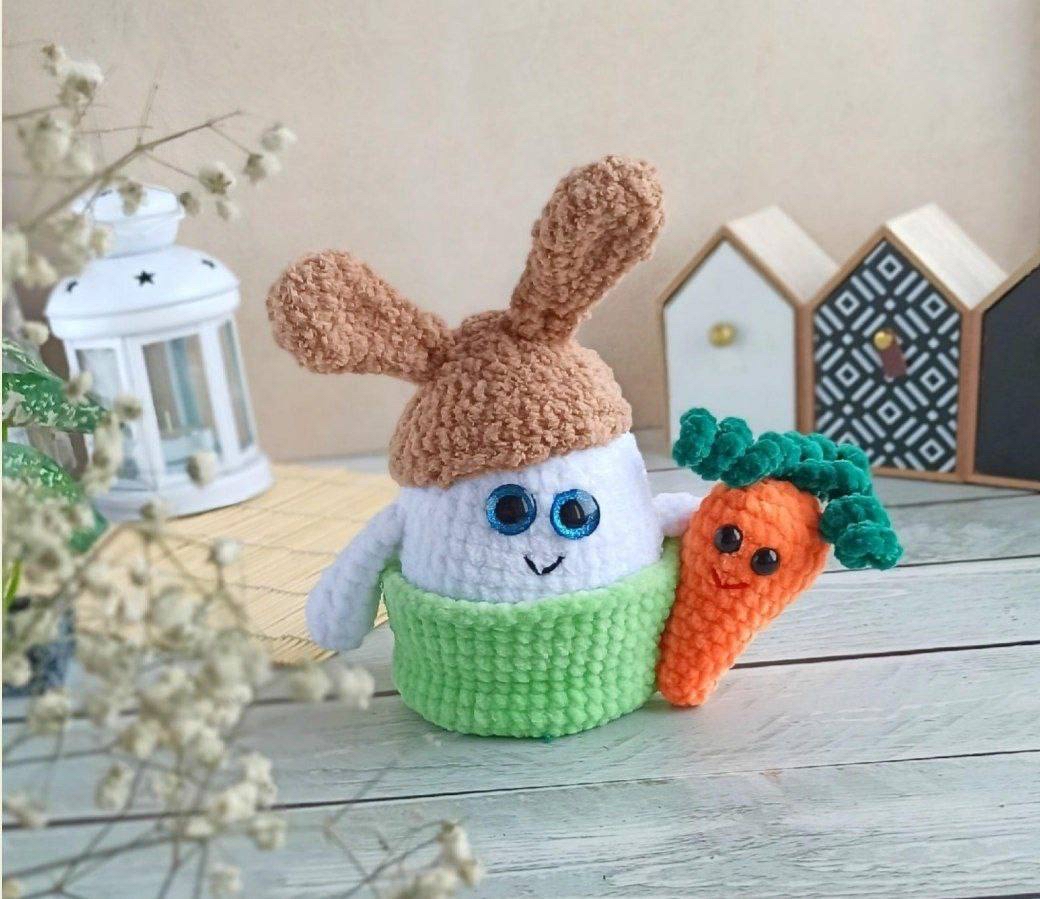
Are you looking for the perfect handmade touch to add to your spring decor this year? This free crochet Easter egg bunny pattern is an incredibly cute, beginner-friendly amigurumi project. Made with super bulky plush yarn, this adorable little egg character wears a cozy bunny hat, sits in its own custom-fit egg cup stand, and holds a sweet miniature carrot!
This completed plush stands about 5 inches tall (excluding the bunny ears), or up to 7.5 inches tall with the ears included. It is the perfect size for tiered trays, Easter baskets, or as a joyful desk companion. Grab your hook, settle into your favorite crafting chair, and let’s make some spring magic together!
Materials & Abbreviations
Before you begin, gather your supplies. To achieve the extra-soft, plush look shown in the photos, we recommend using a super bulky chenille-style yarn.
Yarn Requirements
- Body Color: Super Bulky Plush Yarn (Weight Category 6, approx. 130 yards per 3.5 oz) in White
- Hat Color: Textured Plush or Super Bulky Yarn in Beige/Taupe
- Cup/Stand Color: Super Bulky Plush Yarn in Lime Green
- Carrot Colors: Super Bulky Plush Yarn in Orange and Emerald Green
- Facial Details: Small amounts of medium weight (Category 4) cotton or acrylic yarn in Black and Red/Pink for embroidering the mouths
Tools & Notions
- Crochet Hook: Size E-4 or F-5 (3.5 mm) – use a smaller hook if needed to keep stitches tight so stuffing doesn’t show through
- Safety Eyes: One pair of 18 mm safety eyes (for the white egg)
- Carrot Eyes: Two 10 mm black half-beads or small safety eyes
- Stuffing: Premium polyester fiberfill
- Notions: Large-eye tapestry needle, stitch markers, scissors, and craft glue (for the carrot’s eyes if using half-beads)
Crochet Abbreviations (US Terms)
- MR: Magic Ring (Magic Loop)
- ch: Chain
- sc: Single crochet
- inc: Increase (work 2 single crochets into the same stitch)
- dec: Decrease (invisible decrease recommended)
- BLO: Back loops only
- st(s): Stitch(es)
- ( … ) * x: Repeat the instructions within parentheses x number of times
Step-by-Step Instructions
Step 1: The Arms (Make 2)
Using White yarn:
- Round 1: Work 6 sc into a MR (6)
- Round 2: (1 sc, inc) * 3 (9)
- Round 3: 9 sc (9)
- Round 4: dec, 7 sc (8)
- Round 5: dec, 6 sc (7)
- Round 6: dec, 5 sc (6)
- Rounds 7–8: 6 sc (6)
Do not stuff the arms. Fold the top of the arm flat and work 3 sc through both layers to close the opening. Fasten off and set aside; we will attach these directly to the body as we crochet.
Step 2: The Egg Body
Using White yarn:
- Round 1: Work 6 sc into a MR (6)
- Round 2: 6 inc (12)
- Round 3: (1 sc, inc) * 6 (18)
- Round 4: (2 sc, inc) * 6 (24)
- Round 5: (3 sc, inc) * 6 (30)
- Round 6: (4 sc, inc) * 6 (36)
- Round 7: (5 sc, inc) * 6 (42)
- Rounds 8–13: 42 sc (42)
- Round 14 (Joining the Arms): 9 sc, work 3 sc joining the first arm (crochet through both the arm’s top edge and the body stitches together), 18 sc, work 3 sc joining the second arm, 9 sc (42)
- Round 15: (5 sc, dec) * 6 (36)
- Rounds 16–17: 36 sc (36)
- Round 18: (4 sc, dec) * 6 (30)
- Round 19: 30 sc (30)
Eye Placement: Insert your 18 mm safety eyes between Rounds 16 and 17, leaving exactly 1 stitch of space between them. Secure the backings firmly inside.
- Round 20: (3 sc, dec) * 6 (24)
- Round 21: (2 sc, dec) * 6 (18)
- Round 22: 18 sc (18)
- Round 23: (1 sc, dec) * 6 (12)
- Round 24: 6 dec (6)
Stuff the egg firmly with fiberfill, ensuring it holds a classic egg shape. Using your tapestry needle, thread the yarn tail through the front loops of the remaining 6 stitches and pull tightly to close. Weave in the yarn end and hide it inside the body.
Step 3: The Bunny Hat & Ears
The Hat
Using Beige yarn:
- Round 1: Work 6 sc into a MR (6)
- Round 2: 6 inc (12)
- Round 3: (1 sc, inc) * 6 (18)
- Round 4: (2 sc, inc) * 6 (24)
- Round 5: (3 sc, inc) * 6 (30)
- Round 6: (4 sc, inc) * 6 (36)
- Round 7: (5 sc, inc) * 6 (42)
- Rounds 8–9: 42 sc (42)
Fasten off and weave in the ends.
The Ears (Make 2)
Using Beige yarn:
- Round 1: Work 6 sc into a MR (6)
- Round 2: 6 inc (12)
- Round 3: (2 sc, inc) * 4 (16)
- Round 4: 16 sc (16)
- Round 5: dec, 6 sc, dec, 6 sc (14)
- Round 6: dec, 5 sc, dec, 5 sc (12)
- Round 7: dec, 4 sc, dec, 4 sc (10)
- Rounds 8–10: 10 sc (10)
Do not stuff the ears. Fold the bottom opening of each ear flat and crochet the edges closed with 5 sc. Fasten off, leaving a long tail for sewing. Position and sew the ears to the top of the bunny hat.
Step 4: The Cup / Stand
Using Lime Green yarn:
- Round 1: Work 8 sc into a MR (8)
- Round 2: 8 inc (16)
- Round 3: (1 sc, inc) * 8 (24)
- Round 4: (2 sc, inc) * 8 (32)
- Round 5: (3 sc, inc) * 8 (40)
- Round 6: (4 sc, inc) * 8 (48)
- Round 7: Work 48 sc in BLO (this creates the sharp, flat edge for the bottom of the cup) (48)
- Rounds 8–15: 48 sc (48)
Fasten off, secure, and weave in your ends. The stand should sit flat and perfectly cradle the base of your plush egg.
Step 5: The Little Carrot
Carrot Body
Using Orange yarn:
- Round 1: Work 6 sc into a MR (6)
- Round 2: 6 sc (6)
- Round 3: 1 sc, inc, 2 sc, inc, 1 sc (8)
- Round 4: (3 sc, inc) * 2 (10)
- Round 5: 2 sc, inc, 4 sc, inc, 2 sc (12)
- Round 6: (5 sc, inc) * 2 (14)
- Round 7: 3 sc, inc, 6 sc, inc, 3 sc (16)
- Round 8: (7 sc, inc) * 2 (18)
- Round 9: 4 sc, inc, 8 sc, inc, 4 sc (20)
- Round 10: (9 sc, inc) * 2 (22)
- Round 11: 5 sc, inc, 10 sc, inc, 5 sc (24)
- Round 12: 24 sc (24)
- Round 13: (2 sc, dec) * 6 (18)
- Round 14: (1 sc, dec) * 6 (12)
- Round 15: 6 dec (6)
Stuff the carrot firmly. Thread your yarn tail through the remaining stitches, pull closed, and hide the tail inside.
Carrot Greens (Make 3)
Attach Emerald Green yarn directly to the top center of the carrot:
- Chain 13.
- Starting in the second chain from your hook, work 12 increases (2 single crochets in each chain stitch) back down to the base.
- Repeat this process to make 3 curly leaf strands. Fasten off and weave in the ends.
Finishing & Assembly
Embroidering the Faces
To bring your Easter egg bunny and carrot to life, we’ll add some sweet expressions:
- Egg Face: Use black cotton thread or embroidery floss to stitch a tiny, downward-pointing “V” mouth right between and slightly below the safety eyes. You can add small eyelashes or blush cheeks if desired!
- Carrot Face: Glue two 10 mm black half-beads (or sew small black buttons) onto the front of the carrot. Using black embroidery thread, stitch a cute little smile between the eyes.
Putting It All Together
- Place your completed white egg into the green cup stand.
- Pop the beige bunny hat onto the top of the egg. (You can sew the hat to the head if you’d like it to remain permanent, or keep it removable!).
- Nestle the sweet little carrot right next to the egg cup and sew it securely to the side of the green stand so your Easter bunny egg is always holding its favorite snack.
Tips for Success with Plush Amigurumi
- Tighten Your Tension: Chenille and plush yarns can be slippery but tend to work up loosely. Use a stitch marker and pull your yarn snugly to prevent any gaps where fiberfill might peek through.
- Invisible Decreases: When decreasing, work only through the front loops of the two stitches you are combining. This keeps the plush texture looking uniform and hides any bulky decrease seams.
- Avoid Shedding: Plush yarns can shed at the cut ends. When fastening off, you can singe the yarn tail very lightly with a lighter to seal the fibers, or tie a small, tight knot at the very end of the thread before weaving it in.
Your beautiful, soft Easter Egg Bunny is officially ready to display! Happy crocheting, and may your spring be filled with beautiful stitches!