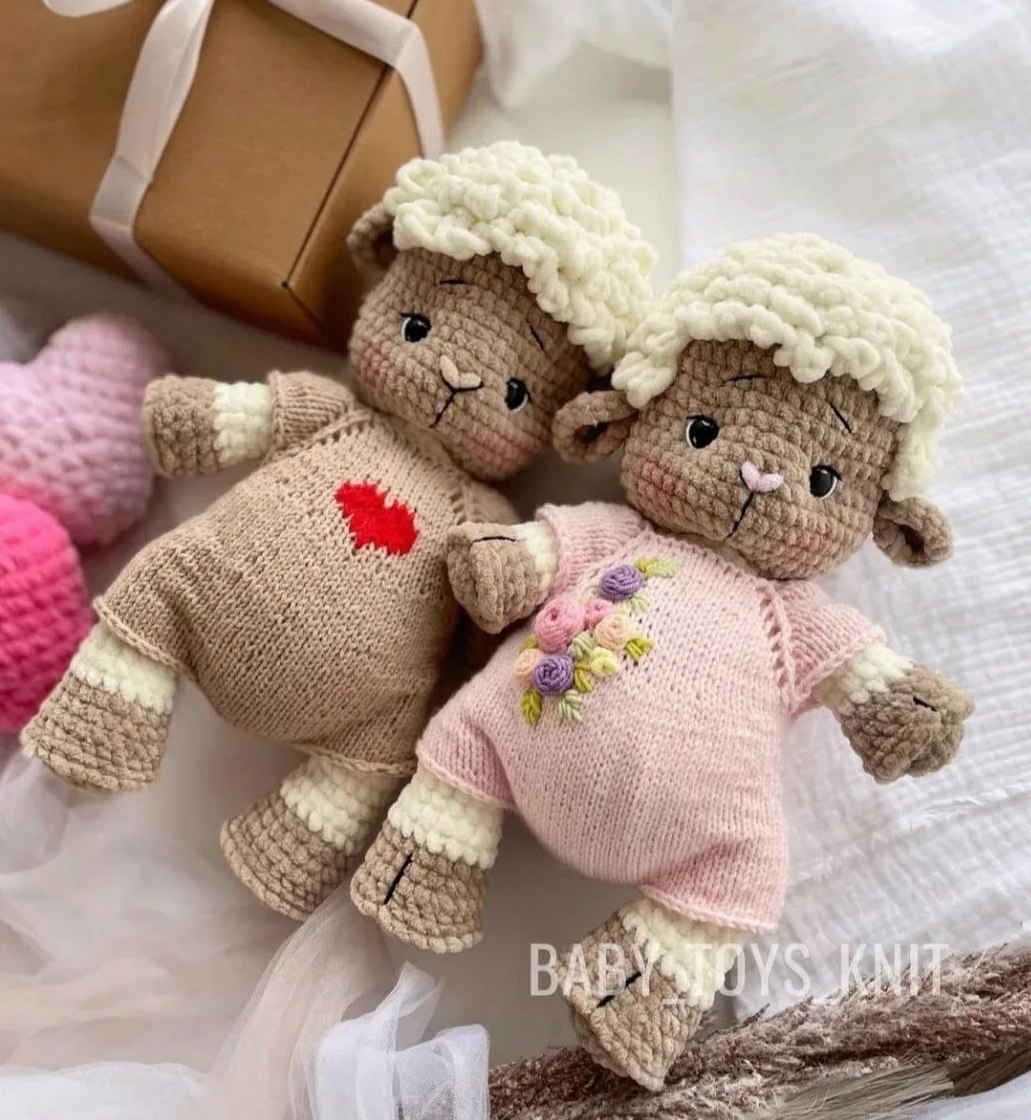
Adorable Plush Crochet Sheep Pattern: Free Amigurumi Lamb Tutorial
There is nothing quite as comforting as a soft, squishy plush toy, and this adorable crochet sheep is the ultimate cuddly companion! Made with super bulky plush chenille yarn, this friendly amigurumi lamb is incredibly soft, quick to make, and perfect for baby shower gifts, nursery decor, or a cozy new addition to your own collection.
In this comprehensive, beginner-friendly tutorial, we will walk you through how to crochet your very own plush sheep (with variations for both a girl sheep and a boy lamb). When using the recommended materials, your finished sweet sheep will stand at a huggable 12 to 12.5 inches tall.
Materials & Abbreviations
Supplies Needed
- Yarn: Super Bulky plush chenille yarn (Size 6, such as Himalaya Dolphin Baby or Premier Parfait XL)
- Main Color (Cream/Off-White): Approx. 110 yards (less than 1 skein)
- Secondary Color (Beige/Taupe for muzzle and feet): Approx. 65 yards (about half a skein)
- Crochet Hook: US E-4 (3.5 mm) size hook
- Safety Eyes: 14 mm safety eyes
- Stuffing: High-quality polyester fiberfill
- Notions: Tapestry needle with a large eye, sharp scissors, stitch markers, and a lighter (optional, to lightly singe the ends of the plush yarn to prevent shedding)
- Embroidery Details: Small amount of black and pink embroidery floss or fine cotton yarn for the facial features; cosmetic blush for the rosy cheeks
Abbreviations (US Crochet Terms)
- ch – chain
- sc – single crochet
- inc – single crochet increase (2 single crochets in the same stitch)
- dec – single crochet decrease (invisible decrease recommended)
- bpsc – back post single crochet
- sl st – slip stitch
- st(s) – stitch(es)
- Rnd – Round
- MR – Magic Ring
- * [number] – repeat instructions within the parentheses the indicated number of times
Step-by-Step Instructions
Head
Note: The head is crocheted using the Secondary Color (Beige).
- Rnd 1: Work 6 sc into a MR (6)
- Rnd 2: Work 6 inc (12)
- Rnd 3: *1 sc, inc* 6 times (18)
- Rnd 4: *2 sc, inc* 6 times (24)
- Rnd 5: *3 sc, inc* 6 times (30)
- Rnd 6: *4 sc, inc* 6 times (36)
- Rnd 7: *5 sc, inc* 6 times (42)
- Rnd 8: *6 sc, inc* 6 times (48)
- Rnd 9–14: Sc in each st around (48 sts for 6 rounds)
- Rnd 15: *7 sc, inc* 6 times (54)
- Rnd 16–18: Sc in each st around (54 sts for 3 rounds)
- Rnd 19: *7 sc, dec* 6 times (48)
- Rnd 20: *6 sc, dec* 6 times (42)
- Rnd 21: *5 sc, dec* 6 times (36)
- Rnd 22: *4 sc, dec* 6 times (30)
- Rnd 23: *3 sc, dec* 6 times (24)
Eye Placement: Insert the 14 mm safety eyes between Rounds 15 and 16. Ensure they are spaced 8 sc apart. Crucial Tip: Align the eyes so that the line of decreases runs right down the center between them. This naturally creates a slight, adorable muzzle bulge below the eyes.
Fasten off, leaving a short tail. Stuff the head firmly with fiberfill, distributing the stuffing evenly from the center out to the edges. Add extra stuffing to the lower part of the muzzle between the eyes to enhance the shape.
Upper Limbs (Arms) – Make 2
Start with the Secondary Color (Beige). Do not stuff the limbs completely to keep them soft and posable.
- Rnd 1: Work 6 sc into a MR (6)
- Rnd 2: Work 6 inc (12)
- Rnd 3: *1 sc, inc* 6 times (18)
- Rnd 4: Work 18 bpsc around (18). (This creates a clean, defined edge for the hoof!)
- Rnd 5: *4 sc, dec* 3 times (15)
- Rnd 6: *3 sc, dec* 3 times (12). On the last stitch, color change to the Main Color (Cream).
- Rnd 7–10: Sc in each st around (12 sts for 4 rounds)
- Stuffing: Lightly stuff only the lower half of the arm.
- Rnd 11: *2 sc, dec* 3 times (9)
- Rnd 12–13: Sc in each st around (9 sts for 2 rounds)
Fold the top opening flat and crochet across both sides together using 4 sc to seal the arm closed. Fasten off and cut the yarn, leaving a short tail.
Adding the Hoof Detail: Attach the Main Color (Cream) to the remaining loops of Round 4. Slip stitch loosely in each of the 18 stitches all the way around. Join with a slip stitch to the first stitch, pull the yarn through, knot securely, and hide the tails inside the arm.
Lower Limbs (Legs) – Make 2
Start with the Secondary Color (Beige).
- Rnd 1: Work 6 sc into a MR (6)
- Rnd 2: Work 6 inc (12)
- Rnd 3: *1 sc, inc* 6 times (18)
- Rnd 4: *2 sc, inc* 6 times (24)
- Rnd 5: Work 24 bpsc around (24)
- Rnd 6: *6 sc, dec* 3 times (21)
- Rnd 7: *5 sc, dec* 3 times (18)
- Rnd 8: Sc in each st around (18). On the last stitch, change color to the Main Color (Cream).
- Rnd 9: Sc in each st around (18)
- Rnd 10: *4 sc, dec* 3 times (15)
- Rnd 11–14: Sc in each st around (15 sts for 4 rounds)
- Stuffing: Lightly stuff the lower half of the leg.
- Rnd 15: *3 sc, dec* 3 times (12)
- Rnd 16–17: Sc in each st around (12 sts for 2 rounds)
Work 1 shift stitch (sc) to align the fold. Fold the top opening flat and crochet across both sides together using 6 sc to seal the leg closed. Fasten off and cut yarn.
Leg Hoof Detail: Just like with the arms, attach the Main Color (Cream) yarn to the remaining front loops of Round 5. Slip stitch loosely in all 24 stitches around, fasten off, and weave in your ends.
Ears – Make 2
Use the Secondary Color (Beige). Choose your ear style below:
For a Girl Sheep:
- Rnd 1: Work 6 sc into a MR (6)
- Rnd 2: Work 6 inc (12)
- Rnd 3: *3 sc, inc* 3 times (15)
For a Boy Lamb:
- Rnd 1: Work 6 sc into a MR (6)
- Rnd 2: Work 6 inc (12)
Fasten off, leaving a long tail for sewing. Fold the circular ear in half at the base and sew the first two stitches together to create a realistic pinched ear shape.
Body
Use the Main Color (Cream). You will join the legs and arms directly into the body as you crochet, saving you sewing time later!
- Rnd 1: Work 6 sc into a MR (6)
- Rnd 2: Work 6 inc (12)
- Rnd 3: *1 sc, inc* 6 times (18)
- Rnd 4: *2 sc, inc* 6 times (24)
- Rnd 5: *3 sc, inc* 6 times (30)
- Rnd 6: *4 sc, inc* 6 times (36)
- Rnd 7: *5 sc, inc* 6 times (42)
- Rnd 8: *6 sc, inc* 6 times (48)
- Rnd 9: *7 sc, inc* 6 times (54)
- Rnd 10: Sc in each st around (54)
- Rnd 11 (Joining the Legs): Crochet 6 sc through both the stitches of the first leg and the body, work 18 sc across the front of the body, crochet 6 sc through both the second leg and the body, work 24 sc across the back (54)
- Rnd 12: Sc in each st around (54)
- Rnd 13: *7 sc, dec* 6 times (48)
- Rnd 14: Sc in each st around (48)
- Rnd 15: *6 sc, dec* 6 times (42)
- Rnd 16: Sc in each st around (42)
- Rnd 17: *5 sc, dec* 6 times (36)
- Rnd 18: Sc in each st around (36)
Tip: Start stuffing the lower body firmly now. It gets much more difficult to pack stuffing down into the bottom of the body once the neck opening decreases further.
- Rnd 19: *4 sc, dec* 6 times (30)
- Rnd 20: Sc in each st around (30)
- Rnd 21: *3 sc, dec* 6 times (24)
- Rnd 22 (Joining the Arms): Work 2 sc, crochet 4 sc through both the first arm and the body, work 6 sc across the chest, crochet 4 sc through both the second arm and the body, work 8 sc across the back (24). (Adjust the starting alignment by a stitch or two if needed to make sure the arms are perfectly centered on the sides of the body.)
- Rnd 23: Sc in each st around (24)
Stuff the remainder of the body firmly. Fasten off, leaving a long, strong tail for sewing the head to the body.
Tail
Find the center-back of the lamb’s body between Rounds 8 and 9. Insert your hook under a stitch and pull up a loop of the Main Color (Cream).
Chain 7. Starting in the second chain from your hook, work 3 single crochets in each of the next 5 chains (this creates a cute, bouncy spiral shape). Work 1 single crochet in the very last chain. Slip stitch back into the body at the base of the tail. Fasten off, knot the tails securely, and hide the excess yarn ends deep inside the body.
Assembly & Finishing
Assembling the Pieces
First, sew the head onto the body. Make sure to pack extra fiberfill stuffing into the neck area right before finishing your last few stitches. This step is critical to ensure your lamb’s head does not tilt or flop!
Next, secure the arms and legs. To keep the limbs lying nicely against the body rather than sticking straight out, use matching thread or yarn to tack the inner sides of the limbs down to the body with a few small, hidden stitches.
Sewing the Ears
- For a Girl Sheep: Sew the ears at eye level (between Rounds 15 and 16), approximately 6 stitches away from the outer edge of each safety eye.
- For a Boy Lamb: Sew the ears higher up on the head, between Rounds 10 and 11, keeping them about 6 stitches away from the outer eye line.
Sculpting the Face
To give your sheep a soulful, expressive face, perform a simple eye indentation (eye sculpting). Thread a long tapestry needle with a strong thread or matching beige yarn. Insert the needle at the base of the neck, bring it out at the bottom-inner corner of the left eye, cross over to the bottom-inner corner of the right eye, and pull the needle back down to the neck base. Gently tug on both yarn ends to pull the eyes slightly inward, creating realistic eye sockets, and knot the ends securely at the neck.
Adding Plush Curls
The distinctive, fluffy wool coat is worked directly onto the head in a loose spiral. Use your Main Color (Cream) yarn.
Attach the yarn under a single crochet post near Round 1 at the top of the head. Chain 3, skip 1 single crochet on the head, and slip stitch into the next stitch. Repeat this sequence: [ch 3, skip 1, sl st] in a continuous spiral from Rounds 1 to 10.
Crucial Tip: Keep your tension very relaxed! The chains should be large and loose. If you pull the working yarn tightly, the curls will flatten. Keeping the yarn loose results in a thick, voluminous crown of fleece.
From Round 10 to Round 15, switch to working in rows (back-and-forth) to frame the face. Determine where you want the fleece to stop around the face (usually about 3 stitches away from the ears and eyes). Work the [ch 3, skip 1, sl st] pattern back and forth across the back and sides of the head down to Round 15. Fasten off and hide the tails inside the head.
Facial Embroidery & Details
- Eye Highlights: Using white yarn or embroidery floss, embroider a thin, crescent-shaped line along the outer lower edge of each safety eye. Add tiny, delicate eyelashes on the upper corners using thin black thread.
- Eyebrows: Embroider small, slanted eyebrows on Round 12 using a fine brown or black thread.
- Nose: Center a sweet “Y” shaped nose between the eyes around Round 17 using pink or dark brown embroidery floss.
- Cheeks: For a gorgeous finishing touch, dab a small blush brush into real cosmetic blush and gently sweep it onto the cheeks right underneath the eyes.
Bonus: Knitted Overalls Pattern
Give your lamb some extra charm by knitting a cozy pair of custom overalls! This pattern is designed for those who have basic knitting skills.
Overalls Materials
- Yarn: Sport weight yarn (such as YarnArt Jeans: 55% Cotton, 45% Acrylic)
- Knitting Needles: US size 1.5 to 2.5 (2.5 mm to 3 mm)
- Crochet Hook: US size 1.5 to 2.0 mm (for the back tie)
Knitting Abbreviations
- Edge st – Edge stitch (slip the first stitch of the row, purl the last stitch of the row)
- K – Knit
- P – Purl
- Yo – Yarn over
Overalls Instructions
Cast on 32 stitches.
- Row 0: Edge st, K30, Edge st (32 sts)
- Row 1: Edge st, *K4, Yo, K1, Yo*, K5, Yo, K1, Yo, K8, Yo, K1, Yo, K5, Yo, K1, Yo, K4, Edge st (40 sts)
- Row 2: Edge st, P38, Edge st (40 sts)
- Row 3: Edge st, *K5, Yo, K1, Yo*, K7, Yo, K1, Yo, K10, Yo, K1, Yo, K7, Yo, K1, Yo, K5, Edge st (48 sts)
- Row 4: Edge st, P46, Edge st (48 sts)
- Row 5: Edge st, *K6, Yo, K1, Yo*, K9, Yo, K1, Yo, K12, Yo, K1, Yo, K9, Yo, K1, Yo, K6, Edge st (56 sts)
- Row 6: Edge st, P54, Edge st (56 sts)
- Row 7: Edge st, *K7, Yo, K1, Yo*, K11, Yo, K1, Yo, K14, Yo, K1, Yo, K11, Yo, K1, Yo, K7, Edge st (64 sts)
- Row 8: Edge st, P62, Edge st (64 sts)
- Row 9: Edge st, *K8, Yo, K1, Yo*, K13, Yo, K1, Yo, K16, Yo, K1, Yo, K13, Yo, K1, Yo, K8, Edge st (72 sts)
- Row 10: Edge st, P70, Edge st (72 sts)
- Row 11: Edge st, *K9, Yo, K1, Yo*, K15, Yo, K1, Yo, K18, Yo, K1, Yo, K15, Yo, K1, Yo, K9, Edge st (80 sts)
- Row 12: Edge st, P78, Edge st (80 sts)
- Row 13: Edge st, *K10, Yo, K1, Yo*, K17, Yo, K1, Yo, K20, Yo, K1, Yo, K17, Yo, K1, Yo, K10, Edge st (88 sts)
- Row 14: Edge st, P86, Edge st (88 sts)
- Row 15: Edge st, *K11, Yo, K1, Yo*, K19, Yo, K1, Yo, K22, Yo, K1, Yo, K19, Yo, K1, Yo, K11, Edge st (96 sts)
- Row 16: Edge st, P94, Edge st (96 sts)
- Row 17 (Dividing Row): Edge st, K12, bind off 22 sleeve stitches, K26, bind off 22 sleeve stitches, K12, Edge st (52 sts remaining on needle)
- Row 18: Edge st, P50, Edge st (52 sts)
- Row 19 (Increases): Edge st, *K1, Yo, K2, Yo, K2, Yo…* repeat across to last st, K1, Edge st (77 sts)
Divide the stitches onto 4 double-pointed needles (or use the magic loop method) and join to begin knitting in the round. Work entirely in Knit stitches for Rounds 20 through 39 (77 sts).
Check the fit of the overalls on your toy. You may need to add or subtract a few rounds depending on your unique knitting tension to reach the base of the tail.
To make room for the tail: In Round 40, bind off the center 4 stitches at the back. In Round 41, cast on 4 new stitches over the gap to replace them. Continue knitting in the round for an additional 15 rounds. Bind off all stitches. Sew the crotch seam closed between the legs and weave in all yarn ends.
Drawstring: Using a crochet hook, chain 100. Thread this chain in a zigzag fashion through the back opening of the overalls, tying the ends into a neat bow to secure.
Pro Tips for Working with Plush Yarn
- Keep Your Stitches Even: Plush yarn can hide small stitch inconsistencies, but it can be hard to see your stitch loops. Use your fingers to feel for the next stitch opening, and always use a stitch marker at the beginning of every round.
- Prevent Yarn Shedding: Cut ends of chenille yarn tend to shed fiber easily. Use a lighter to very gently melt the cut tip of the yarn tail. This fuses the fibers and locks them to the core thread.
- Adjusting the Curls: If you find the chain-3 loop curls are too small or tight, try upgrading to a chain-4 loop or using a slightly larger hook (like a 4.0 mm) specifically for the curly hair section to give it an extra fluffy boost.