Easy Crochet Zebra Pattern: A Step-by-Step Amigurumi Tutorial
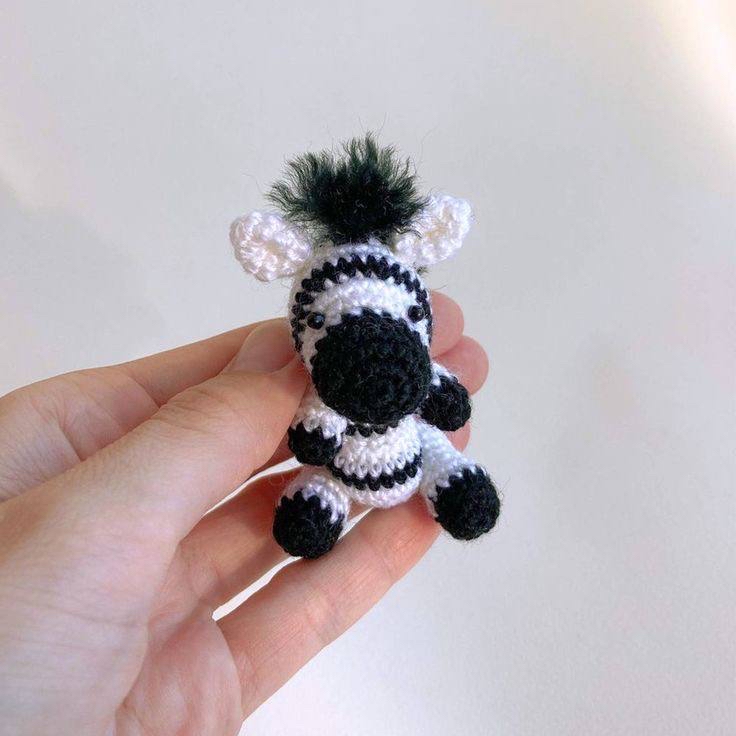
Are you looking for a quick, adorable project to add to your crochet collection? This miniature crochet zebra is the perfect solution! Whether you are looking to create a unique gift for a child, a charming desk companion, or simply want to practice your amigurumi skills, this little striped friend is a joy to make. This project is small enough to be finished in an afternoon but detailed enough to look professional and high-end.
Amigurumi, the Japanese art of knitting or crocheting small, stuffed yarn creatures, is all about texture and personality. With this zebra pattern, we use high-contrast black and white yarn to create that iconic striped look. Because this is a micro-amigurumi project, it’s a fantastic way to practice tight tension and precise color changes. Let’s grab our hooks and get started on this safari adventure!
Materials & Abbreviations
To ensure your zebra turns out perfectly, it is important to use the right tools. Since this is a small project, I recommend using a smaller hook than usual to keep your stitches tight so the stuffing doesn’t peek through.
What You Will Need
- Yarn: Cotton or a wool-blend yarn works best for definition. You will need approximately 415 yards (380 m) of fingering weight yarn in two colors: Black and White.
- Crochet Hook: 1.5 mm (or the size needed to achieve a very tight fabric).
- Eyes: 3 mm plastic safety eyes.
- Stuffing: High-quality polyester fiberfill.
- Tools: A sewing needle (tapestry needle), pins, scissors, and a small amount of glue for the eyes.
Abbreviations (US Terms)
Please note that this pattern uses standard US crochet terminology. If you are used to UK terms, please be sure to convert them before beginning!
- MR: Magic Ring (or Magic Circle)
- ch: Chain
- sc: Single Crochet
- inc: Increase (2 sc in the same stitch)
- dec: Decrease (sc 2 stitches together)
- slst: Slip Stitch
- BLO: Back Loop Only
Step-by-Step Instructions
The Head
The head features a beautiful striped pattern. To achieve this, follow the color change instructions closely. Remember, when changing colors, do not cut the previous color’s thread unless specifically instructed; instead, simply pull the new color through the last loop of the previous stitch.
Start with Black yarn.
- Round 1: 6 sc in MR (6)
- Round 2: 6 inc (12)
- Round 3: (1 sc, inc) * 6 (18)
- Rounds 4-5: 18 sc (2 rounds total)
- Change to White (do not cut the black thread).
- Round 6: 18 sc
- Round 7: 7 sc, 4 inc, 7 sc (22)
- Round 8: 7 sc, 1 inc, 6 sc, 1 inc, 7 sc (24)
- Change to Black (do not cut the white thread).
- Round 9: (3 sc, inc) * 6 (30)
- Change to White.
- Rounds 10-12: 30 sc (3 rounds total)
- Change to Black.
- Round 13: (3 sc, dec) * 6 (24)
- Change to White.
- Round 14: (2 sc, dec) * 6 (18)
- Stuff the head firmly with fiberfill.
- Round 15: (1 sc, dec) * 6 (12)
- Round 16: 6 dec
Fasten off the yarn, secure the thread, and weave in the ends carefully.
The Body
The body is slightly larger than the head to give your zebra a cute, sturdy stance.
Start with Black yarn.
- Round 1: 6 sc in MR (6)
- Round 2: 6 inc (12)
- Change to White (do not cut the black thread).
- Round 3: (1 sc, inc) * 6 (18)
- Round 4: (2 sc, inc) * 6 (24)
- Round 5: 24 sc
- Change to Black (do not cut the white thread).
- Round 6: 24 sc
- Change to White.
- Round 7: 24 sc
- Round 8: 6 dec, (1 sc, dec) * 4 (14)
- Round 9: 14 sc
- Change to Black.
- Round 10: 14 sc
- Change to White.
- Round 11: 14 sc
- Round 12: (5 sc, dec) * 2 (12)
- Round 13: 12 sc
Leave a long tail for sewing. Stuff the body firmly before closing.
The Ears (Make 2)
Use White yarn.
- Round 1: 6 sc in MR (6)
- Round 2: (1 sc, inc) * 3 (9)
- Round 3: (2 sc, inc) * 3 (12)
- Round 4: 12 sc
- Round 5: (2 sc, dec) * 3 (9)
Fold the ears in half and sew the edges together. Leave a long tail for sewing the ears onto the head later.
The Legs (Make 2)
Start with Black yarn.
- Round 1: 6 sc in MR (6)
- Round 2: 6 inc (12)
- Round 3: 12 sc in BLO (Back Loop Only)
- Change to White.
- Rounds 4-5: 12 sc (2 rounds total)
- Round 6: (2 sc, dec) * 3 (9)
- Rounds 7-10: 9 sc (4 rounds total)
Stuff the legs lightly. Tighten the opening, secure the thread, and weave in the ends.
The Arms (Make 2)
Start with Black yarn.
- Round 1: 6 sc in MR (6)
- Round 2: (1 sc, inc) * 3 (9)
- Change to White.
- Rounds 3-4: 9 sc (2 rounds total)
- Round 5: (1 sc, dec) * 3 (6)
- Rounds 6-7: 6 sc (2 rounds total)
Stuff the arms. Tighten the opening, secure the thread, and weave in the ends.
The Tail
Use White yarn.
Chain 11. Starting from the second chain from the hook, work 10 slip stitches (slst) into each chain. At the end of the tail, attach your black yarn and create a small tassel to give the tail some movement and character.
Finishing
Assembly
Now comes the most important part: bringing your zebra to life! Use your sewing needle and the tails you left from each piece to join everything together.
- Ears: Sew the ears onto the head at rounds 11 and 12. Ensure there are 6 sc between the two ears for a centered look.
- Eyes: Glue your 3 mm safety eyes between rounds 7 and 8 of the head. For the best look, place them on the outer edges of the increases from round 7.
- Head to Body: Sew the head onto the body securely.
- Arms: Attach the arms using a thread-attachment method (or sew them) approximately 1 round below the seam where the head meets the body.
- Legs: Attach the legs to the sides of the body between rounds 4 and 5.
- The Mane: This is what makes your zebra special! Cut several strands of black yarn to your desired length. Thread 2 strands through each round of the head, starting with the round between the ears. Continue threading through the middle of the head down to where the head meets the body. Finally, take a fine-tooth comb and gently brush/comb the yarn strands to create a fluffy, realistic mane.
- Tail: Sew the tail onto the back of the body between rounds 4 and 5.
Tips
To make your amigurumi look professional, keep these tips in mind:
- Tension is Key: If you see gaps between your stitches, your tension might be too loose. Try using a smaller hook to ensure the stuffing stays hidden.
- Color Changes: To get clean color changes, always pull the new color through the very last loop of the stitch *before* the change. This creates a seamless transition.
- Safety First: If you are making this for a small child, please consider embroidering the eyes with black yarn instead of using plastic safety eyes to prevent any choking hazards.
- The Mane Trick: When combing the mane, do it in small sections to avoid pulling too hard on your crochet stitches. This will give you that perfect, soft texture.