Cute Amigurumi Hippo Crochet Pattern: A Step-by-Step Tutorial
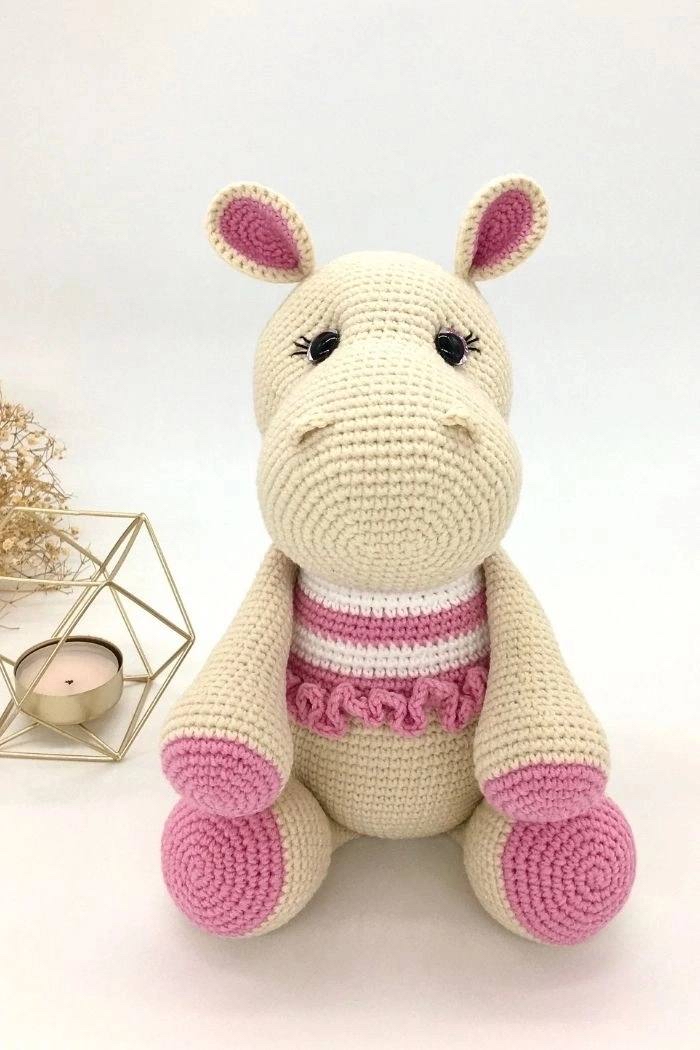
If you are looking for your next adorable amigurumi project, look no further! This little hippo is absolutely darling, with a sweet expression and a charming pink-and-white striped skirt. Whether you are making this as a nursery decoration, a gift for a little one, or simply a treat for yourself, this hippo is sure to bring a smile to everyone’s face.
This pattern is designed to be beginner-friendly for those with intermediate crochet skills. We will be working in continuous rounds, which is the standard for amigurumi to ensure a seamless look. Follow along closely, and before you know it, you’ll have a chunky, lovable hippo sitting on your shelf!
Materials & Abbreviations
To ensure your hippo turns out exactly like the photos, I recommend using a smooth cotton-blend yarn. This provides great stitch definition, which is essential for amigurumi.
What You Will Need
- Yarn: Fine Sport weight yarn (55% cotton, 45% acrylic). You will need:
- 2 balls of Beige (Color 05)
- 1 ball of Pink (Color 20)
- 1 ball of White (Color 62)
- A small scrap of Black yarn (for embroidering eyelashes)
- Crochet Hook: 2.5 mm (B/1). If you use a different yarn weight, please adjust your hook size accordingly, but I recommend staying a size smaller than the yarn recommends for a tight tension.
- Safety Eyes: 12 mm safety eyes.
- Stuffing: Polyester fiberfill.
- Other Tools: Scissors, a tapestry needle, and stitch markers.
Safety Note: If you are making this for a child under 3 years old, please use embroidered eyes instead of plastic safety eyes to avoid any choking hazards.
Abbreviations (US Terms)
- MR: Magic Ring
- CH: Chain
- ST: Stitch
- SC: Single Crochet
- HDC: Half Double Crochet
- DC: Double Crochet
- TR: Treble Crochet
- SL: Slip Stitch
- INC: Increase (2 SC in one stitch)
- L INC: Large Increase (3 SC in one stitch)
- DEC: Decrease
- INV DEC: Invisible Decrease
- BLO: Back Loop Only
- FO: Fasten Off
- {…}: The number in brackets indicates the total stitch count at the end of the round.
Step-by-Step Instructions
The Ears
The ears are made by crocheting two separate circles and then joining them together to create a folded effect.
Instructions for both the inner and outer ear:
- R1: MR, 6 SC in ring {6}
- R2: INC in each ST {12}
- R3: (SC, INC) x 6 {18}
- R4: SC in next ST, SL, (SC in next 2 ST, INC) x 5, SC in next ST {24}
- R5 (Inner ear only): (SC in next 3 ST, INC) x 6 {30}. Fasten off and weave in the end.
- R5 (Outer ear only): (SC in next 3 ST, INC) x 6 {30}
- R6 (Outer ear only): SC in each ST around {30}. Do NOT fasten off; you will use this thread to join the circles.
To join the ears: Place the inner circle on top of the outer circle (wrong sides facing each other). Working with the outer ear’s thread, SC through both the beige and pink stitches around the entire circumference {30}. To shape the ear, fold it in half and sew the two sides together, leaving one side open.
The Head
The head is worked from the front toward the back. This part includes a special eye-sculpting technique to give the hippo its expressive look.
- R1: CH 6 {6}
- R2: SC in 2nd CH from hook, through back loops of each CH, now work on the opposite side of the chain: INC, DC in next 3 ST, INC {12}
- R3: INC, SC in next 3 ST, INC, SC in next 3 ST, INC in last 2 ST {18}
- R4: (SC, INC) x 1, SC in next 3 ST, (SC, INC) x 3, SC in next 3 ST, (SC, INC) x 2 {24}
- R5: (SC, INC) x 1, SC in next 3 ST, (SC, INC) x 3, SC in next 3 ST, (SC, INC) x 2, SC in last ST {30}
- R6: (SC in next 3 ST, INC) x 1, SC in next 3 ST, (SC in next 3 ST, INC) x 3, SC in next 3 ST, (SC in next 3 ST, INC) x 2 {36}
- R7: (SC in next 2 ST, INC) x 1, SC in next 3 ST, (SC in next 4 ST, INC) x 3, SC in next 3 ST, (SC in next 4 ST, INC) x 2, SC in last 2 ST {42}
- R8: (SC in next 5 ST, INC) x 1, SC in next 3 ST, (SC in next 5 ST, INC) x 3, SC in next 3 ST, (SC in next 5 ST, INC) x 2 {48}
- R9: (SC in next 3 ST, INC) x 1, SC in next 3 ST, (SC in next 6 ST, INC) x 3, SC in next 3 ST, (SC in next 6 ST, INC) x 2, SC in last 3 ST {54}
- R10: (SC in next 7 ST, INC) x 1, SC in next 3 ST, (SC in next 7 ST, INC) x 3, SC in next 3 ST, (SC in next 7 ST, INC) x 2 {60}
- R11: (SC in next 4 ST, INC) x 1, SC in next 3 ST, (SC in next 8 ST, INC) x 3, SC in next 3 ST, (SC in next 8 ST, INC) x 2, SC in last 4 ST {66}
- R12-R19: SC in each ST around {66}
- R20: (SC in next 9 ST, DEC) x 6 {60}
- R21: SC in next 4 ST, DEC, (SC in next 8 ST, INV DEC) x 5, SC in next 4 ST {54}
- R22: (SC in next 7 ST, DEC) x 6 {48}
- R23: SC in next ST, HDC, (SC in next 5 ST, HDC) x 3, SC in next 7 ST, HDC, (SC in next 6 ST, HDC) x 2, SC in next 6 ST {55}
- R24: SC in next 2 ST, HDC, (SC in next 6 ST, HDC) x 3, SC in next 8 ST, HDC, (SC in next 7 ST, HDC) x 2, SC in next 6 ST {62}
- R25: SC in next 3 ST, INC, (SC in next 7 ST, INC) x 3, SC in next 9 ST, DEC, (SC in next 8 ST, INC) x 2, SC in next 6 ST {69} – Place a stitch marker at the start of R25 to help with eye placement.
- R26: SC in next 4 ST, INC, (SC in next 8 ST, INC) x 3, SC in next 37 ST {73}
- R27: SC in each ST around {73}
- R28: SC in next 46 ST, HDC, (SC in next 9 ST, HDC) x 2, SC in next 6 ST {76}
- R29-R35: SC in each ST around {76}
- R36: (SC in next 17 ST, DEC) x 4 {72}
- R37: SC in each ST around {72}
- R38: SC in next 5 ST, DEC, (SC in next 10 ST, DEC) x 5, SC in next 5 ST {66}
- R39: (SC in next 9 ST, DEC) x 6 {60}
- R40: SC in each ST around {60}
- R41: SC in next 4 ST, DEC, (SC in next 8 ST, INV DEC) x 5, SC in next 4 ST {54}
- R42: (SC in next 7 ST, DEC) x 6 {48}
- R43: SC in next 3 ST, DEC, (SC in next 6 ST, DEC) x 5, SC in next 3 ST {42}
- R44: (SC in next 5 ST, DEC) x 6 {36}
- R45: SC in next 2 ST, DEC, (SC in next 4 ST, DEC) x 5, SC in next 2 ST {30}
- R46: (SC in next 3 ST, DEC) x 6 {24}
- R47: SC in next ST, DEC, (SC in next 2 ST, INV DEC) x 5, SC in next ST {18}
- R48: (SC in next ST, DEC) x 6 {12}
- R49: SC in each ST around {12}
Eye Sculpting Technique: Before stuffing the head completely, use a long piece of black yarn and a needle to create the eye sockets. Remove the safety eyes temporarily. Insert the needle near the eye hole, pull the yarn through to the inside, then re-insert it near the other eye hole and pull tight. Repeat this 3 times to create a deep indentation. Once satisfied, re-insert the safety eyes and add more stuffing.
FO: Fasten off and weave in ends. You can now finish the head by adding the nostrils (see Assembly).
The Body and Skirt
The body is worked from the bottom up. Be mindful of the color changes!
- R1: MR, 6 SC in ring {6}
- R2: INC in each ST {12}
- R3: (SC, INC) x 6 {18}
- R4: SC in next ST, DEC, (SC in next 2 ST, INC) x 5, SC in next ST {24}
- R5: (SC in next 3 ST, INC) x 6 {30}
- R6: (SC in next 2 ST, INC), (SC in next 4 ST, INC) x 5, SC in next 2 ST {36}
- R7: (SC in next 5 ST, INC) x 6 {42}
- R8: (SC in next 3 ST, INC), (SC in next 6 ST, INC) x 5, SC in next 3 ST {48}
- R9: (SC in next 7 ST, INC) x 6 {54}
- R10: (SC in next 4 ST, HDC), (SC in next 8 ST, HDC) x 5, SC in next 4 ST {60}
- R11: (SC in next 9 ST, INC) x 6 {66}
- R12: (SC in next 5 ST, INC), (SC in next 10 ST, INC) x 5, SC in next 5 ST {72}
- R13: SC in each ST around {72}
- R14: (SC in next 11 ST, INC) x 6 {78}
- R15: SC in each ST around {78}
- R16: (SC in next 6 ST, HDC), (SC in next 12 ST, HDC) x 5, SC in next 6 ST {84}
- R17-R22: SC in each ST around {84}
- R23: (SC in next 6 ST, DEC), (SC in next 12 ST, DEC) x 5, SC in next 6 ST {78}
- R24-R25: SC in each ST around {78}
- R26: (SC in next 11 ST, DEC) x 6 {72}
Color Change: Switch to Pink after R26.
- R27: SC in each ST around {72}
- R28: SC in each ST around in BLO {72}
Color Change: Switch to White after the first stitch of R30.
- R29: SC in next 5 ST, DEC, (SC in next 10 ST, DEC) x 5, SC in next 5 ST {66}
- R30: SC in each ST around {66}
- R31: SC in each ST around {66}
- R32: (SC in next 9 ST, DEC) x 6 {60}
Stuff the body firmly now.
Color Change: Switch to Pink after the second stitch of R33.
- R33: SC in each ST around {60}
- R34: (SC in next 4 ST, DEC), (SC in next 8 ST, INV DEC) x 5, SC in next 4 ST {54}
- R35: SC in each ST around {54}
Color Change: Switch to White after the second stitch of R36.
- R36: (SC in each ST around) {54}
- R37: (SC in next 7 ST, DEC) x 6 {48}
- R38: SC in each ST around {48}
Color Change: Switch to Pink after the third stitch of R39.
- R39: (SC in each ST around) {48}
- R40: SC in each ST around {48}
- R41: (SC in next 3 ST, DEC), (SC in next 6 ST, DEC) x 5, SC in next 3 ST {42}
Color Change: Switch to White after the third stitch of R42.
- R42: (SC in each ST around) {42}
- R43-R44: SC in each ST around {42}
Color Change: Switch to Pink after the third stitch of R45.
- R45: (SC in each ST around) {42}
- R46: (SC in next 5 ST, DEC) x 6 {36}
- R47: SC in each ST around {36}
FO: Fasten off, leaving a long tail for sewing.
The Skirt
The skirt is worked by attaching new yarn to the front loops of R28 of the body.
- R1: SC in each ST around {72}
- R2: CH 3, 3 DC in the first stitch, (4 DC in each ST around), SL in the top of the starting chain {72}
FO: Fasten off and weave in ends.
The Arms
Worked from bottom up.
- R1: MR, 6 SC in ring {6}
- R2: INC in each ST {12}
- R3: (SC, INC) x 6 {18}
- R4: SC in next ST, DEC, (SC in next 2 ST, INC) x 5, SC in next ST {24}
- R5: (SC in next 3 ST, INC) x 6 {30}
- R6: (SC in next 2 ST, INC), (SC in next 4 ST, INC) x 5, SC in next 2 ST {36}
Color Change: Switch to Beige.
- R7-R10: SC in each ST around {36}
- R11: (SC in next 2 ST, DEC), (SC in next 4 ST, DEC) x 5, SC in next 2 ST {30}
- R12: (SC in next 3 ST, DEC) x 6 {24}
- R13-R14: SC in each ST around {24}
Stuff the arms.
- R15: (SC in next 3 ST, DEC), (SC in next 6 ST, DEC) x 2, SC in next 3 ST {21}
- R16-R17: SC in each ST around {21}
- R18: (SC in next 5 ST, DEC) x 3 {18}
- R19-R21: SC in each ST around {18}
- R22: INV DEC, SC in next 16 ST {17}
- R23-R24: SC in each ST around {17}
Stop stuffing.
- R25: INC, DEC, SC in next 15 ST {16}
- R26-R27: SC in each ST around {16}
- R28: (SC in next 14 ST, DEC) {15}
- R29-R30: SC in each ST around {15}
- R31: INV DEC, SC in next 13 ST {14}
- R32-R33: SC in each ST around {14}
- R34: SC in next 3 ST, then SC through both the next two stitches to close {14}
FO: Leave a long tail for sewing.
The Legs
Worked from bottom up.
- R1: MR, 6 SC in ring {6}
- R2: INC in each ST {12}
- R3: (SC, INC) x 6 {18}
- R4: SC in next ST, DEC, (SC in next 2 ST, INC) x 5, SC in next ST {24}
- R5: (SC in next 3 ST, INC) x 6 {30}
- R6: (SC in next 2 ST, INC), (SC in next 4 ST, INC) x 5, SC in next 2 ST {36}
- R7: (SC in next 5 ST, INC) x 6 {42}
- R8: (SC in next 13 ST, INC) x 3 {45}
Color Change: Switch to Beige.
- R9-R12: SC in each ST around {45}
- R13: (SC in next 13 ST, DEC) x 3 {42}
- R14: SC in each ST around {42}
- R15: (SC in next 5 ST, DEC) x 6 {36}
Stuff the legs.
- R16: SC in each ST around {36}
- R17: (SC in next 2 ST, DEC), (SC in next 4 ST, DEC) x 5, SC in next 2 ST {30}
- R18: SC in each ST around {30}
- R19: (SC in next 3 ST, DEC) x 6 {24}
- R20: SC in each ST around {24}
- R21: (SC in next 3 ST, DEC), (SC in next 6 ST, DEC) x 2, SC in next 3 ST {21}
- R22: SC in each ST around {21}
- R23: (SC in next 5 ST, DEC) x 3 {18}
- R24: SC in each ST around {18}
- R25: INV DEC, SC in next 16 ST {17}
- R26: SC in each ST around {17}
- R27: INC, DEC, SC in next 15 ST {16}
- R28-R31: SC in each ST around {16}
- R32: SC through the next two stitches together to close {16}
FO: Leave a long tail for sewing.
The Tail
- R1: MR, 6 SC in ring {6}
- R2: (SC, INC) x 3 {9}
- R3: SC in each ST around {9}
- R4: SC in next ST, INC, (SC in next 2 ST, INC) x 2, SC in next ST {12}
- R5: SC in each ST around {12}
- R6: (SC in next 3 ST, INC) x 3 {15}
- R7-R8: SC in each ST around {15}
- R9: (SC in next 2 ST, HDC), (SC in next 4 ST, HDC) x 2, SC in next 2 ST {18}
- R10: SC in each ST around {18}
- R11: (SC in next 5 ST, INC) x 3 {21}
- R12-R13: SC in each ST around {21}
FO: Leave a long tail. Stuff lightly so the tail stays relatively flat.
Finishing
Nostrils and Eyelashes
To give your hippo personality, we will embroider the nostrils and eyelashes.
Nostrils: Using the head as a guide, mark the positions between R12 and R14. Using black yarn, stitch two small lines. One nostril is between ST 4 and 9 of R12; the second is between ST 17 and 22 of R12.
Eyelashes: Using a long piece of black yarn, embroider delicate lashes just above the eyes to enhance the cute expression.
Assembly Guide
Now comes the most important part: putting your hippo together! I recommend using large head pins to mark everything before you start sewing.
- Ears to Head: Attach the ears to the head between R36 and R39. Ensure they look symmetrical from both the front and the back.
- Body to Head: Sew the body to the head. The body should be centered at the back of the head. You may need to add more stuffing during this step to ensure a seamless connection.
- Arms to Body: Attach the arms to the body at approximately a 45-degree angle facing forward. Position them between R36 and R42 of the body.
- Legs to Body: Turn the body upside down. Attach the legs to the bottom of the body (between R2 and R10 of the body). A good trick is to sit the hippo down and adjust the legs until they look perfect.
- Tail to Body: Attach the tail to the center of the lower back, between R13 and R19.
Tips
- Tension is Key: Keep your stitches tight, especially when working on amigurumi, to prevent the stuffing from showing through.
- Use Pins: Always use stitch markers and large pins when assembling. It is much easier to move a pin than it is to unpick a seam!
- Stuffing: Stuff your pieces firmly but avoid overstuffing, which can distort the shape of the crochet work.
- Color Changes: When changing colors, try to do so at the end of a stitch to ensure the stripes look clean and professional.