How to Crochet a Cute Rudolph Reindeer: A Detailed Amigurumi Tutorial
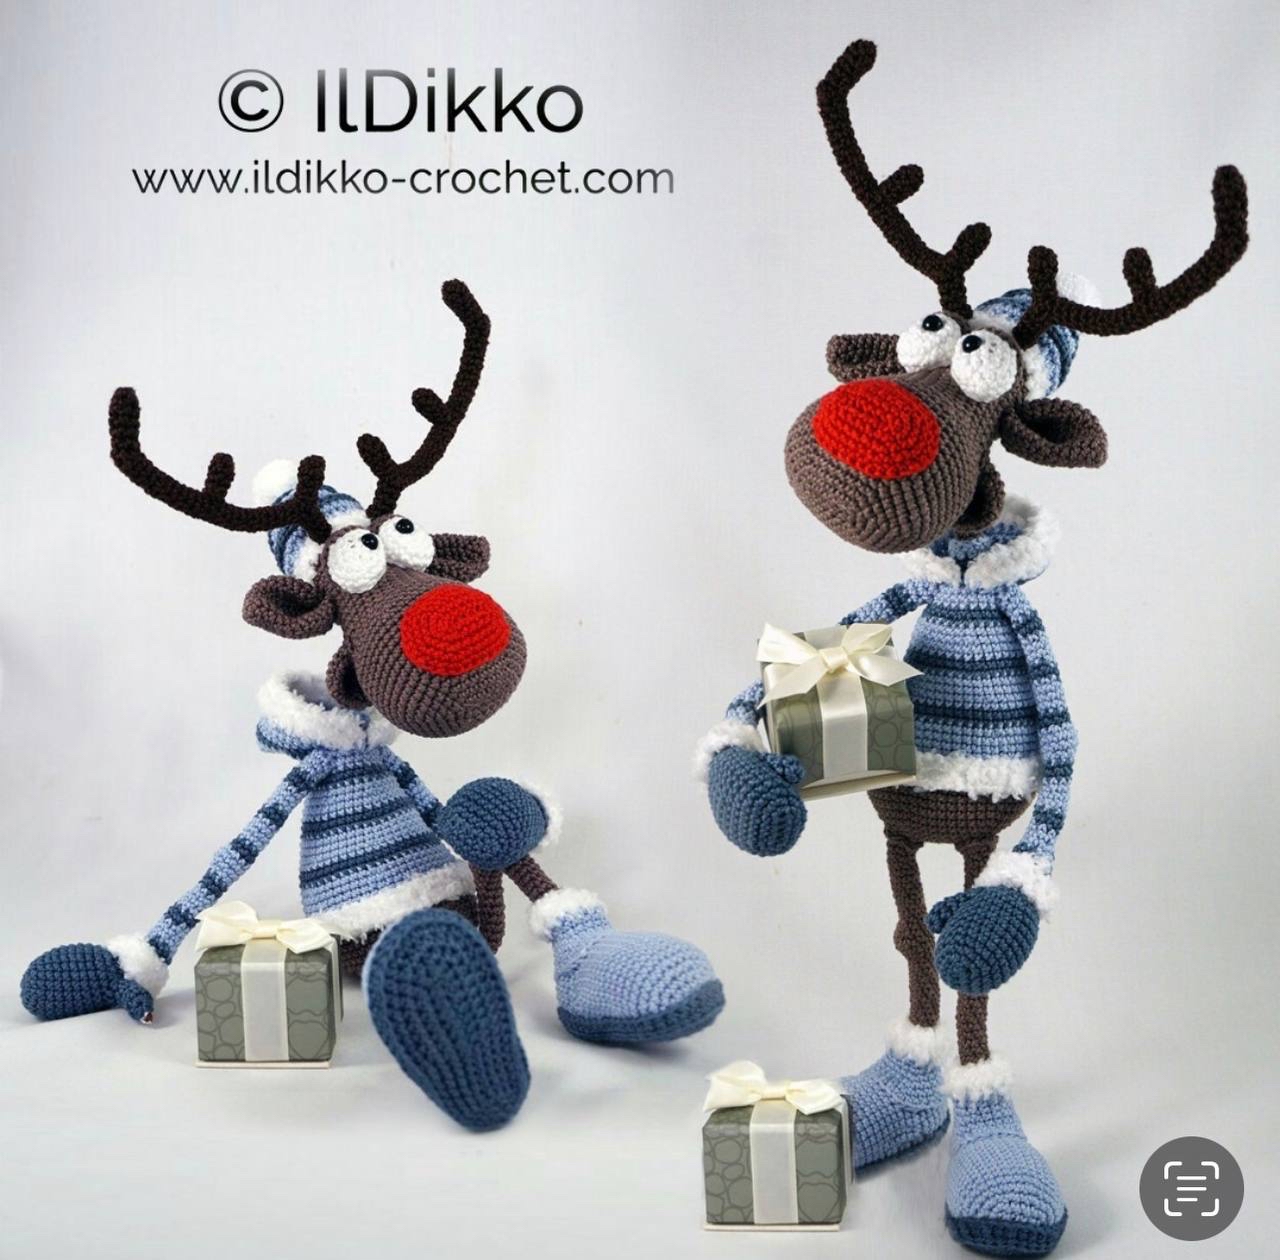
Are you looking for the perfect holiday crochet project to brighten up your home or to give as a handmade gift? Look no further! This adorable Rudolph the Reindeer amigurumi is a festive standout. With his cozy striped sweater, tiny hat, and iconic red nose, he is sure to bring a smile to anyone’s face. Whether you are a seasoned amigurumi artist or a beginner looking for a fun challenge, this step-by-step guide will walk you through every single stitch to create your very own holiday companion.
This pattern is designed to create a large, poseable reindeer measuring approximately 17-18 inches tall. Because we use a wire armature, you can pose him sitting, standing, or even lying down in a playful pose! Let’s dive into the magic of crochet and bring Rudolph to life.
Materials & Abbreviations
Before we pick up our hooks, let’s make sure you have everything you need. For the best results, I recommend using a smooth cotton yarn for the main body and a plush or “eyelash” yarn for the fuzzy white details to give him that authentic wintry feel.
Materials Needed
- Yarn (Cotton/Catania type):
- Brown (Main body)
- Dark Brown (Antlers and details)
- Light Blue (Sweater and boots)
- Gray (Sweater and boot details)
- Red (Nose)
- White (Eyes and hat trim)
- Faux Fur or Eyelash Yarn: White (for the hat trim, boot cuffs, and tail).
- Crochet Hook: 3.0mm (approx. B/3 or D hook).
- Wire Armature: Approximately 79 inches of 0.1-inch diameter wire, and about 16 inches of 0.06-inch diameter wire for finer details.
- Stuffing: High-quality polyester fiberfill.
- Eyes: Two 8mm half-beads or safety eyes.
- Tools: Electrical tape (to cover wire), pliers, wire cutters, a yarn needle, scissors, and stitch markers.
- Optional: A small weight to help him sit steadily.
Abbreviations (US Terms)
Please note that all instructions are worked in a continuous spiral unless otherwise stated. Use stitch markers to keep track of the beginning of each round.
- MR: Magic Ring
- ch: Chain
- sc: Single Crochet
- inc: Increase (2 sc in one stitch)
- dec: Decrease (sc 2 together)
- hdc: Half Double Crochet
- hdc inc: HDC Increase (2 hdc in one stitch)
- hdc dec: HDC Decrease (hdc 2 together)
- sl st: Slip Stitch
- BLO: Back Loops Only
- FLO: Front Loops Only
- sp: Space (e.g., in a chain space)
Step-by-Step Instructions
1. The Muzzle (Brown)
We start with the snout to give Rudolph his character.
- Round 1: 6 sc in MR (6)
- Round 2: 6 inc (12)
- Round 3: (1 sc, 1 inc) * 6 (18)
- Round 4: (2 sc, 1 inc) * 6 (24)
- Rounds 5-8: 24 sc (24)
- Round 9: (2 sc, 1 dec) * 6 (18)
2. The Head (Brown)
The head is worked in a way that creates a distinct snout shape. After finishing the rounds, we will insert the wire frame.
- Round 1: 6 ch
- Round 2: Sc in 2nd ch from hook, 3 sc, 3 inc, 3 sc, inc, inc, 3 sc, 3 inc, 3 sc, 2 inc (18)
- Round 3: inc, 3 sc, 3 inc, 3 sc, 2 inc (18)
- Round 4: (sc, inc), 3 sc, (sc, inc) * 3, 3 sc, (sc, inc) * 2 (24)
- Round 5: (2 sc, inc), 3 sc, (2 sc, inc) * 3, 3 sc, (2 sc, inc) * 2 (30)
- Round 6: (3 sc, inc), 3 sc, (3 sc, inc) * 3, 3 sc, (3 sc, inc) * 2 (36)
- Round 7: (4 sc, inc), 3 sc, (4 sc, inc) * 3, 3 sc, (4 sc, inc) * 2 (42)
- Round 8: (5 sc, inc), 3 sc, (5 sc, inc) * 3, 3 sc, (5 sc, inc) * 2 (48)
- Rounds 9-16: 48 sc (48)
- Round 17: (5 sc, dec), 3 sc, (5 sc, dec) * 3, 3 sc, (5 sc, dec) * 2 (42)
- Round 18: (4 sc, dec), 3 sc, (4 sc, dec) * 3, 3 sc, (4 sc, dec) * 2 (36)
- Round 19: (3 sc, dec), 3 sc, (3 sc, dec) * 3, 3 sc, (3 sc, dec) * 2 (30)
Important: At Round 20, we will join the muzzle to the head.
Round 20: 9 sc into the muzzle loops, 21 sc around the head (30).
Round 21: 9 sc in the muzzle, 21 sc around the head (30).
Continue with rounds 22-27 with 30 sc.
Round 28: 8 sc, 2 ch, skip one stitch, 21 sc (31).
Round 29: 8 sc, sc in ch-sp, 21 sc (30).
Round 30-31: 30 sc (30).
Round 32: 30 sc (30).
Note: When working with plush/velour yarn, it is easier to first work a round with regular cotton yarn into the back loops only.
Creating the Frame: Take about 51 inches of your wire, bend it to fit the shape of the head, and thread both ends through the opening created in Round 28. Stuff the head firmly.
3. The Eyes & Nose
The Eyes (Make 2)
White Base:
- Round 1: 4 ch (4)
- Round 2: Sc in 2nd ch from hook, sc, 3 inc, sc, inc (14)
- Round 3: inc, sc, 3 inc, sc, 2 inc (20)
- Round 4: (sc, inc), sc, (sc, inc) * 3, sc, (sc, inc) * 2 (24)
- Round 5: 20 sc (20)
- Round 6: (sc, dec), sc, (sc, dec) * 3, sc, (sc, dec) * 2 (14)
Leave a long tail for sewing. Once finished, attach your half-beads to the white center and sew the brown eyelids on top.
Brown Eyelids (Make 2):
- Round 1: 11 ch (11)
- Round 2: From 2nd ch: 10 sc, turn (10)
- Round 3: dec, 2 sc, dec, 2 sc, dec, turn (7)
- Round 4: 3 dec, sl st (4)
The Nose (Red):
- Round 1: 6 sc in MR (6)
- Round 2: Sc in 2nd ch, 3 sc, 3 inc, 3 sc, inc (18)
- Round 3: inc, 3 sc, 3 inc, 3 sc, 2 inc (24)
- Round 4: (sc, inc), 3 sc, (sc, inc) * 3, 3 sc, (sc, inc) * 2 (30)
- Round 5: (2 sc, inc), 3 sc, (2 sc, inc) * 3, 3 sc, (2 sc, inc) * 2 (36)
- Round 6: 30 sc (30)
Stuff the nose and sew it onto the head below the eyes.
4. Ears & Antlers
Ears (Make 2, Brown)
- Round 1: 3 sc in MR (3)
- Round 2: 3 inc (6)
- Round 3: (sc, inc) * 3 (9)
- Round 4: (2 sc, inc) * 3 (12)
- Round 5: (3 sc, inc) * 3 (15)
- Round 6: (4 sc, inc) * 3 (18)
- Round 7: (5 sc, inc) * 3 (21)
- Round 8: (6 sc, inc) * 3 (24)
- Round 9: 24 sc (24)
Fold them in half and sew to the sides of the head.
Antlers (Make 2, Dark Brown)
These are worked in sections to create branches. We will eventually add a wire frame to make them poseable.
- Round 1: 3 sc in MR (3)
- Round 2: 3 inc (6)
- Round 3-6: 6 sc (6)
- Section 2: 3 sc, ch, turn. 3 sc, ch, turn. 3 sc, hdc, sc, hdc (6)
- Section 3: 6 sc, then work in rows (back and forth) for the remaining length.
Once finished, create a wire frame in the shape of the antlers and thread it through the head. You can add small “bumps” (additional small crocheted pieces) to the antlers for extra detail.
5. The Body (Brown/Blue/Gray)
The body is a striped sweater design. We will leave openings for the arms and legs.
- Round 1: 6 sc in MR (6)
- Round 2: 6 inc (12)
- Round 3: (sc, inc) * 6 (18)
- Round 4: (2 sc, inc) * 6 (24)
- Round 5: (3 sc, inc), 1 sc, 2 ch, skip 1 stitch, 1 sc, inc, (3 sc, inc), 1 sc, 2 ch, skip 1 stitch, 1 sc, inc, (3 sc, inc) * 2 (32)
Note: These gaps are for the legs.
- Round 6: (4 sc, inc), 1 sc, 1 sc in ch-sp, 2 sc, inc, (4 sc, inc), 1 sc, 1 sc in ch-sp, 2 sc, inc, (4 sc, inc) * 2 (36)
- Round 7: (5 sc, inc) * 6 (42)
- Round 8: (6 sc, inc) * 6 (48)
- Round 9: (7 sc, inc) * 6 (54)
- Rounds 10-15: 54 sc (54)
- Round 16: (Switch to Light Blue) 54 sc (54)
- Round 17: 54 sc in BLO (54)
- Rounds 18-19: 54 sc (54)
- Round 20: (Switch to Gray) (7 sc, dec) * 6 (48)
- Round 21-22: 48 sc (48)
- Round 23: (Switch to Light Blue) 48 sc (48)
- Round 24: (6 sc, dec) * 6 (42)
- Round 25-26: (Switch to Gray) 42 sc (42)
- Round 27: 42 sc (42)
- Round 28: (Switch to Light Blue) (5 sc, dec) * 6 (36)
- Rounds 29-31: 36 sc (36)
- Round 32: (Switch to Gray) 30 sc (30)
- Round 33: 30 sc, start stuffing (30)
- Round 34: (3 sc, dec) * 6, (Switch to Light Blue) (24)
- Round 35: 24 sc (24)
Armholes: In Round 36, create holes for the arms: 6 sc, 2 ch, skip 1 stitch, 9 sc, 2 ch, skip 1 stitch, 7 sc (26).
Round 37: 6 sc, sc in ch-sp, 9 sc, sc in ch-sp, 7 sc (24).
Round 38: (2 sc, dec) * 6, (Switch to Gray) (18).
Round 39: (sc, dec) * 6 (12).
Round 40: (4 sc, dec) * 2, (Switch to Brown) (10).
Round 41: (3 sc, dec) * 2 in BLO (8).
Round 42-52: 8 sc (8).
Round 53: (sc, inc) * 4 (12).
Leave a long tail for sewing.
6. Arms, Mittens & Legs
Arms & Mittens (Blue/Gray)
Arms: Work in stripes of Gray and Light Blue.
Round 1: 8 sc in MR (8).
Rounds 2-4: 8 sc (Switch colors as needed).
Round 5: (4 sc, inc) * 3 (18).
Round 6: (5 sc, inc) * 3 (21).
Round 7: (6 sc, inc) * 3 (24).
Round 8: (7 sc, inc) * 3 (27).
Round 9: (8 sc, inc) * 3 (30).
Rounds 10-18: 8 sc (Switch colors as needed).
Round 19: 4 inc, 4 sc (12).
Round 20-21: 12 sc (12).
Round 22: 4 dec, 4 sc (8).
Round 23-32: 8 sc (Switch colors as needed).
Round 33: (3 sc, inc) * 2 (10).
Round 34: (4 sc, inc) * 2 (Switch to Gray) (12).
Round 35: 12 sc (12).
Round 36: (3 sc, inc) * 3 (15).
Round 37: 15 sc in BLO (15).
Round 38-39: 15 sc (15).
Mittens (Make 2):
First, make a small thumb (6 sc in MR, then 6 sc for 5 rounds).
Then, for the main mitten:
Round 1: 6 ch.
Round 2: Sc in 2nd ch, 3 sc, 3 inc, 3 sc, inc (18).
Round 3: inc, 3 sc, 3 inc, 3 sc, 2 inc (24).
Round 4: (sc, inc), 3 sc, (sc, inc) * 3, 3 sc, (sc, inc) * 2 (36).
Round 5-11: 24 sc (24).
Round 12: Work the thumb attachment: For Right hand (6 sc, 3 sc with thumb, 15 sc). For Left hand (3 sc with thumb, 21 sc).
Round 13: (sc, dec) * 2, 3 sc on thumb, (sc, dec) * 2, 3 sc, (sc, dec) * 2 (18).
Round 14: dec, 3 sc, 3 dec, 3 sc, 2 dec (12).
Round 15: 12 sc (12).
Assemble the mitten around the wire and the thumb.
Legs & Boots (Brown/Blue)
Legs (Make 2, Brown):
Round 1: 8 sc in MR (8).
Rounds 2-20: 8 sc (8).
Round 21: 4 inc, 4 sc (12).
Round 22-23: 12 sc (12).
Round 24: 4 dec, 4 sc (8).
Round 25-36: 8 sc (8).
Round 37: (sc, inc) * 4 (12).
Slide these onto the wire and sew to the body.
Boots (Make 2, Blue):
Round 1: 6 ch.
Round 2: Sc in 2nd ch, 3 sc, 3 inc, 3 sc, inc (18).
Round 3: inc, 3 sc, 3 inc, 3 sc, 2 inc (24).
Round 4: inc, (sc, inc) * 3, 3 inc, 6 sc, 2 inc (36).
Round 5: 6 sc, inc, 6 sc, inc, 12 sc, inc (42).
Rounds 6-16: 30 sc (30).
Round 17: 6 sc, dec, 6 sc, dec, 12 sc, dec (27).
Round 18: 5 sc, dec, 5 sc, dec, 11 sc, dec (24).
Round 19-21: 24 sc (24).
Round 22: 5 sc, 2 ch, skip 1 stitch, 18 sc (24).
Round 23: 5 sc, sc in ch-sp, 18 sc (24).
Round 24: (2 sc, dec) * 6 (18).
Round 25: (sc, dec) * 6 (12).
Round 26: 6 sc (6).
Sew the boots onto the legs.
Boot Soles (Make 2, Gray):
Round 1: 15 ch.
Round 2: Sc in 2nd ch, 5 sc, 7 hdc, 3 hdc in one stitch, 7 hdc, 5 sc, inc (30).
Round 3: inc, 5 sc, 7 hdc, 3 hdc inc, 7 hdc, 5 sc, 2 inc, (sc, inc), 5 sc, 7 hdc, (hdc, hdc inc) * 3, 7 hdc, 5 sc, (sc, inc) * 2 (42).
Round 4: (2 sc, inc), 5 sc, 7 hdc, (2 hdc inc) * 3, 7 hdc, 5 sc, (2 sc, inc) * 2 (48).
Round 5: 48 sc in BLO (48).
Round 6: 48 sc (48).
Sew the soles to the bottom of the boots.
4. Final Accessories
The Hat & Scarf (Blue/Gray/White)
Hat:
Round 1: (4 hdc, hdc inc) * 6, sl st (36).
Round 2: 1 ch, 36 hdc, 3 ch, switch to Gray (36).
Round 3: 1 ch, 36 sc in FLO, sl st (36).
Round 4: (Switch to Light Blue) 2 ch, 36 hdc, sl st (36).
Round 5: 1 ch, (4 hdc, hdc dec) * 6, sl st (30).
Round 6: 1 ch, 30 sc in FLO, sl st (30).
Round 7: 1 ch, (3 hdc, hdc dec) * 6, sl st (24).
Round 8: 1 ch, (2 hdc, hdc dec) * 6, switch to Gray (18).
Round 9: 1 ch, 18 sc in FLO, sl st (18).
Round 10: 1 ch, (hdc, hdc dec) * 6, sl st (12).
Round 11: 6 dec (6).
Finish by adding a small pom-pom on top.
Tail (Brown/White)
Make two identical pieces. One in plain brown, one in white eyelash/faux fur yarn.
Round 1: 6 ch.
Round 2: Sc in 2nd ch, 3 sc, 3 inc, 3 sc, ch, turn (14).
Round 3: 4 sc, 3 inc, 4 sc, ch, turn (14).
Sew the two pieces together and finish the edge with the white fur yarn.
Finishing
Assembly is where Rudolph really comes to life! Follow these steps carefully:
- Stuffing: Stuff the head and body firmly. Make sure the wire is centered so the reindeer can balance.
- Face Assembly: Sew the eyes (with lids) and the red nose onto the head. Ensure they are symmetrical for the best look.
- Ear & Antler Attachment: Sew the ears to the sides. Carefully attach the wire-reinforced antlers to the top of the head.
- Clothing: Slide the sweater over the body. The wire frame should run from the head down through the torso. Attach the arms into the armholes and the legs into the leg holes.
- Boots & Hat: Place the boots onto the feet and the hat on the head.
- Final Touches: Secure all loose ends with your yarn needle and trim any stray threads.
Tips for Success
- Tension is Key: When working with amigurumi, try to keep your stitches tight so the stuffing doesn’t show through.
- Working with Plush Yarn: If you are using eyelash/faux fur yarn for the white trim, it can be tricky to see your stitches. Use a larger hook or work with a regular cotton yarn first to create a “base” round, then work your plush stitches into that.
- Wire Safety: Always cover your wire with electrical tape before inserting it into the crochet pieces. This prevents the sharp ends from poking through the fabric.
- Posing: Because of the wire armature, don’t be afraid to move his limbs! You can make him look like he’s waving, sitting, or even playing with a small gift.
Congratulations! You have just created a beautiful, handmade Rudolph the Reindeer. He is ready to join your holiday celebrations!