How to Crochet a Pikachu Amigurumi: A Cute Step-by-Step Tutorial
If you are looking for a fun, quick, and adorable crochet project, you have come to the right place! This Pikachu amigurumi is the perfect addition to any Pokémon fan’s collection or a sweet gift for a friend. This little electric mouse is small enough to sit on a desk or a bookshelf, measuring approximately 4 inches tall and 2 inches wide. While the project is beginner-friendly, the unique tail requires a bit of intermediate skill, making it a great way to level up your crochet game.
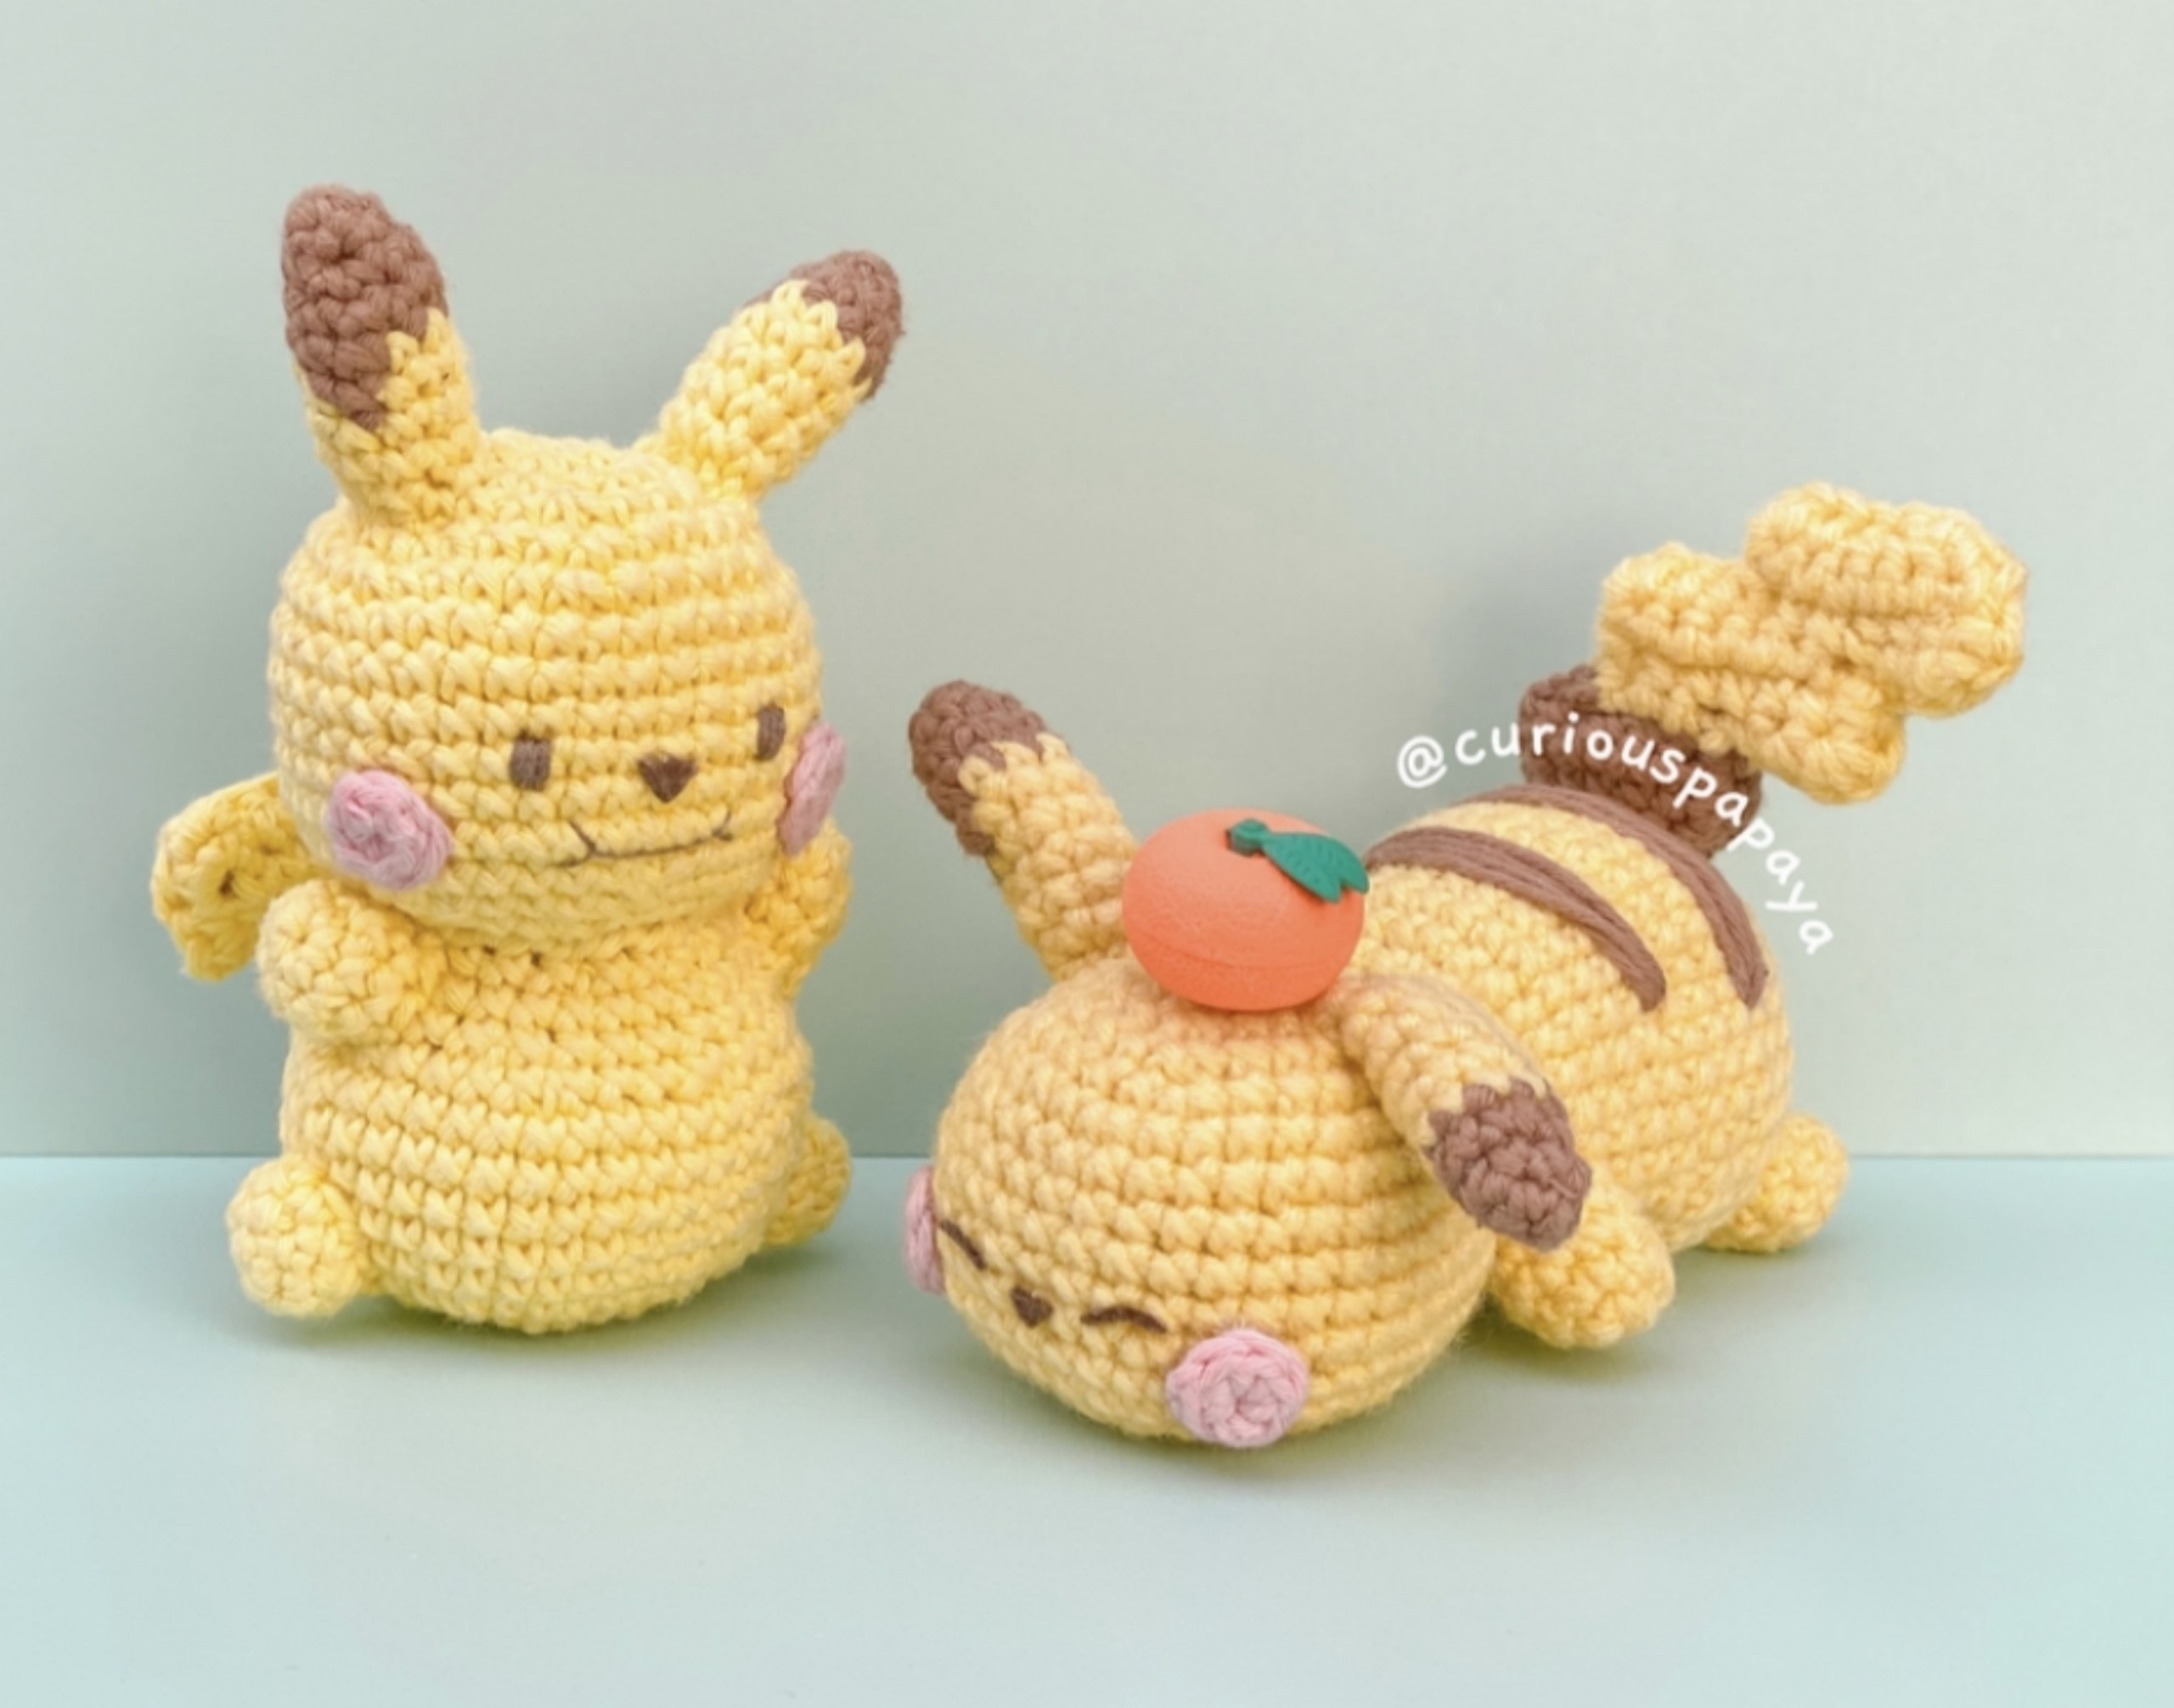
In this tutorial, I will walk you through every single step, from creating the magic ring to the final assembly. You can choose to finish your Pikachu in two different poses: standing up or laying down on its belly. Let’s grab our hooks and get started!
Materials & Abbreviations
To ensure your Pikachu looks as professional as possible, I recommend using a smooth cotton yarn. This helps define your stitches, which is crucial for amigurumi.
What You Will Need
- Yarn: Medium weight (Aran/Worsted) cotton yarn in yellow, light brown, and light pink.
- Crochet Hook: 2.75 mm (or a size that creates tight stitches).
- Stuffing: Polyfill or similar fiberfill.
- Eyes & Nose: Dark brown embroidery thread or small pieces of dark brown felt.
- Cheeks: Pink embroidery thread or pink felt.
- Tools: Yarn needle, scissors, stitch markers, and fabric glue (optional).
Abbreviations (US Terms)
- ch: chain
- sc: single crochet
- inc: increase (2 sc in one stitch)
- dec: decrease (sc 2 together)
- sl st: slip stitch
- MR: magic ring
- FLO: front loop only
- [#]: number of stitches in the current round
- (…) x #: repeat the instructions within the parentheses the specified number of times
Note: All pieces are worked in a continuous spiral. Please use a stitch marker to keep track of the beginning of each round.
Step-by-Step Instructions
The Head (Worked in Yellow)
The head needs to be well-stuffed, especially the cheek area, to give it that iconic rounded look.
- Round 1: 6 sc in a Magic Ring [6]
- Round 2: inc in each st around [12]
- Round 3: (1 sc, inc) x 6 [18]
- Round 4: sc, inc, (2 sc, inc) x 5, sc [24]
- Round 5: (3 sc, inc) x 6 [30]
- Round 6: 2 sc, inc, (4 sc, inc) x 5, 2 sc [36]
- Rounds 7-10: sc in each st around [36]
- Round 11: (5 sc, inc) x 6 [42]
- Round 12: sc in each st around [42]
- Round 13: (5 sc, dec) x 6 [36]
- Round 14: (4 sc, dec) x 6 [30]
- Round 15: (3 sc, dec) x 6 [24]
- Note: Stuff the head thoroughly here. Make sure to stuff the “cheek” area extra well to create the round shape.
- Round 16: dec x 12 [12]
- Stuff completely. Fasten off, leaving a long tail for sewing.
The Body (Worked in Yellow)
If you want your Pikachu to stand up upright, stop at Round 14. If you want it to lay down, continue to Round 16.
- Round 1: 8 sc in a Magic Ring [8]
- Round 2: inc in each st around [16]
- Round 3: (1 sc, inc) x 8 [24]
- Round 4: (2 sc, inc) x 8 [32]
- Round 5: (3 sc, inc) x 8 [40]
- Rounds 6-11: sc in each st around [40]
- Round 12: (3 sc, dec) x 8 [32]
- Rounds 13-16: sc in each st around [32] (Note: Skip rounds 15-16 if you want the standing version)
- Stuff the body. Fasten off, leaving a long tail for sewing.
The Ears (Make 2; Worked in Brown and Yellow)
We will start with brown and then transition to yellow.
- Round 1: 6 sc in a Magic Ring [6]
- Round 2: (1 sc, inc) x 3 [9]
- Round 3: sc in each st around [9]
- Change color to Yellow:
- Round 4: (4 sc in brown, 5 sc in yellow) [9]
- Round 5: (2 sc in brown, 7 sc in yellow) [9]
- Round 6: (1 sc in brown, 8 sc in yellow) [9]
- Rounds 7-8: sc in each st around [9]
- Stuff lightly and leave a long tail for sewing.
Arms & Legs (Make 4; Worked in Yellow)
These are small, simple shapes to give your Pikachu its limbs.
- Round 1: 6 sc in a Magic Ring [6]
- Round 2: (1 sc, inc) x 3 [9]
- Rounds 3-4: sc in each st around [9]
- Stuff lightly and leave a long tail for sewing.
The Cheeks (Make 2; Worked in Pink)
- Round 1: 6 sc in a Magic Ring [6]
- Fasten off. You can either sew these on or use fabric glue if you prefer.
The Tail (Intermediate Level)
The tail is made by crocheting two flat panels and then joining them together to create a 3D shape. This requires careful attention to color changes and stitch counts.
Panel 1 (Brown and Yellow)
- Row 1: Ch 6. Starting in the 2nd ch from hook, sc in the next 5 ch. Ch 1, turn [5]
- Rows 2-3: sc in each st across. Ch 1, turn [5]
- Row 4: 4 sc. On the 4th stitch, join the yellow yarn to create a color change, leaving a long tail. Skip 1 sc, ch 1, turn [4]
- Note: Use the long yellow tail for the next row.
- Row 5: 4 sc, then 3 sc worked into the long yellow tail. Ch 1, turn [7]
- Row 6: 7 sc. Ch 1, turn [7]
- Row 7: 7 sc, ch 3, 1 ch (upward loop), turn [10]
- Row 8: Starting in the 2nd ch from hook, 6 sc. Skip 4 sts, ch 1, turn [6]
- Row 9: 6 sc. Ch 1, turn [6]
- Fasten off, leaving a short tail.
Panel 2 (Brown and Yellow)
Repeat the same process as Panel 1, but ensure you leave a very long brown tail. This long tail will be used to sew the two panels together.
Joining the Tail
Place the two panels together. You will join them by crocheting around the edges using single crochet.
- For outer corners (sharp points): (sc, ch 1, sc) in one stitch.
- For inner corners (valleys): sl st.
- As you join, remember to switch colors. When you reach the brown section, switch to brown yarn. When you reach the yellow section, switch to yellow yarn.
- Tuck any remaining yarn ends inside the tail while joining.
Finishing & Assembly
Now comes the fun part—bringing your Pikachu to life! Depending on how you crocheted the body, follow the instructions for either the “Laying Down” (A) or “Standing” (B) pose.
Head & Body
- Pose A (Laying Down): Place the head on the back of the body. Sew the head to the body between rounds 7 and 13.
- Pose B (Standing Up): Sew the head directly onto the top of the body.
Face Details
- Eyes: If using felt, cut two small eyes and secure them at Round 10. If embroidering, place eyes 6 sc apart on Round 10.
- Nose: Secure a small dark brown nose between Rounds 10 and 11.
- Mouth: Embroider a small mouth approximately 2 rows below the eyes.
- Cheeks: Sew or glue the pink cheeks between Rounds 10 and 12.
Limbs
- Arms:
- Pose A: Sew arms to the belly, about 6 sc away from the center, between Rounds 1-3.
- Pose B: Sew arms to the body between Rounds 1-3, about 8 sc away from the center.
- Legs:
- Pose A: Sew legs to the belly, about 6 sc away from the center, between Rounds 11-13.
- Pose B: Sew legs to the bottom of the body between Rounds 8-10, about 14 sc away from the center.
Ears & Tail
- Ears: Tilt the ears slightly so the brown tips look angled. Sew them between Rounds 3 and 5 of the head. Tip: Tilt one ear to the side for extra cuteness!
- Tail: Sew the tail to the back of the body, about 2 rows below the bottom brown stripe.
- Body Stripes: Use your embroidery thread to create the brown stripes on the back. Sew the top stripe between Rounds 6-7 (12 sc wide) and the bottom stripe between Rounds 9-10 (16 sc wide).
- Final Touch: Sew a tiny pink “X” stitch under the tail for a sweet detail.
Tips for Success
- Tension is Key: For amigurumi, keep your tension tight so that the stuffing doesn’t peek through the holes.
- Stitch Markers: Never crochet without a stitch marker. It is very easy to lose count in the continuous spiral.
- Stuffing Strategy: When stuffing, use your crochet hook or a pencil to push the stuffing into hard-to-reach corners like the cheeks and the tip of the tail.
- Color Changes: When changing colors, try to pull the new color through the last two loops of the final stitch of the previous color to ensure a clean transition.