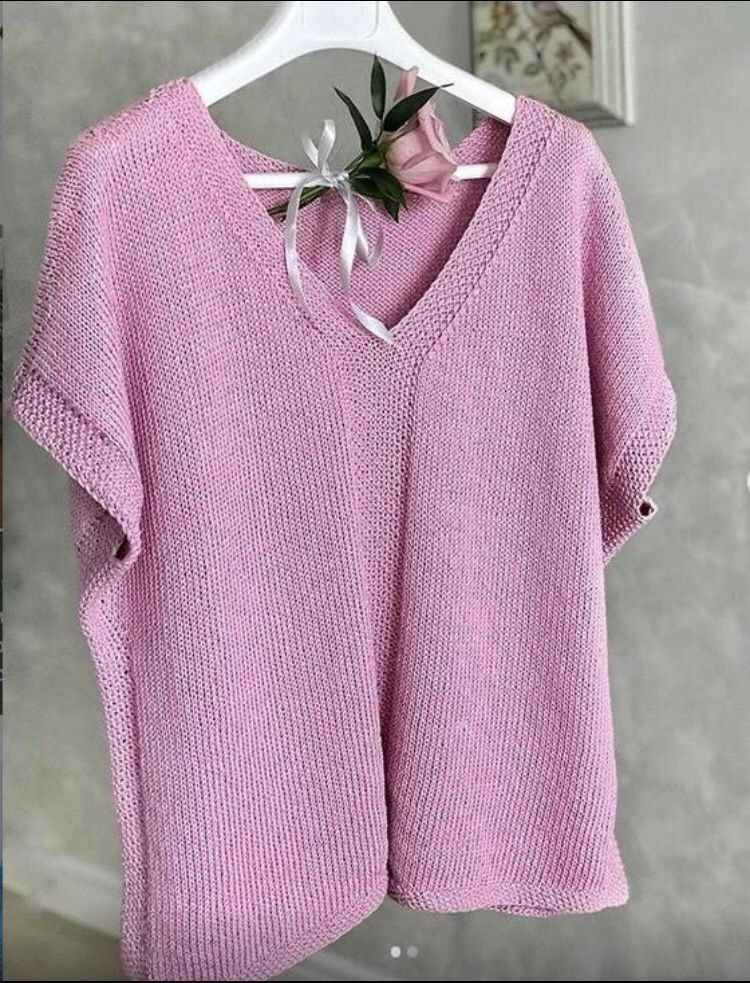
The Portofino Knit Top: A Chic and Easy Summer Tee Pattern
Are you looking for the perfect lightweight, stylish, and comfortable addition to your warm-weather wardrobe? Look no further than the Portofino Knit Top! This gorgeous, oversized summer knit tee features a flattering V-neck, beautifully textured seed stitch borders, and an effortless drape that looks amazing on every body type. Whether you are strolling along the boardwalk or heading out for brunch, this chic top is bound to become your new favorite hand-knit staple.
In this comprehensive, beginner-accessible tutorial, we will walk you through everything you need to knit your own Portofino Top. Grab your needles, select your favorite summer yarn, and let’s get knitting!
Materials & Abbreviations
Sizes and Measurements
This top is designed with a relaxed, oversized fit. Choose your size based on your desired positive ease:
- Size Small (Fits Bust 32.5″ – 35″): Finished Circumference: 41.7″
- Size Medium (Fits Bust 35.5″ – 40″): Finished Circumference: 45″
- Size Large (Fits Bust 40.5″ – 43.5″): Finished Circumference: 48″
Recommended Materials
- Yarn: DK weight cotton or cotton-blend yarn (approx. 125 yards per 1.75 oz / 50g).
- Size Small: Approx. 750 – 1,000 yards
- Size Medium: Approx. 850 – 1,150 yards
- Size Large: Approx. 1,000 – 1,300 yards
- Needles: US 7 (4.5 mm) or US 8 (5.0 mm) circular knitting needles on a 32″ to 47″ cable, or size needed to obtain gauge.
- Hook: US E-4 to H-8 (3.0 mm – 5.0 mm) crochet hook (used for minor finishing details).
- Notions: Stitch markers, tapestry needle (both blunt and sharp ends), scissors, and a flexible measuring tape.
Gauge
20 sts x 26 rows = 4″ x 4″ (10 x 10 cm) in Stockinette Stitch after wet blocking. Taking the time to knit and block a gauge swatch is highly recommended to ensure your top fits perfectly.
Abbreviations (US Terms)
- CO: Cast on
- K: Knit
- P: Purl
- St(s): Stitch(es)
- St st: Stockinette Stitch (Knit on RS, Purl on WS / Knit every round)
- M1R (Make 1 Right): Lift the bar between stitches from back to front, then knit through the front loop.
- M1L (Make 1 Left): Lift the bar between stitches from front to back, then knit through the back loop.
- SSK (Slip Slip Knit): Slip two stitches knitwise one at a time, insert the left needle tip into the fronts of these two stitches, and knit them together (left-leaning decrease).
- K2tog: Knit two stitches together (right-leaning decrease).
- DS (Double Stitch): Used in German Short Rows. Slip the first stitch purlwise with yarn in front, then pull the yarn over the needle to the back to create a double-legged stitch.
- RS: Right Side
- WS: Wrong Side
Step-by-Step Instructions
1. Cast On and Bottom Border
We begin by knitting the body of the top in the round from the bottom up.
- Using your circular needles, CO 212 (228, 244) sts. Join to knit in the round, being careful not to twist your stitches. Place a marker to denote the beginning of the round.
- Work in Seed Stitch (K1, P1 alternation, shifting by one stitch on subsequent rounds so you knit the purls and purl the knits) for 8 rounds.
2. Body Pattern Setup
On Round 9, we will set up our stitch markers to divide the seed stitch borders from the smooth stockinette panels:
- Work 15 sts in Seed Stitch (Left Side Panel marker).
- Work 38 (42, 46) sts in Stockinette Stitch (Knit).
- Work 15 sts in Seed Stitch (Front Center Placket marker).
- Work 38 (42, 46) sts in Stockinette Stitch.
- Work 15 sts in Seed Stitch (Right Side Panel marker).
- Work 91 (99, 107) sts in Stockinette Stitch across the Back.
Continue working in this established pattern until the piece measures 11 inches (28 cm) from the cast-on edge.
3. Sleeve and Armhole Shaping
To create the relaxed, grown-on dolman sleeve shape, we will now begin adding increases along the side panels. Increases are worked on every 2nd round (every other round) a total of 14 times (adding 4 stitches per increase round, for 56 total stitches added).
Increase Round:
- Work 15 sts of the Left Side Panel in Seed Stitch, then M1R.
- Knit to the Center Placket, work 15 sts in Seed Stitch, knit to the next side panel, then M1L.
- Work 15 sts of the Right Side Panel in Seed Stitch, then M1R.
- Knit across the Back to the end of the round, then M1L.
Work one even round without increases. Repeat these two rounds 14 times total.
Your stitch counts will now be:
- Side Panels: 15 sts Seed Stitch each
- Front Stockinette Panels: 52 (56, 60) sts each
- Center Placket: 15 sts Seed Stitch
- Back Stockinette Panel: 119 (127, 135) sts
4. Dividing Front and Back
We will now split the piece to work the Front and Back panels flat.
Divide your work at the side panels. Split the 15 seed stitches of each side panel as follows: 8 stitches will go to the Front, and 7 stitches will go to the Back. To make the Front and Back even, add 1 stitch to each side of the Back panel so that both Front and Back contain 135 (143, 151) sts total.
Place the Back stitches on a holder or spare cable and focus on the Front first.
5. Working the Front and V-Neck Decreases
Continue knitting the Front flat in turning rows:
- Row Pattern: 8 sts Seed Stitch, 52 (56, 60) sts Stockinette, 15 sts Center Placket (Seed Stitch), 52 (56, 60) sts Stockinette, 8 sts Seed Stitch.
- Work flat until your piece measures 16.5 inches (42 cm) from the cast-on edge.
6. Shaping the Left and Right Front (V-Neck)
To create the V-neck, split the Front into two halves down the middle of the 15-stitch Center Placket.
- The Left Front gets 8 stitches of the placket.
- The Right Front gets 7 stitches + 1 added stitch (totaling 8 stitches of Seed Stitch border).
Each side now has 68 (72, 76) sts.
Decrease 1 stitch at the inner neck edge (where the Stockinette meets the Seed Stitch border) on every RS row, 25 times total on each side.
- Left Front Neck Decrease: Work SSK just before the neck border.
- Right Front Neck Decrease: Work K2tog just after the neck border.
7. Shoulder Slopes (German Short Rows)
Once you reach the 20th neck decrease, begin shaping the shoulder slope using German Short Rows while continuing the remaining 5 neck decreases.
Divide your shoulder stitches into 5 groups for gradual sloping:
- Size S: 8, 8, 8, 9, and 10 sts
- Size M: 9, 9, 9, 10, and 10 sts
- Size L: 10, 10, 10, 10, and 11 sts
Left Front Shoulder Slope (WS Short Rows)
- On a WS row, work to the designated turn point, turn your work to the RS, and make a Double Stitch (DS).
- Work to the end of the RS row, continuing any remaining neck decreases.
- Repeat this process, turning short of the previous turn point by the designated stitch count each time, until you have 5 double stitches on your needle.
- Work 2 rows across all shoulder stitches, resolving the DS double loops by knitting or purling them together as a single stitch. Keep these stitches live on a stitch holder.
Right Front Shoulder Slope (RS Short Rows)
- On a RS row, work to the designated turn point, turn your work to the WS, and make a DS.
- Work to the end of the WS row.
- Repeat this process, turning short of the previous turn point each time, until you have 5 double stitches.
- Work 2 rows across all shoulder stitches, resolving the DS loops. Keep these stitches live on a stitch holder.
8. Working the Back Panel
Return to the live Back panel stitches on your holder 135 (143, 151) sts.
- Work flat in established pattern (8 sts Seed Stitch, Stockinette, 8 sts Seed Stitch) until the Back measures the same height as the Front to the shoulder slope.
- Shape the shoulder slopes on the Back using the same German Short Row method.
- Back Neck Band: After working 4 rows of the shoulder slope, start working a central Seed Stitch band across the middle 49 sts of the back neck. Expand this Seed Stitch band by 1 stitch on each side in every row for 8 rows (until the neck placket is 65 sts wide).
- Bind off the center 49 sts of the neck, leaving the shoulder stitches live for grafting.
Finishing
Grafting the Shoulders
Align the live shoulder stitches of the Front and Back panels with right sides facing out. Using a tapestry needle and your working yarn, graft the shoulders together using the Kitchener Stitch (horizontal horizontal graft) for a seamless, professional finish.
Weaving in Ends
Thread all loose yarn tails onto a sharp tapestry needle and weave them securely into the wrong side of your seed stitch borders to keep them completely invisible.
Blocking
Gently wash your finished top in lukewarm water with mild wool wash. Press out excess water with a towel (do not wring!). Lay the top flat to dry on blocking mats, pinning it out to the schematic measurements to open up the stockinette stitch and smooth out the seed stitch borders.
Tips for Success
- Avoid Twisted Stitches: Depending on whether you use the Eastern (“Babushka”) or Western classic knitting method, ensure your stitches are mounted correctly on your needles so you don’t inadvertently twist them, which can make the fabric stiff.
- Seamless Yarn Joins: For cotton yarns, try using a Russian join or a splices method to avoid bulky knots in the middle of your smooth stockinette panels.
- Stitch Markers are Your Friends: Place colorful markers between your seed stitch borders and stockinette panels so you don’t have to count stitches on every row!