How to Crochet a Cute Baby Bear Rattle: Free Amigurumi Teether Pattern
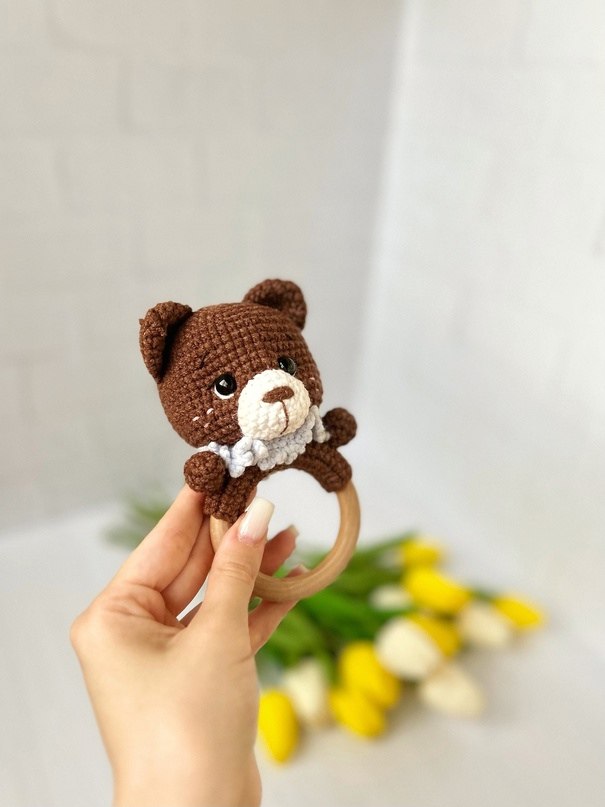
Looking for the perfect handmade gift for a baby shower or a new arrival? This adorable crochet baby bear rattle is a wonderful project for makers of all levels. Combining a soft, huggable amigurumi bear with a natural wooden teething ring, this toy provides both sensory stimulation and soothing relief for teething gums. We love the addition of a tiny winter hat and scarf, making this bear the sweetest companion for any newborn.
In this tutorial, we will walk you through every step of creating this plush bear. We will use a combination of soft cotton yarn for the body and a luxurious chenille yarn for the accessories to create a high-contrast tactile experience for the baby.
Materials & Abbreviations
To get started, gather the following materials. For the best results, we recommend using a cotton-blend yarn for the bear to ensure durability and ease of cleaning.
Materials Needed
- Main Yarn: Sport weight cotton yarn (e.g., YarnArt Jeans) in your choice of bear color (beige, white, or brown).
- Accent Yarn: Sport weight cotton yarn in lilac or pink for the outfit.
- Trim Yarn: Chenille or velvet yarn (e.g., Alize Softy) in a matching color for the cozy trim.
- Embroidery Thread: Small amounts of black, white, and brown thread for the nose and eye details.
- Safety Eyes: 9-10mm safety eyes.
- Crochet Hook: 2.0mm hook.
- Hardware: One 2.36-inch (60mm) untreated beech wood ring and one 1.5-inch (38mm) rattle insert.
- Stuffing: High-quality hypoallergenic polyester fiberfill.
- Tools: Yarn needle, scissors, and stitch markers.
Abbreviations (US Terms)
- MR: Magic Ring
- sc: Single crochet
- inc: Increase (two sc in one stitch)
- dec: Decrease (sc two stitches together)
- ch: Chain
- sl st: Slip stitch
- BLO: Back loop only
- st(s): Stitch(es)
Step-by-Step Instructions
The Bear Head
The head is worked in continuous rounds. Place your rattle insert inside the head before closing the piece.
- Round 1: 6 sc in MR (6)
- Round 2: inc in each st around (12)
- Round 3: (1 sc, inc) * 6 (18)
- Round 4: (2 sc, inc) * 6 (24)
- Round 5: (3 sc, inc) * 6 (30)
- Round 6: (4 sc, inc) * 6 (36)
- Round 7: (5 sc, inc) * 6 (42)
- Round 8: (6 sc, inc) * 6 (48)
- Rounds 9-14: sc in each st around (48) for 6 rounds
- Round 15: (15 sc, inc) * 3 (51)
- Round 16: sc in each st around (51)
- Round 17: (16 sc, inc) * 3 (54)
- Round 18: sc in each st around (54)
Tip: Insert safety eyes between rounds 13 and 14.
- Round 19: (7 sc, dec) * 6 (48)
- Round 20: (6 sc, dec) * 6 (42)
- Round 21: (5 sc, dec) * 6 (36)
- Round 22: (4 sc, dec) * 6 (30)
- Round 23: (3 sc, dec) * 6 (24)
- Round 24: (2 sc, dec) * 6 (18)
- Round 25: (1 sc, dec) * 6 (12)
Fasten off, leaving a long tail for sewing.
The Wood Ring Cover
This piece wraps around the wooden ring to add a soft touch.
- Ch 28.
- Starting in the 2nd ch from hook, work 27 sc.
- Turn your work. Ch 1, work 27 sc across.
- Repeat this row for approximately 8 rows (or until the fabric is wide enough to cover the thickness of your ring).
- Fasten off and leave a tail for sewing.
The Muzzle
- Round 1: 6 sc in MR (6)
- Round 2: inc in each st around (12)
- Round 3: (1 sc, inc) * 6 (18)
- Round 4: (2 sc, inc) * 6 (24)
- Round 5: (7 sc, inc) * 3, end with a sl st (26)
Fasten off, leaving a tail for sewing.
The Ears (Make 2)
- Round 1: 6 sc in MR (6)
- Round 2: inc in each st around (12)
- Round 3: sc in each st around (12)
Fold the circle in half and sc through both layers for 5 stitches to flatten the ear. Fasten off and leave a tail.
The Winter Hat
The hat is composed of 5 identical modules worked in rows using Back Loop Only (BLO). At the end of every row, ch 1 and turn.
Module Pattern:
- Ch 19. Start in 2nd ch from hook.
- 11 sc, sl st in the 12th st, ch 1, turn.
- 12 sc, ch 1, turn.
- 12 sc, sc into the ch-1 space from the previous row, sl st, ch 1, turn.
- 14 sc, ch 1, turn.
- 14 sc, sc into the ch-1 space, sl st, ch 1, turn.
- 16 sc, ch 1, turn.
- 16 sc, sc into the ch-1 space, sl st, ch 1, turn.
- 18 sc, ch 1, turn.
Important: For modules 2 and 4, modify Row 9 to create ear holes: 5 sc, ch 6, skip 6 stitches, sc in the 11th st, 7 sc, ch 1, turn.
Once you have 5 modules, sew them together side-by-side to form the hat. Pull the top closed and sew it shut.
The Pom Pom
- Round 1: 6 sc in MR (6)
- Round 2: inc in each st around (12)
- Round 3: sc in each st around (12)
- Round 4: dec around (6)
Fasten off and sew to the top of the hat.
Winter Accessories (Scarf & Snood)
The Scarf: Ch 85. Row 1: 84 sl st, ch 1, turn. Row 2: 84 sl st in BLO, ch 1. Fasten off. Using the chenille yarn, sc around one short edge for a fuzzy trim.
The Snood: Ch 12. Row 1: 11 sl st in BLO, ch 1, turn. Repeat until the piece measures about 4 inches (10-11 cm). Sew the two short ends together to make a loop. Fold the loop in half and sc around the entire edge using chenille yarn.
Finishing
- Attach Head to Ring: Sew the ring cover around the wooden ring, then sew the head securely to the top of the cover.
- Sculpting: Use your yarn needle to gently pull the stuffing or create “indents” in the face to give the bear a more three-dimensional, cute expression.
- Adding Features: Sew the muzzle to the center of the face. Attach the ears so the top of the ear sits between rounds 4 and 5 of the head.
- Detailing: Using embroidery thread, stitch a small brown triangular nose on the muzzle and add white highlights to the eyes.
- Dress Up: Slip the hat and snood/scarf onto your bear!
Tips for Success
- Tight Tension: When working with amigurumi, keep your tension tight so that the fiberfill doesn’t show through the stitches.
- Safety First: If this is for a very young infant, consider embroidering the eyes with black yarn instead of using plastic safety eyes to eliminate choking hazards.
- Yarn Choice: If you cannot find the specific brands mentioned, any “Sport” or “Fine” weight (Category 2) cotton yarn will work beautifully for the bear’s body.
- Cleaning: Since this is a baby toy, recommend that the user removes the wooden ring before hand-washing the crochet portions in mild soap.