Adorable Crochet Cow Amigurumi Pattern: Free Step-by-Step Tutorial
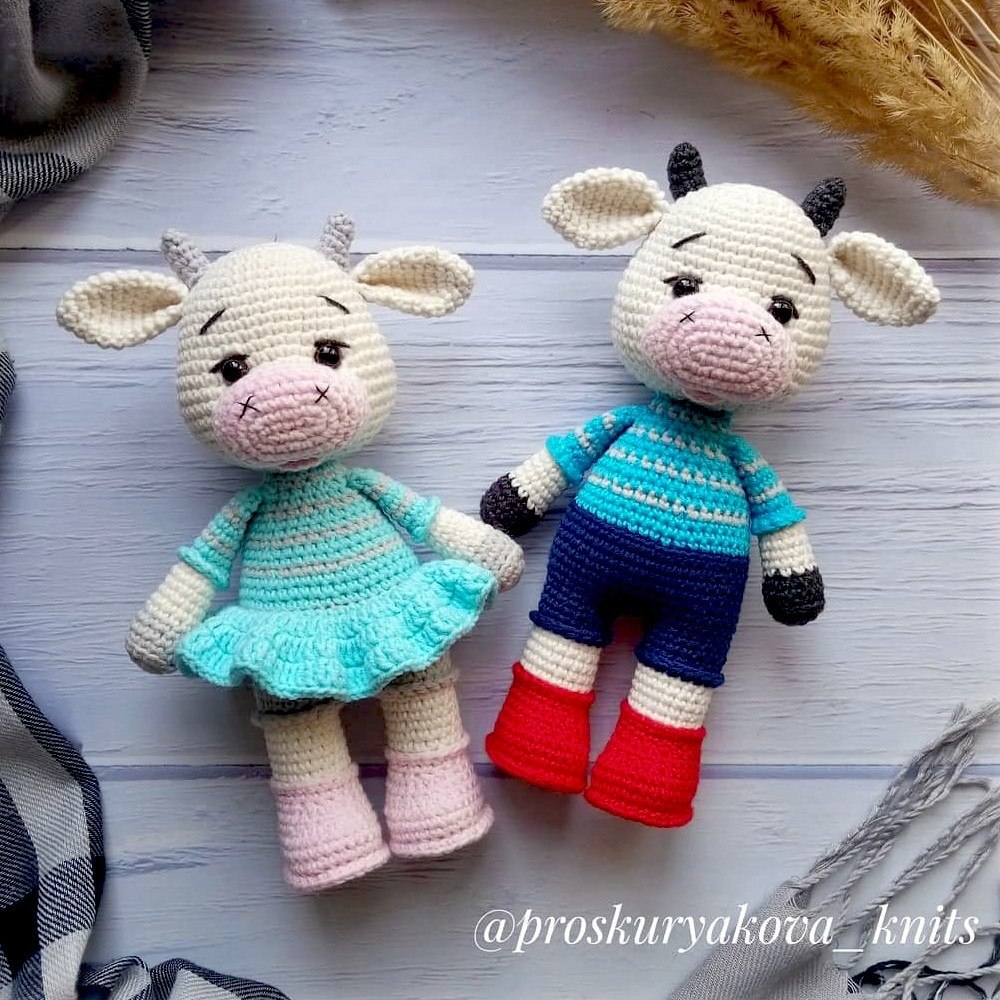
There is nothing quite as charming as a little crochet cow! Whether you are looking to make a sweet gift for a newborn, a cute companion for a child, or a quirky addition to your own amigurumi collection, this cow pattern is the perfect project. In this tutorial, we will guide you through creating two versions: a dapper little bull and a sweet little cow with a pretty skirt.
This project is designed to be beginner-friendly, utilizing basic stitches and a simple construction method. By following this guide, you’ll create a plush, huggable cow with a distinct personality. Let’s dive into the magic of amigurumi and start stitching!
Materials & Abbreviations
To get started, gather your materials. For this project, we recommend a cotton-blend yarn (like a sport weight) to ensure the stitches are tight and the stuffing doesn’t peek through.
Materials Needed
- Yarn: Sport weight yarn in the following colors:
- Main color: Off-white or Cream
- Accents: Red (for boots), Dark Blue (for pants), Light Blue and Grey (for clothing), and Black/Brown (for horns and hands)
- Muzzle/Lip: Light Pink
- Crochet Hook: 2mm (or a size that gives you a tight fabric)
- Eyes: 10mm (approx. 0.4 inch) safety eyes
- Stuffing: High-quality polyester fiberfill
- Additional Tools: Yarn needle, scissors, and small pieces of plastic or sturdy cardboard for the soles of the feet.
US Crochet Terms and Abbreviations
- MR: Magic Ring
- sc: Single Crochet
- inc: Increase (two sc in one stitch)
- dec: Decrease (sc two stitches together)
- ch: Chain
- sl st: Slip Stitch
- dc: Double Crochet
- BLO: Back Loop Only
- FLO: Front Loop Only
- ( ) x 6: Repeat the instructions inside the parentheses 6 times
Step-by-Step Instructions
The Arms (Make 2)
Stuff only the bottom portion of the arms to keep them flexible.
Start with black yarn:
- Round 1: 6 sc in MR (6)
- Round 2: inc in each st around (12)
- Round 3: (3 sc, inc) x 3 (15)
- Round 4: 15 sc in BLO (15)
- Rounds 5-6: 15 sc (15)
Switch to beige yarn:
- Round 7: (3 sc, dec) x 3 (12)
- Rounds 8-12: 12 sc (12)
Switch to light blue yarn:
- Round 13: 12 sc in BLO (12)
- Round 14: 12 sc (12)
Switch to grey yarn:
- Round 15: 12 sc (12)
Switch to light blue yarn:
- Rounds 16-17: 12 sc (12)
Switch to grey yarn:
- Round 18: 12 sc (12)
Switch to light blue yarn:
- Rounds 19-20: 12 sc (12)
Fold the arm in half and sc across the opening (6 sc) to close. Leave a tail for sewing. Detail Tip: Go back to Round 12 and crochet sc into the FLO using light blue yarn to create a cuff detail.
The Ears (Make 2)
Use the main off-white yarn:
- Round 1: 6 sc in MR (6)
- Round 2: (sc, inc) x 3 (9)
- Round 3: (2 sc, inc) x 3 (12)
- Round 4: (3 sc, inc) x 3 (15)
- Rounds 5-9: 15 sc (15)
- Round 10: (3 sc, dec) x 3 (12)
Fold in half and sc across (6 sc) to close. Fasten off and leave a tail for sewing.
The Horns (Make 2)
Use black or dark brown yarn:
- Round 1: 6 sc in MR (6)
- Round 2: 5 sc, inc (7)
- Round 3: 6 sc, inc (8)
- Round 4: 7 sc, inc (9)
- Round 5: 9 sc (9)
Fasten off and leave a tail for sewing.
The Head
Use the main off-white yarn. Stuff as you go.
- Round 1: 6 sc in MR (6)
- Round 2: inc in each st around (12)
- Round 3: (sc, inc) x 6 (18)
- Round 4: (2 sc, inc) x 6 (24)
- Round 5: (3 sc, inc) x 6 (30)
- Round 6: (4 sc, inc) x 6 (36)
- Round 7: (5 sc, inc) x 6 (42)
- Rounds 8-12: 42 sc (42)
- Round 13: (6 sc, inc) x 6 (48)
- Round 14: 48 sc (48)
- Round 15: (7 sc, inc) x 6 (54)
- Rounds 16-17: 54 sc (54)
- Round 18: (7 sc, dec) x 6 (48)
- Round 19: 48 sc (48)
Eye Placement: Insert safety eyes between rounds 14 and 15, leaving 8 stitches between them.
- Round 20: (6 sc, dec) x 6 (42)
- Round 21: (5 sc, dec) x 6 (36)
- Round 22: (4 sc, dec) x 6 (30)
- Round 23: (3 sc, dec) x 6 (24)
- Round 24: (2 sc, dec) x 6 (18)
- Round 25: 18 sc (18)
Fasten off and leave a tail for sewing.
The Muzzle and Lip
Use light pink yarn.
Muzzle:
- Round 1: Ch 6. Starting from the 2nd ch from hook: 4 sc, 3 sc in the last ch. Turn to work on the other side of the chain: 3 sc, inc (12)
- Round 2: inc, 3 sc, (inc) x 3, 3 sc, (inc) x 2 (18)
- Round 3: sc, inc, 3 sc, (sc, inc) x 3, 3 sc, (sc, inc) x 2 (24)
- Round 4: 2 sc, inc, 3 sc, (2 sc, inc) x 3, 3 sc, (2 sc, inc) x 2 (30)
- Rounds 5-7: 30 sc (30)
Fasten off and leave a tail for sewing.
Lip:
- Round 1: 6 sc in MR (6)
- Round 2: inc in each st around (12)
Do not cut the yarn; use the tail for sewing.
The Legs (Make 2)
Stuff firmly as you go.
Start with red yarn:
- Round 1: Ch 6. Starting from 2nd ch from hook: 4 sc, 3 sc in last ch. Turn to work on other side: 3 sc, inc (12)
- Round 2: inc, 3 sc, (inc) x 3, 3 sc, (inc) x 2 (18)
- Round 3: sc, inc, 3 sc, (sc, inc) x 3, 3 sc, (sc, inc) x 2 (24)
- Round 4: 2 sc, inc, 3 sc, (2 sc, inc) x 3, 3 sc, (2 sc, inc) x 2 (30)
The Sole: Trace the bottom of your work and cut a matching oval out of plastic or cardboard. Place it inside the leg now.
- Round 5: 30 sc in BLO (30)
- Rounds 6-7: 30 sc (30)
- Round 8: 9 sc, (dec) x 6, 9 sc (24)
- Round 9: 8 sc, (dec) x 4, 8 sc (20)
- Rounds 10-11: 20 sc (20)
Switch to beige yarn:
- Round 12: 8 sc, dec, 8 sc, dec in BLO (18)
- Rounds 13-17: 18 sc (18)
Switch to dark blue yarn:
- Round 18: 18 sc in BLO (18)
- Rounds 19-20: 18 sc (18)
Fasten off the first leg. For the second leg, do not cut the yarn.
The Body
Working from the second leg, crochet a few sc to reach the inner side of the leg. Ch 3, and join to the inner side of the first leg.
- Round 21: 18 sc around the first leg, 3 sc across the chain, 18 sc around the second leg, 3 sc across the chain (42)
- Round 22: 42 sc (42)
- Round 23: (9 sc, inc, 10 sc, inc) x 2 (46)
- Rounds 24-29: 46 sc (46)
Switch to light blue yarn:
- Round 30: (9 sc, dec, 10 sc, dec) x 2 in BLO (42)
- Rounds 31-32: 42 sc (42)
Switch to grey yarn:
- Round 33: (5 sc, dec) x 6 (36)
Switch to light blue yarn:
- Rounds 34-35: 36 sc (36)
Switch to grey yarn:
- Round 36: (4 sc, dec) x 6 (30)
Switch to light blue yarn:
- Rounds 37-38: 30 sc (30)
Switch to grey yarn:
- Round 39: (3 sc, dec) x 6 (24)
Switch to light blue yarn:
- Rounds 40-41: 24 sc (24)
Switch to grey yarn:
- Round 42: (2 sc, dec) x 6 (18)
Switch to light blue yarn:
- Rounds 43-44: 18 sc (18)
Fasten off and leave a tail for sewing.
The Accessories
The Tail: With black yarn, ch 12. Starting from the 2nd ch from hook, work sl st into each chain, wrapping the yarn around several times to create a chunky effect. Fold in half and wrap the base for a finished look.
The Skirt (For the Cow): Attach light blue yarn to the BLO between rounds 29 and 30 of the body.
- Row 1: Ch 2, (dc, inc) x 23, sl st to join (69)
- Row 2: Ch 2, (2 dc, inc) x 23, sl st to join (92)
- Row 3: Ch 2, (3 dc, inc) x 23, sl st to join (105)
Finishing & Assembly
Now comes the fun part—bringing your cow to life!
- Muzzle: Sew the muzzle to the head, starting just below the eyes at Round 14. Use a needle to sculpt the face by pulling a thread from the muzzle through to the back of the head (shaping/indenting).
- Lip: Sew the small pink lip to the center of the muzzle.
- Horns & Ears: Sew the horns about 4 stitches away from the center of the head on both sides. Attach the ears slightly lower and to the sides.
- Face Details: Optional: Use black embroidery thread to sew eyelashes and small eyebrows.
- Arms: Sew the arms to the body at Round 41.
- Head: Sew the head to the body. Pro Tip: Use a large needle or a knitting needle to temporarily hold the head in place while you pack extra stuffing into the neck for stability before sewing it permanently.
- Tail: Sew the tail to the back of the body.
Tips for a Perfect Cow
- Tension is Key: Keep your stitches tight so the fiberfill doesn’t show. If you see gaps, try dropping down a hook size.
- Invisible Decreases: For the cleanest look, use the “invisible decrease” method (insert hook into front loops only of the two stitches you are decreasing).
- Stuffing: Stuff the head and body firmly, but leave the neck slightly softer before adding the final “plug” of stuffing to ensure the head doesn’t wobble too much.
- Color Customization: Feel free to change the colors! You can make a strawberry cow with pink and white, or a classic Holstein with black and white.