How to Crochet a Cute Baby Elephant in a Sweater: Free Amigurumi Pattern
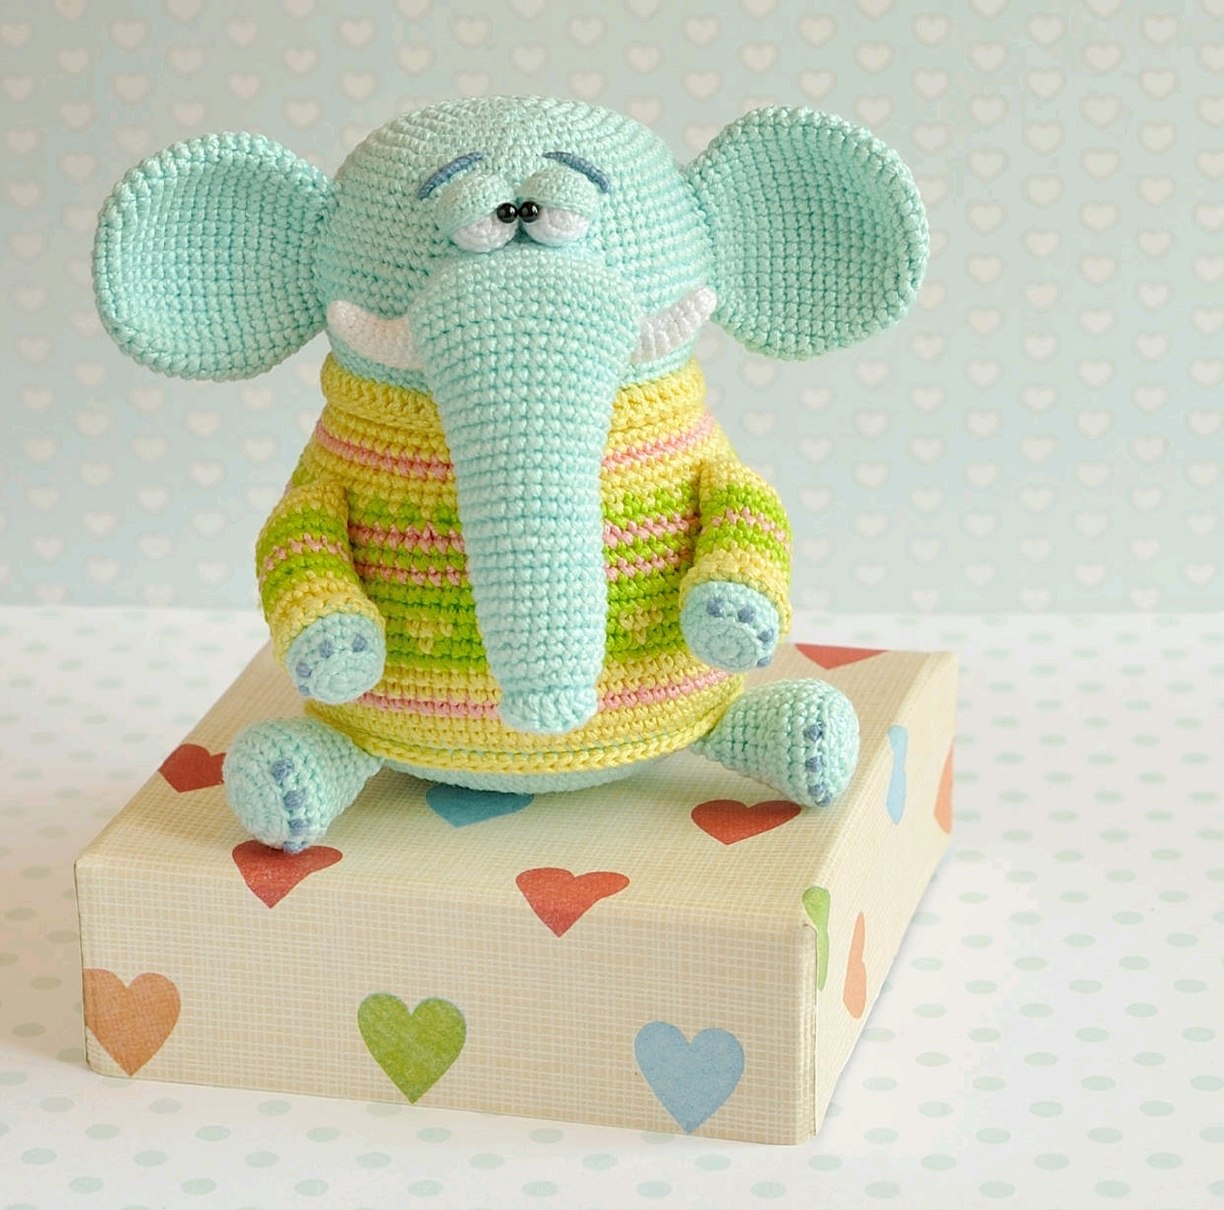
If you are looking for a small, heartwarming project to brighten your day, this adorable baby elephant in a colorful striped sweater is the perfect choice. This amigurumi project is designed to be petite—standing at approximately 4 inches tall—making it a wonderful gift, a desk companion, or a cute addition to a nursery. Whether you are a seasoned pro or a beginner looking to practice your color changes and shaping, this tutorial will guide you through every stitch.
Materials & Abbreviations
To achieve the look in the photos, we recommend using a fine mercerized cotton yarn. This gives the elephant a clean, crisp definition.
Materials Needed
- Yarn: Fine weight (fingering or lace) cotton yarn in the following colors:
- Light Blue (Main body)
- Yellow, Light Green, and Pink (For the sweater)
- White (For eyes and tusks)
- Dark Blue (For eyebrows and toes)
- Crochet Hooks: 1.25mm and 0.9mm
- Eyes: 2.5mm glass eyes or black beads for pupils
- Wire: 1mm aluminum wire (for the legs, trunk, and ears to make them posable)
- Stuffing: Polyester fiberfill
- Tools: Yarn needle, scissors, stitch markers, and pins
- Stuffing Aid: A chopstick or wooden skewer to help push stuffing into tight spaces
Abbreviations (US Terms)
- MR: Magic Ring
- ch: Chain
- sc: Single crochet
- hdc: Half double crochet
- dc: Double crochet
- sl st: Slip stitch
- inc: Increase (2 sc in one stitch)
- dec: Decrease (sc 2 together)
- BLO: Back loop only
- FLO: Front loop only
- (…) * n: Repeat the instructions inside the parentheses n times
- (Number): Total stitch count at the end of the round
Step-by-Step Instructions
The Head
Use light blue yarn and a 1.25mm hook. Work in continuous rounds.
- Rnd 1: 8 sc in MR (8)
- Rnd 2: 8 inc (16)
- Rnd 3: (1 sc, inc) * 8 (24)
- Rnd 4: 1 sc, inc, (2 sc, inc) * 7, 1 sc (32)
- Rnd 5: (3 sc, inc) * 8 (40)
- Rnd 6: 2 sc, inc, (4 sc, inc) * 7, 2 sc (48)
- Rnd 7: (5 sc, inc) * 8 (56)
- Rnd 8: 3 sc, inc, (6 sc, inc) * 7, 3 sc (64)
- Rnd 9-15: sc in each stitch for 7 rounds (64)
- Rnd 16: (7 sc, inc) * 8 (72)
- Rnd 17: 4 sc, inc, (8 sc, inc) * 7, 4 sc (80)
- Rnd 18-21: sc in each stitch for 4 rounds (80)
- Rnd 22: 4 sc, dec, (8 sc, dec) * 7, 4 sc (72)
- Rnd 23: (7 sc, dec) * 8 (64)
- Rnd 24: 3 sc, dec, (6 sc, dec) * 7, 3 sc (56)
Fasten off, leaving a long tail for sewing the head to the body. Stuff lightly to maintain the shape.
The Body
Use a 1.25mm hook. Start with light blue yarn.
- Rnd 1: 8 sc in MR (8)
- Rnd 2: 8 inc (16)
- Rnd 3: (1 sc, inc) * 8 (24)
- Rnd 4: 1 sc, inc, (2 sc, inc) * 7, 1 sc (32)
- Rnd 5: (3 sc, inc) * 8 (40)
- Rnd 6: 2 sc, inc, (4 sc, inc) * 7, 2 sc (48)
- Rnd 7: (5 sc, inc) * 8 (56)
- Rnd 8: 3 sc, inc, (6 sc, inc) * 7, 3 sc (64)
- Rnd 9: (7 sc, inc) * 8 (72)
- Rnd 10: 4 sc, inc, (8 sc, inc) * 7, 4 sc (80)
- Rnd 11: sc in each stitch (80)
- Rnd 12: (9 sc, inc) * 8 (88)
- Rnd 13: sc in each stitch (88)
The Sweater Section: Change colors as follows:
- Rnd 14 (Yellow): Working in BLO, sc in each stitch (88)
- Rnd 15-16 (Yellow): sc in each stitch (88)
- Rnd 17 (Pink): sc in each stitch (88)
- Rnd 18-19 (Yellow): sc in each stitch (88)
- Rnd 20 (Green): sc in each stitch (88)
- Rnd 21 (Green & Yellow): (3 sc green, 1 sc yellow) * 22 (88)
- Rnd 22 (Green & Yellow): 1 sc yellow, (1 sc green, 3 sc yellow) * 21, 1 sc green, 2 sc yellow (88)
- Rnd 23-24 (Green): sc in each stitch (88)
- Rnd 25 (Pink): (9 sc, dec) * 8 (80)
- Rnd 26 (Green): sc in each stitch (80)
- Rnd 27 (Pink): sc in each stitch (80)
- Rnd 28 (Green): 4 sc, dec, (8 sc, dec) * 7, 4 sc (72)
- Rnd 29 (Green & Yellow): (1 sc green, 1 sc yellow) * 36 (72)
- Rnd 30 (Yellow): sc in each stitch (72)
- Rnd 31 (Yellow): (7 sc, dec) * 8 (64)
- Rnd 32 (Pink): sc in each stitch (64)
- Rnd 33 (Yellow): sc in each stitch (64)
- Rnd 34 (Yellow): 3 sc, dec, (6 sc, dec) * 7, 3 sc (56)
- Rnd 35-36 (Yellow): sc in each stitch (56)
- Rnd 37 (Yellow, FLO): ch 1, 56 dc (56)
Fasten off. Fold the last round (Rnd 37) down to create a folded collar and sew the ends together. Stuff the body firmly.
Back Legs (Make 2)
Use light blue yarn and a 1.25mm hook.
- Rnd 1: 8 sc in MR (8)
- Rnd 2: 8 inc (16)
- Rnd 3: (1 sc, inc) * 8 (24)
- Rnd 4 (BLO): sc in each stitch (24)
- Rnd 5-6: sc in each stitch (24)
- Rnd 7: 6 sc, dec, 6 sc, dec, 6 sc (18)
- Rnd 8-11: sc in each stitch (18)
- Rnd 12: (1 sc, dec) * 6 (12)
Stuff the leg. Fold the piece in half (heel to toe) and crochet 6 sc across the opening to flatten the foot. Fasten off leaving a long tail.
Front Legs (Make 2)
Use a 1.25mm hook. Start with light blue yarn.
- Rnd 1: 8 sc in MR (8)
- Rnd 2: 8 inc (16)
- Rnd 3 (BLO): sc in each stitch (16)
- Rnd 4-5: sc in each stitch (16)
Change colors to match the sweater stripes: Yellow (Rnd 6-8), Green (Rnd 9-10), Pink (Rnd 11), Green (Rnd 12-13), and Yellow (Rnd 14-16). Use BLO on Rnd 6.
- Rnd 17: (2 sc, dec) * 4 (12)
Stuff lightly and fasten off. Using yellow yarn, attach and work 16 sc into the front loops of Rnd 6 to create a little sleeve detail.
The Trunk
Use light blue yarn and a 1.25mm hook.
- Rnd 1: 8 sc in MR (8)
- Rnd 2: 8 inc (16)
- Rnd 3 (BLO): (7 sc, inc) * 2 (18)
- Rnd 4-6: sc in each stitch (18)
- Rnd 7: (5 sc, inc) * 3 (21)
- Rnd 8-11: sc in each stitch (21)
- Rnd 12: 3 sc, inc, (6 sc, inc) * 2, 3 sc (24)
- Rnd 13-17: sc in each stitch (24)
- Rnd 18: (7 sc, inc) * 3 (27)
- Rnd 19-24: sc in each stitch (27)
- Rnd 25: 4 sc, inc, (8 sc, inc) * 2, 4 sc (30)
- Rnd 26-32: sc in each stitch (30)
Fasten off. To add the decorative ridge, attach yarn to Rnd 3 (working in FLO): 5 sc, 2 hdc, 2 dc, 2 hdc, 5 sc. Fasten off and hide the end.
Eyes and Eyelids (Make 2 each)
Eye: Use white thin yarn and a 0.9mm hook. 1: 6 sc in MR, 2: 6 inc (12), 3: (3 sc, inc) * 3 (15), 4-5: sc in each stitch (15), 6: (3 sc, dec) * 3 (12), 7: 6 dec (6). Stuff and close.
Eyelid: Use light blue yarn and a 0.9mm hook (use double strand). 1: 6 sc in MR, 2: 6 inc (12), 3: (1 sc, inc) * 6 (18), 4-5: sc in each stitch (18). Sl st to finish.
Tusks (Make 2)
Use white thin yarn and a 0.9mm hook.
- Rnd 1: 6 sc in MR (6)
- Rnd 2: 6 sc (6)
- Rnd 3: 5 sc, inc (7)
- Rnd 4: 6 sc, inc (8)
- Rnd 5: 7 sc, inc (9)
- Rnd 6: 8 sc, inc (10)
- Rnd 7: 9 sc, inc (11)
- Rnd 8: 10 sc, inc (12)
- Rnd 9: 11 sc, inc (13)
- Rnd 10: 13 sc, sl st (13)
Ears (Make 2)
Use light blue yarn and a 1.25mm hook.
- Rnd 1: ch 8. Starting in 2nd ch from hook: 6 sc, 3 sc in last ch. Work along the opposite side of the chain: 5 sc, inc (16)
- Rnd 2: inc, 5 sc, 3 inc, 5 sc, 2 inc (22)
- Rnd 3: 1 sc, inc, 5 sc, inc, 1 sc, 2 inc, 1 sc, inc, 5 sc, inc, 1 sc, inc (29)
- Rnd 4: inc, 28 sc (30)
- Rnd 5: (14 sc, inc) * 2 (32)
- Rnd 6: 32 sc (32)
- Rnd 7: (15 sc, inc) * 2 (34)
- Rnd 8: 34 sc (34)
- Rnd 9: (16 sc, inc) * 2 (36)
- Rnd 10-12: sc in each stitch (36)
- Rnd 13: (16 sc, dec) * 2 (34)
- Rnd 14: (15 sc, dec) * 2 (32)
- Rnd 15: (6 sc, dec) * 4 (28)
- Rnd 16: (5 sc, dec) * 4 (24)
- Rnd 17: (10 sc, dec) * 2 (22)
Fasten off. Do not stuff the ears.
Finishing & Assembly
The Wire Frame
To make your elephant posable, insert aluminum wire into the limbs. Fold a 7.5-inch piece of wire in half and insert it into each front leg. Fold a 6.7-inch piece of wire in half and insert it into the trunk. For the ears, use a 4.7-inch piece of wire folded in half.
Putting it Together
- Body & Head: Sew the head to the body, adding extra stuffing to the neck area to ensure it is firm.
- Back Legs: Sew the back legs to Row 13 of the body. Position them wide apart but not in a full split, with toes pointing slightly toward each other.
- Front Legs: Insert the wire ends of the front legs into the body. Position the lower end between Rows 26-27 and the upper end between Rows 29-30. Sew them in place.
- Trunk: Position the trunk on the face. The top edge should meet Row 14 of the head, and the bottom edge should meet Row 22. Stretch the base slightly into an oval shape before sewing.
- Eyes: Sew the eyelid around the white eye circle. Sew the completed eye assembly above the trunk. Add the 2.5mm pupils just under the eyelid for a sleepy, cute look.
- Tusks: Insert wire into the tusks. Position them just below the middle of the trunk base and sew them to the face.
- Ears: Insert the wire ends into the head (one end between Rows 13-14 and the other between Rows 20-21). Sew the ears around the edge using FLO.
- Tail: Cut three 5.5-inch strands of light blue yarn. Thread them through a stitch at the bottom of the back, pull to the center, and braid the six resulting strands. Tie the end with dark blue yarn.
Final Tips
- Embroider the Toes: Use dark blue thin yarn to add small toe details. Mark 4 points on each foot (separated by 2 sc) and make 5 vertical stitches for each toe. Do this on Row 4 for back feet and Row 3 for front feet.
- Perfecting the Face: Use pins to position the eyes and eyebrows before sewing. For the eyebrows, make one long stitch and then use a backstitch around it to add thickness.
- Sizing: If you want a tiny version (approx 2.7 inches), use the same pattern but switch to a thinner lace-weight yarn and a 0.6mm hook.