Free Crochet Elf Doll Pattern: Cute Amigurumi Holiday Helper
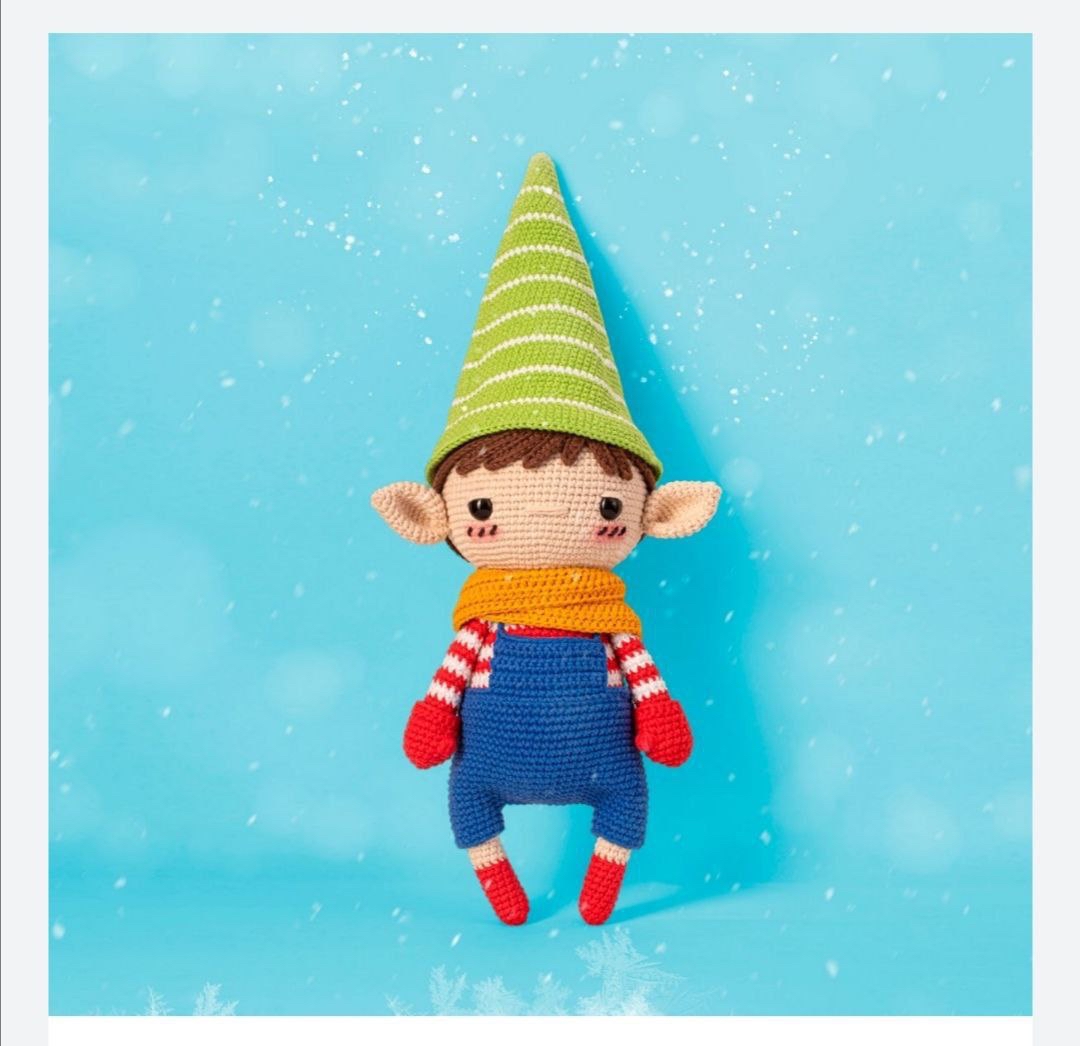
Bring holiday magic into your handmade collection with this adorable crochet elf amigurumi doll! Measuring approximately 15 inches tall from his boots to the tip of his floppy striped hat, this whimsical doll features removable overalls, cute little mittens, a mustard yellow scarf, and a cozy striped sweater. Whether you are creating a heirloom toy for a child or adding festive cheer to your mantelpiece, this comprehensive tutorial will guide you through every stitch.
Materials & Abbreviations
Finished Sizing & Details
- Finished Height: Approximately 15 inches (38 cm) tall from foot to hat tip.
- Skill Level: Intermediate
Materials Needed
- Yarn: Fine / Sport Weight (Category 2) Cotton Yarn (less than 1.75 oz / 50 grams per color):
- Skin tone / Beige
- Red
- White
- Green
- Brown
- Mustard Yellow
- Royal Blue
- Crochet Hook: Size US B-1 / C-2 (2.25 mm)
- Safety Eyes: 1 pair of 12 mm black safety eyes
- Stuffing: Polyester fiberfill stuffing
- Notions & Tools:
- Tapestry needle and standard sewing needle
- Brown sewing thread (for sewing the wig)
- Stitch markers
- 20 straight pins
- Pink fabric paint or cosmetic blush with a small makeup brush
- Small scrap of black yarn for cheek details
- Scissors
Crochet Abbreviations (US Terms)
- MR: Magic Ring
- ch: chain
- sc: single crochet
- hdc: half double crochet
- inc: single crochet increase (2 sc in same stitch)
- dec: single crochet decrease (sc 2 together)
- sl st: slip stitch
- BLO: back loop only
- FLO: front loop only
- st(s): stitch(es)
- [ ]: work instructions inside brackets as specified
Step-by-Step Instructions
Body and Head (One Piece)
Work in continuous spirals starting at the bottom of the body with Red yarn.
- Rnd 1: 6 sc in MR (6)
- Rnd 2: 6 inc (12)
- Rnd 3: [1 sc, inc] x 6 (18)
- Rnd 4: [2 sc, inc] x 6 (24)
- Rnd 5: [3 sc, inc] x 6 (30)
- Rnd 6: [4 sc, inc] x 6 (36)
- Rnd 7: [5 sc, inc] x 6 (42)
- Rnd 8: [6 sc, inc] x 6 (48)
- Rnd 9: [7 sc, inc] x 6 (54)
- Rnd 10: [8 sc, inc] x 6 (60)
- Rnds 11-17: sc around (60)
Switch to White yarn.
- Rnd 18: sc around (60)
- Rnd 19: [18 sc, dec] x 3 (57)
Switch to Red yarn.
- Rnd 20: sc around (57)
- Rnd 21: [17 sc, dec] x 3 (54)
Switch to White yarn.
- Rnd 22: sc around (54)
- Rnd 23: [16 sc, dec] x 3 (51)
Switch to Red yarn.
- Rnd 24: sc around (51)
- Rnd 25: [15 sc, dec] x 3 (48)
Switch to White yarn.
- Rnd 26: sc around (48)
- Rnd 27: [14 sc, dec] x 3 (45)
Switch to Red yarn.
- Rnd 28: sc around (45)
- Rnd 29: [13 sc, dec] x 3 (42)
Switch to White yarn.
- Rnd 30: sc around (42)
- Rnd 31: [12 sc, dec] x 3 (39)
Switch to Red yarn.
- Rnd 32: sc around (39)
- Rnd 33: [11 sc, dec] x 3 (36)
Switch to White yarn.
- Rnd 34: sc around (36)
- Rnd 35: [4 sc, dec] x 6 (30)
Switch to Red yarn.
- Rnd 36: sc around (30)
- Rnd 37: [3 sc, dec] x 6 (24). Stuff the body firmly with fiberfill.
Switch to Skin Tone yarn.
- Rnd 38: Work in BLO: sc around (24)
- Rnd 39: 24 inc (48)
- Rnd 40: [7 sc, inc] x 6 (54)
- Rnd 41: 4 sc, inc, [8 sc, inc] x 5, 4 sc (60)
- Rnd 42: [9 sc, inc] x 6 (66)
- Rnd 43: 5 sc, inc, [10 sc, inc] x 5, 5 sc (72)
- Rnd 44: [11 sc, inc] x 6 (78)
- Rnd 45: 6 sc, inc, [12 sc, inc] x 5, 6 sc (84)
- Rnds 46-60: sc around (84)
Face Details: Place the 12 mm safety eyes on Round 49, leaving 18 stitches of space between them. Using skin tone yarn, embroider a straight nose centered between the eyes on Round 49 (wrap yarn 4 times over 6 stitches). Embroider eyelids with skin-tone yarn diagonally near the outer eye corners. Apply blush to the cheeks using pink fabric paint or cosmetics, then stitch 3 small black diagonal lines on each cheek.
- Rnd 61: [12 sc, dec] x 6 (78)
- Rnd 62: [11 sc, dec] x 6 (72)
- Rnd 63: [10 sc, dec] x 6 (66)
- Rnd 64: [9 sc, dec] x 6 (60)
- Rnd 65: [8 sc, dec] x 6 (54)
- Rnd 66: [7 sc, dec] x 6 (48)
- Rnd 67: [6 sc, dec] x 6 (42). Stuff the neck and head firmly.
- Rnd 68: [5 sc, dec] x 6 (36)
- Rnd 69: [4 sc, dec] x 6 (30)
- Rnd 70: [3 sc, dec] x 6 (24)
- Rnd 71: [2 sc, dec] x 6 (18). Finish stuffing the head completely.
- Rnd 72: [1 sc, dec] x 6 (12)
- Rnd 73: 6 dec (6)
Cut yarn leaving a tail, weave through FLO of remaining 6 stitches, pull tight, and hide end.
Hair Wig & Bangs
Using Brown yarn, work in continuous rounds for the wig cap, then create individual bangs strands without fastening off.
- Rnd 1: 6 sc in MR (6)
- Rnd 2: 6 inc (12)
- Rnd 3: [1 sc, inc] x 6 (18)
- Rnd 4: [2 sc, inc] x 6 (24)
- Rnd 5: [3 sc, inc] x 6 (30)
- Rnd 6: 2 sc, inc, [4 sc, inc] x 5, 2 sc (36)
- Rnd 7: [5 sc, inc] x 6 (42)
- Rnd 8: 3 sc, inc, [6 sc, inc] x 5, 3 sc (48)
- Rnd 9: [7 sc, inc] x 6 (54)
- Rnd 10: 4 sc, inc, [8 sc, inc] x 5, 4 sc (60)
- Rnd 11: [9 sc, inc] x 6 (66)
- Rnd 12: 5 sc, inc, [10 sc, inc] x 5, 5 sc (72)
- Rnd 13: [11 sc, inc] x 6 (78)
- Rnd 14: 6 sc, inc, [12 sc, inc] x 5, 6 sc (84)
- Rnds 15-26: sc around (84)
Do not fasten off. Continue directly into the Bangs (6 strands):
- Strand 1: 1 sc, ch 13. Starting in 3rd ch from hook, 10 hdc. Skip 1 st on wig base, sl st into next st.
- Strand 2: ch 11. Starting in 3rd ch from hook, 8 hdc. Skip 1 st on wig base, sl st into next st.
- Strand 3: ch 9. Starting in 3rd ch from hook, 6 hdc. Skip 1 st on wig base, sl st into next st.
- Strand 4: ch 6. Starting in 3rd ch from hook, 3 hdc. Skip 1 st on wig base, sl st into next st.
- Strand 5: ch 7. Starting in 3rd ch from hook, 4 hdc. Skip 1 st on wig base, sl st into next st.
- Strand 6: ch 7. Starting in 3rd ch from hook, 4 hdc. Skip 1 st on wig base, sl st into next st.
Fasten off, secure threads on back side of wig, and weave in loose ends.
Arms (Make 2)
Start with Skin Tone yarn.
- Rnd 1: 6 sc in MR (6)
- Rnd 2: 6 inc (12)
- Rnds 3-7: sc around (12)
Switch to Red yarn.
- Rnd 8: Work in BLO: sc around (12)
- Rnd 9: sc around (12)
Switch to White yarn.
- Rnds 10-11: sc around (12)
Continue alternating color stripes every 2 rounds (Red: R12-13, R16-17, R20-21, R24-25; White: R14-15, R18-19, R22-23, R26) until completing Round 26. Fasten off leaving a long sewing tail. Do not stuff arms.
Ears (Make 2)
Use Skin Tone yarn.
- Rnd 1: 6 sc in MR (6)
- Rnd 2: sc around (6)
- Rnd 3: 6 inc (12)
- Rnd 4: sc around (12)
- Rnd 5: [1 sc, inc] x 6 (18)
- Rnd 6: sc around (18)
- Rnd 7: [2 sc, inc] x 6 (24)
- Rnds 8-11: sc around (24)
- Rnd 12: [2 sc, dec] x 6 (18)
- Rnd 13: [1 sc, dec] x 6 (12)
Fasten off leaving a long tail for sewing.
Legs (Make 2)
Start with Red yarn.
- Rnd 1: 6 sc in MR (6)
- Rnd 2: 6 inc (12)
- Rnds 3-10: sc around (12)
Switch to Skin Tone yarn.
- Rnd 11: Work in BLO: sc around (12)
- Rnds 12-18: sc around (12)
Switch to Red yarn.
- Rnds 19-25: sc around (12)
Fasten off leaving a long tail for sewing.
Mittens (Make 2)
Use Red yarn.
Right Mitten:
- Rnd 1: 6 sc in MR (6)
- Rnd 2: 6 inc (12)
- Rnd 3: [1 sc, inc] x 6 (18)
- Rnds 4-5: sc around (18)
- Rnd 6: 12 sc, 1 popcorn stitch (thumb), 5 sc (18)
- Rnds 7-8: sc around (18)
- Rnd 9: ch 1, 18 hdc, join with sl st to first st. Fasten off and hide ends.
Left Mitten:
- Rnds 1-5: Repeat Rnds 1-5 of Right Mitten.
- Rnd 6: 6 sc, 1 popcorn stitch (thumb), 11 sc (18)
- Rnds 7-8: sc around (18)
- Rnd 9: ch 1, 18 hdc, join with sl st to first st. Fasten off and hide ends.
Overalls / Jumper
Use Royal Blue yarn.
Chain 66. Ensure chain is not twisted and join into a ring with sl st. Work in continuous spiral rounds.
- Rnds 1-18: sc around (66)
Dividing for Pant Legs: Mark stitches to divide into 15 sts for front center, 15 sts for back center, and 18 sts for each leg opening.
First Leg: Join the last stitch worked to the first stitch of the 18-stitch leg section with 1 sc (counts as 1st sc of round).
- Rnds 19-21: sc around (18). Sl st, fasten off, weave end.
Second Leg: Attach new yarn at stitch 16 of back base round.
- Rnd 19: 18 sc, join to 1st sc of leg with sc.
- Rnds 20-21: sc around (18). Sl st, fasten off, weave end.
Waist Trim: Reattach yarn to foundation chain edge on round 1. Work 66 sc around. Sl st, fasten off, weave end.
Overalls Bib & Straps: Mark upper front edge center 16 stitches. Attach yarn to 1st marked stitch. Work in rows:
- Rows 1-7: 16 sc, ch 1, turn (16)
At end of Row 7, do not cut yarn. Ch 33 for the first shoulder strap. Fasten off leaving a long tail. Attach new yarn to upper right corner of bib, ch 33 for second strap, and fasten off leaving long tail.
Scarf
Use Mustard Yellow yarn. Worked in flat rows.
Chain 112. Start working into 3rd chain from hook.
- Rows 1-5: 110 hdc, ch 1, turn (110)
Fasten off with sl st and hide yarn ends.
Pointy Striped Elf Hat
Start with Green yarn. Alternate single rows of White yarn with Green sections to create stripes as noted below.
- Rnd 1 (Green): 6 sc in MR (6)
- Rnd 2: [1 sc, inc] x 3 (9)
- Rnd 3: sc around (9)
- Rnd 4: [2 sc, inc] x 3 (12)
- Rnd 5: sc around (12)
- Rnd 6: [3 sc, inc] x 3 (15)
- Rnd 7: sc around (15)
- Rnd 8: [4 sc, inc] x 3 (18)
- Rnd 9 (White): sc around (18)
- Rnd 10 (Green): [5 sc, inc] x 3 (21)
- Rnd 11: sc around (21)
- Rnd 12: [6 sc, inc] x 3 (24)
- Rnd 13: sc around (24)
- Rnd 14: [7 sc, inc] x 3 (27)
- Rnd 15 (White): sc around (27)
- Rnd 16 (Green): [8 sc, inc] x 3 (30)
- Rnd 17: sc around (30)
- Rnd 18: [9 sc, inc] x 3 (33)
- Rnd 19: sc around (33)
- Rnd 20: [10 sc, inc] x 3 (36)
- Rnd 21 (White): sc around (36)
- Rnd 22 (Green): [11 sc, inc] x 3 (39)
- Rnd 23: sc around (39)
- Rnd 24: [12 sc, inc] x 3 (42)
- Rnd 25: sc around (42)
- Rnd 26: [13 sc, inc] x 3 (45)
- Rnd 27 (White): sc around (45)
- Rnd 28 (Green): [14 sc, inc] x 3 (48)
- Rnd 29: sc around (48)
- Rnd 30: [15 sc, inc] x 3 (51)
- Rnd 31: sc around (51)
- Rnd 32: [16 sc, inc] x 3 (54)
- Rnd 33 (White): sc around (54)
- Rnd 34 (Green): [17 sc, inc] x 3 (57)
- Rnd 35: sc around (57)
- Rnd 36: [18 sc, inc] x 3 (60)
- Rnd 37: sc around (60)
- Rnd 38: [19 sc, inc] x 3 (63)
- Rnd 39 (White): sc around (63)
- Rnd 40 (Green): [20 sc, inc] x 3 (66)
- Rnd 41: sc around (66)
- Rnd 42: [21 sc, inc] x 3 (69)
- Rnd 43: sc around (69)
- Rnd 44: [22 sc, inc] x 3 (72)
- Rnd 45 (White): sc around (72)
- Rnd 46 (Green): [23 sc, inc] x 3 (75)
- Rnd 47: sc around (75)
- Rnd 48: [24 sc, inc] x 3 (78)
- Rnd 49: sc around (78)
- Rnd 50: [25 sc, inc] x 3 (81)
- Rnd 51 (White): sc around (81)
- Rnd 52 (Green): [26 sc, inc] x 3 (84)
- Rnd 53: [13 sc, inc] x 6 (90)
- Rnd 54: 7 sc, inc, [14 sc, inc] x 5, 7 sc (96)
- Rnd 55: sc around (96)
- Rnd 56: [15 sc, inc] x 6 (102)
- Rnd 57: sc around (102)
Fasten off and hide all loose ends inside.
Finishing & Assembly
- Attach Hair Wig: Place the wig onto the head at a slight angle, roughly 9 stitches away from each eye. Position 4 bang strands to the left side and 2 strands to the right side of the forehead. Pin into place and sew down securely using fine brown sewing thread for a clean, invisible seam.
- Attach Ears: Fold ears in half lengthwise. Pin and sew one to each side of the head on Round 47, about 6 stitches away from the eyes. Add a tiny tacking stitch to the back of each ear so they lie neatly against the head.
- Attach Arms: Pin arms to the sides of the body at the upper white stripe section, ensuring color stripes align with the torso. Sew securely using tapestry needle.
- Attach Legs: Pin and sew legs to Round 11 of the lower body on each side. Ensure color changes face toward the back.
- Dress the Doll: Slip overalls onto the elf. Cross straps over back shoulders and sew ends securely to upper back waistband. Slide mittens onto hands, put the tall hat onto the head, and wrap scarf cozy-style around the neck tucking loose ends behind.
Tips & Amigurumi Advice
- Neat Color Transitions: Complete the final yarn-over of the stitch before a color change using the new yarn color to maintain crisp color lines.
- Firm Neck Stuffing: Stuff the neck region very firmly with polyester fiberfill to prevent your elf’s head from tilting or wobbling once assembled.
- Blush Application: Always dab excess blush/fabric paint onto a paper towel or clean rag before applying to yarn stitches to avoid over-saturation.