Adorable Blue Koala Amigurumi Pattern: A Step-by-Step Crochet Tutorial
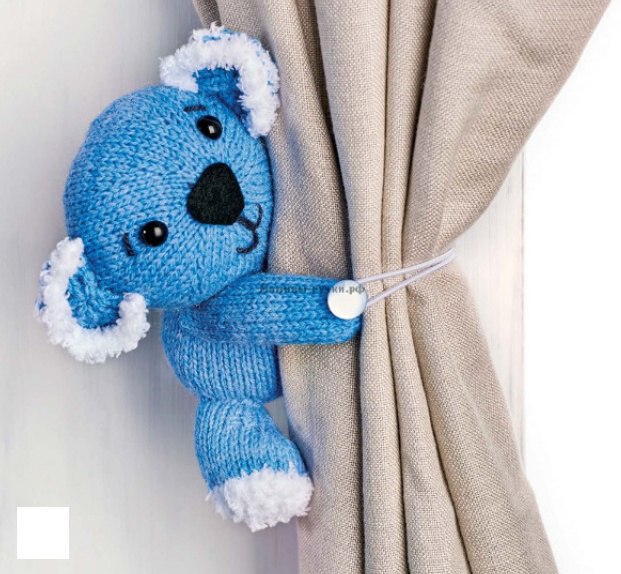
Looking for a charming project to brighten up a nursery or create a unique baby shower gift? Meet our little blue koala! This cuddly companion is not only a wonderful toy for a newborn but also doubles as a creative home accessory. Because of the integrated button and elastic loop, this koala can be used as a whimsical curtain tie-back, adding a touch of playfulness to any room.
This pattern is designed to be beginner-friendly, using basic stitches to create a rounded, huggable shape. Whether you are an experienced crocheter or just starting your amigurumi journey, this project is a great way to practice working in the round and switching yarn colors. Let’s dive into the details and start crafting your very own little marsupial friend!
Materials & Abbreviations
To get the best results, we recommend using a DK weight yarn. The combination of a smooth blue yarn for the body and a fluffy white yarn for the accents gives the koala its signature soft, textured look.
Supplies Needed
- Blue DK Yarn: Approximately 100 yards of a smooth DK weight yarn (wool blend or acrylic).
- White Fluffy Yarn: Approximately 100 yards of a plush, “snowflake” style or chenille DK yarn for the ears and feet.
- Black Yarn: A small amount for embroidering the mouth and eyebrows.
- Crochet Hook: 3.0mm (D) hook (or a size that keeps your stitches tight so the stuffing doesn’t show).
- Safety Eyes: 2 small black safety eyes.
- Felt: A small piece of black felt for the nose.
- Other Notions:
- Polyfill stuffing.
- Tapestry needle.
- Black sewing thread.
- 8 inches of narrow white elastic.
- 2 buttons (approximately 3/4 inch in diameter).
Abbreviations (US Terms)
- MR: Magic Ring
- sc: Single crochet
- inc: Increase (2 sc in one stitch)
- dec: Decrease (sc 2 together)
- st(s): Stitch(es)
- ch: Chain
- sl st: Slip stitch
Step-by-Step Instructions
The Head
The head is worked in a continuous spiral. Do not join rounds with a slip stitch unless specified.
- Round 1: Create a MR and work 8 sc into it. (8 sts)
- Round 2: inc in each st around. (16 sts)
- Round 3: sc in each st around. (16 sts)
- Round 4: (sc 2, inc) repeat around. (24 sts)
- Round 5: sc in each st around. (24 sts)
- Round 6: (sc 3, inc) repeat around. (32 sts)
- Round 7: sc in each st around. (32 sts)
- Round 8: (sc 4, inc) repeat around. (40 sts)
- Round 9: sc in each st around. (40 sts)
- Round 10: (sc 5, inc) repeat around. (48 sts)
- Round 11: sc in each st around. (48 sts)
- Round 12: (sc 6, inc) repeat around. (56 sts)
- Round 13: sc in each st around. (56 sts)
- Round 14: (sc 7, inc) repeat around. (64 sts)
- Round 15: sc in each st around. (64 sts)
- Round 16: (sc 8, inc) repeat around. (72 sts)
- Rounds 17-21: sc in each st around. (72 sts)
- Round 22: (sc 7, dec) repeat around. (64 sts)
- Round 23: sc in each st around. (64 sts)
- Round 24: (sc 6, dec) repeat around. (56 sts)
Stop here to begin stuffing the head firmly with polyfill.
- Round 25: sc in each st around. (56 sts)
- Round 26: (sc 5, dec) repeat around. (48 sts)
- Round 27: sc in each st around. (48 sts)
- Round 28: (sc 4, dec) repeat around. (40 sts)
- Round 29: sc in each st around. (40 sts)
- Round 30: (sc 3, dec) repeat around. (32 sts)
- Round 31: sc in each st around. (32 sts)
- Round 32: (sc 2, dec) repeat around. (24 sts)
- Round 33: sc in each st around. (24 sts)
- Round 34: (sc 1, dec) repeat around. (16 sts)
- Round 35: dec around. (8 sts)
Fasten off, leaving a long tail. Weave the tail through the remaining 8 stitches, pull tight to close the hole, and secure with a knot. Use a tapestry needle to sew the bottom opening closed using a running stitch.
The Body
- Rounds 1-10: Work exactly as the head instructions. (48 sts)
- Rounds 11-22: sc in each st around. (48 sts)
- Rounds 23-30: Follow the decrease pattern from Round 28 of the head through to the end. (Ends with 8 sts)
Stuff the body firmly as you go. Fasten off and sew the bottom closed just as you did with the head.
The Lower Legs (Make 2)
Start with the white fluffy yarn.
- Round 1: MR 6 sc. (6 sts)
- Round 2: inc in each st around. (12 sts)
- Round 3: (inc 3 times, sc 3) repeat twice. (18 sts)
- Round 4: (inc 3 times, sc 6) repeat twice. (24 sts)
- Round 5: (inc 3 times, sc 9) repeat twice. (30 sts)
- Round 6: sc in each st around. (30 sts)
Switch to the blue yarn.
- Rounds 7-8: sc in each st around. (30 sts)
- Round 9: sc 14, dec, sc 14. (29 sts)
- Rounds 10-13: sc in each st around. (29 sts)
- Round 14: (dec 4 times), sc until 2 sts remain, dec. (24 sts)
- Round 15: sc in each st around. (24 sts)
- Round 16: (dec 4 times), sc until 2 sts remain, dec. (19 sts)
Stuff the leg lightly. Work 5 more rounds of sc around. Fasten off and leave a tail for sewing.
The Arms (Make 2)
Using blue yarn:
- Round 1: Ch 18, join into a circle with a sl st. (18 sts)
- Rounds 2-26: sc in each st around. (18 sts)
- Round 27: dec around. (9 sts)
Fasten off and weave in ends. Stuff very lightly.
The Ears (Make 2)
Start with white fluffy yarn. These are worked in rows (flat), not in a spiral.
- Row 1: Ch 25.
- Rows 2-4: sc in each st across.
Switch to blue yarn:
- Row 5: sc 3, dec, sc 3, dec, sc 4, dec, sc 3, dec, sc 3. (20 sts)
- Row 6: ch 1, turn; sc in each st across.
- Row 7: (sc 2, dec) twice, sc 4, (dec, sc 2) twice. (16 sts)
- Row 8: ch 1, turn; sc in each st across.
- Row 9: sc 1, (sc 1, dec) twice, sc 2, (dec, sc 1) twice, sc 1. (12 sts)
- Row 10: dec around. (6 sts)
Fasten off and leave a tail for sewing.
Finishing
Assembly
- Ears: Sew the ears to the top of the head, referencing your desired placement for a cute expression.
- Face: Insert safety eyes between rounds 18 and 20, spaced evenly. Cut a small oval of black felt for the nose and sew it centrally between the eyes. Using black yarn, embroider a small “V” shape for the mouth and two small arches for the eyebrows.
- Body: Sew the head securely to the body.
- Limbs: Sew the arms and legs to the body. Ensure the legs are positioned so the koala can sit upright.
The Curtain Tie-Back Feature
To turn your koala into a curtain tie-back, take your 8-inch piece of elastic and join the ends together to form a loop. Sew one end of the loop to the back of one arm and the other end to the back of the opposite arm. Finally, sew a button to the outer side of each paw. This allows you to wrap the koala around your curtain and secure it with the buttons!
Tips for Success
Safety First
If you are making this koala for a baby or a very young child, please make the following safety modifications:
- Embroider the eyes using black yarn instead of using plastic safety eyes.
- Embroider the nose instead of using felt and glue.
- Skip the buttons and the elastic, as these can be choking hazards.
- Ensure all limbs are sewn on very securely.
Perfecting Your Shape
The key to a professional-looking amigurumi is tension. If you see gaps where the stuffing is peeking through, try dropping down a hook size (e.g., from 3.0mm to 2.5mm). Always stuff your pieces firmly, but not so tight that the fabric stretches and loses its shape.
Yarn Alternatives
While a blue and white combination is classic, this koala looks wonderful in grey, charcoal, or even pastel colors. If you can’t find a “fluffy” yarn, a velvet or chenille yarn works perfectly for the ears and feet to give that soft, tactile contrast.