Knit Your Dream Silhouette: The Sophisticated Broken Rib Bodycon Dress
How to Knit a Sleek Fitted Bodycon Dress in Broken Rib
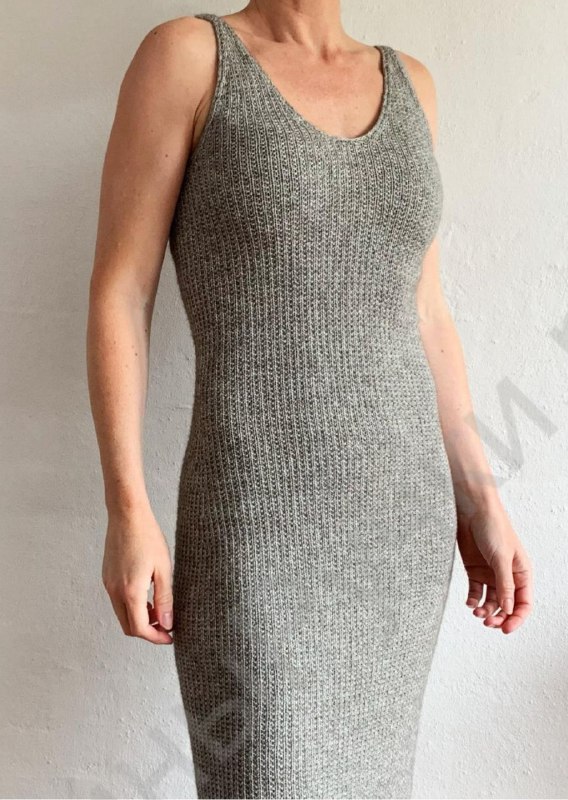
This elegant, form-fitting dress features a beautiful textured “broken rib” stitch that provides both stretch and a sophisticated look. The dress is constructed from the top down, beginning with four triangular straps that are joined to create the bodice, and then worked in the round down to the hem.
Materials and Tools
- Yarn: A fine yarn is recommended. Options include:
- 74% cotton, 16% wool, 10% yak (approx. 200m per 50g) worked as a single strand.
- 50% merino wool, 50% silk (approx. 800m per 100g) worked as a double strand.
- 80% wool, 20% linen (approx. 208m per 50g) worked as a single strand.
- Yarn Quantity:
- Short Dress: 250g to 450g depending on size.
- Long Dress: 350g to 550g depending on size.
- Needles: 3mm circular needles with an 80cm cable.
- Accessories: Stitch holders, waste yarn in a contrasting color, stitch markers, and a tapestry needle.
Gauge and Sizing
Gauge: 28 stitches x 38 rows = 10 cm x 10 cm (4″ x 4″) in broken rib stitch, after washing and blocking. It is highly recommended to knit a swatch to ensure the correct fit.
Sizing: Available for XXS through 3XL. This pattern is designed with negative ease (15-17 cm) to ensure a snug, body-hugging silhouette.
Abbreviations
- RS: Right Side
- WS: Wrong Side
- st(s): stitch(es)
- k: knit
- p: purl
- M1L: Make 1 Left (increase)
- M1R: Make 1 Right (increase)
- sl1-wyf: slip 1 stitch purlewise with yarn in front
- sl1-wyb: slip 1 stitch purlewise with yarn in back
- PM: place marker
- SM: slip marker
The Stitch Pattern: Broken Rib
This texture is created over an even number of stitches:
- Row 1 (RS): Knit all stitches.
- Row 2 (WS): *K1, P1*; repeat from * to the end of the row.
Step-by-Step Instructions
Step 1: Knitting the Straps
You will need to knit 4 identical triangular straps. Each strap starts with a temporary cast-on.
- Using waste yarn, cast on 9 stitches using the Long Tail Cast On method.
- Work 1 row of purl stitches with the waste yarn, then cut the waste yarn.
- Join your main working yarn.
- Row 1 (RS): Knit all stitches.
- Row 2 (WS): Establish the edges (double stockinette) and center pattern: sl1-wyf, k1, sl1-wyf, PM, k1, p1, k1, PM, sl1-wyf, k1, sl1-wyf.
- Row 3 (RS): k1, sl1-wyf, k1, SM, knit to M, SM, k1, sl1-wyf, k1.
- Row 4 (WS): sl1-wyf, k1, sl1-wyf, SM, k1, p1, k1, SM, sl1-wyf, k1, sl1-wyf.
- Repeat Rows 3-4 as specified for your size (ranging from 2 to 10 times).
Step 2: Strap Increases
To form the triangle shape, increases are made at the edges. For sizes XXS-XL, increases occur every 8th row. For 2XL-3XL, they occur every 6th row.
Example Increase Sequence (between markers):
- Row 1 (RS): k1, M1R, sl1-wyb, M1L, k1.
- Row 2 (WS): k1, sl1-wyf, p1, sl1-wyf, k1.
- Row 3 (RS): Knit.
- Row 4 (WS): *K1, P1*; repeat until 1 st before marker, k1.
- Rows 5-8: Repeat the Broken Rib pattern (Rows 3-4).
Continue following the increase pattern until you reach the required stitch count for your size (ranging from 39 to 59 stitches including edge stitches).
Step 3: Joining the Straps
Lay the straps out to form the top of the dress. Use a knitted seam to join the edges of the straps.
- Join the 3 edge stitches of the front strap to the 3 edge stitches of the back strap using a tapestry needle.
- In the first round, sew the edges together while picking up stitches from the extended edge sections.
- Connect the straps in a continuous loop to form the neckline and armholes.
Step 4: The Bodice
Now, begin working in the round from the top down.
- Work a round in Broken Rib: *P1, K1*; repeat until the end of the round.
- Round 1: Knit all stitches.
- Round 2: *K1, P1*; repeat until the marker.
- Continue in this pattern until the piece measures approximately 39-44 cm (depending on size) from the shoulder to the waistline.
Step 5: Hip Shaping
To create the curve of the hips, perform increases every 12th round.
- Increase Round: *M1R, sl1-wyb, M1L, knit to marker, PM*; repeat for both sides.
- Follow with the Broken Rib pattern for the next 11 rounds.
- Repeat the increase sequence 4 times in total.
Step 6: Finishing the Dress
Continue working in the Broken Rib pattern until the dress reaches your desired length:
- Short Dress: Approximately 85-96 cm from the top of the shoulder.
- Long Dress: Approximately 106-117 cm from the top of the shoulder.
Final Edge:
- Work 2 rounds of double stockinette:
- Round 1: *K1, sl1-wyf*; repeat to end.
- Round 2: *sl1-wyb, p1*; repeat to end.
- Bind off using the Italian Bind-off method for a professional, stretchy finish.
- Weave in all remaining ends