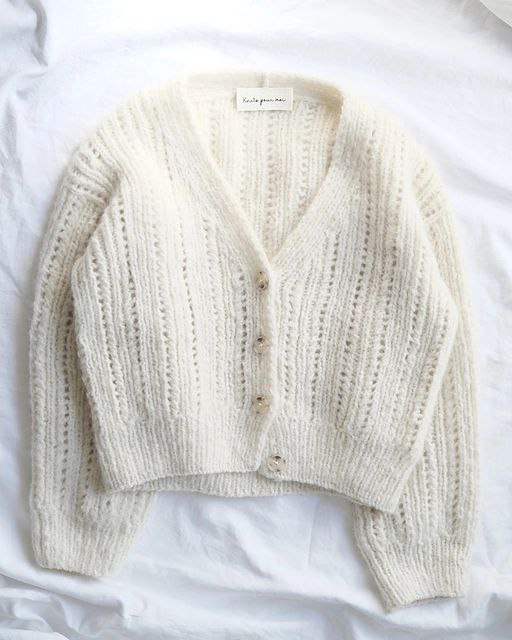
Sophistication in Every Stitch: The Elegant V-Neck Lace Cardigan Pattern
Elegant V-Neck Lace Cardigan Knitting Pattern
Create a timeless addition to your wardrobe with this stunning V-neck lace cardigan. This design features a delicate openwork pattern and a classic silhouette, making it a perfect project for knitters who love a blend of sophistication and cozy comfort. This cardigan is constructed top-down, ensuring a great fit and a satisfying knitting experience.
Materials and Measurements
Finished Sizes
This pattern is available in four sizes. Measurements are provided as: Size 1 (2) 3 (4).
- Chest Circumference: 40.5″ (103 cm), 46.2″ (117.3 cm), 52″ (131.9 cm), 57.6″ (146.4 cm)
- Length: 19″ (48.5 cm), 21.3″ (54 cm), 21.5″ (54.7 cm), 26.1″ (66.4 cm)
- Sleeve Length: 14.4″ (36.4 cm), 17.2″ (43.6 cm), 17.2″ (43.6 cm), 20″ (50.9 cm)
Yarn and Needles
- Yarn: Aran weight yarn. You will need approximately 670 (770) 800 (890) meters / 380 (438) 455 (505) grams.
- Main Needles: 5 mm (US 8) circular needles and double-pointed needles (or long circulars for magic loop).
- Ribbing Needles: 4 mm (US 6) circular needles.
Gauge
16.5 sts x 21 rows = 4″ x 4″ (10 x 10 cm) on 5 mm (US 8) needles after blocking.
Additional Notions
- Stitch markers
- Stitch holders
- Cable needle or scrap yarn
- Buttons (2 cm): 4 (4) 4 (5) buttons
- Tapestry needle for sewing
Abbreviations and Techniques
- K: Knit
- P: Purl
- YO: Yarn over
- K2tog: Knit 2 stitches together
- SSK: Slip, slip, knit
- M1R: Make 1 right
- M1L: Make 1 left
- M1RP: Make 1 right purl
- M1LP: Make 1 left purl
- RS: Right Side
- WS: Wrong Side
- sl1: Slip 1 stitch
Step-by-Step Instructions
Neckline Bands
Right Band: Using 5 mm (US 8) needles, cast on 9 sts using the long-tail method.
- Setup Row (WS): P2, (K1, P1) 3 times, P1.
- Row 1 (RS): K1, (K1, P1) 3 times, K2.
- Row 2 (WS): sl1 P, (P1, K1) 3 times, P2.
Repeat Rows 1 and 2 until the band reaches 12″ (12″ (12″ (16″)) or until you reach row 25 (25) 25 (33), ending on the RS. Cut yarn and place sts on a holder.
Left Band: Using 5 mm (US 8) needles, with the RS facing, pick up and knit 9 sts along the edge of the right band.
- Setup Row (WS): P2, (K1, P1) 3 times, P1.
- Row 1 (RS): sl1 K, (K1, P1) 3 times, K2.
- Row 2 (WS): P2, (K1, P1) 3 times, P1.
Repeat Rows 1 and 2 until the band reaches 12″ (12″ (12″ (16″)) or until you reach row 25 (25) 25 (33), ending on the RS. Cut yarn and place sts on a holder.
The Back Piece
With the RS facing, place the left band on the right and the right band on the left. Using a new thread, pick up and knit 41 (41) 41 (53) sts across the top edge. Turn the work.
- Setup Row (WS): Follow the setup row for the Back Chart.
- Body: Knit according to the Back Chart from Row 1 (RS) to Row 21 (25) 33 (31) (RS).
After the increase row, you will have added 42 (50) 66 (62) sts, for a total of 83 (91) 107 (115) sts on the needles.
Row 22 (26) 34 (32) (WS): Place the first 6 sts on a holder, knit the chart row to the last 6 sts, then place the last 6 sts on a holder. You now have 71 (79) 95 (103) sts on the needles.
Continue following the Back Chart from Row 23 (27) 35 (33) (RS) to Row 46 (60) 62 (70) (WS). Transfer all sts to waste yarn and cut the thread.
The Front Panels
Right Front: With the RS facing, position the neckline band at the top. Pick up and knit 20 (24) 32 (29) sts from the right shoulder. Transfer the 9 sts from the right band onto the needle. Turn work.
- Setup Row (WS): Knit the 8 band sts (sl1 P, P1, K1, P1, K1, P1, K1, P1), then follow the setup row for the Right Front Chart.
- Row 1 (RS): Follow Row 1 of the Right Front Chart, then knit the 8 band sts (K1, P1, K1, P1, K1, P1, K2).
Continue following the Right Front Chart while maintaining the band pattern until Row 40 (48) 48 (60) (WS).
Buttonholes (Sizes 2, 3, 4): Row 49 (49) 61 (RS): Knit according to the chart to the last 5 sts, YO, K2tog, P1, K2. Row 50 (50) 62 (WS): Knit 8 band sts, then follow Row 50 (50) 62 of the Right Front Chart. Cut yarn.
Left Front: Transfer the 9 sts from the left band onto the needle, then pick up and knit 20 (24) 32 (29) sts from the left shoulder. Turn work.
- Setup Row (WS): Follow the setup row for the Left Front Chart, then knit 8 band sts (P1, K1, P1, K1, P1, K1, P2).
- Row 1 (RS): Knit 8 band sts (sl1 K, K1, P1, K1, P1, K1, P1, K1), then follow Row 1 of the Left Front Chart.
Continue following the Left Front Chart and maintaining the band pattern until Row 40 (50) 50 (62) (WS).
Joining and the Main Body
Knit Row 41 (51) 51 (63) of the Left Front Chart, then cast on 5 (1) 5 (1) sts using the backwards loop method. Continue by knitting Row 47 (61) 63 (71) of the Back Chart, then cast on another 5 (1) 5 (1) sts. Finally, knit Row 41 (51) 51 (63) of the Right Front Chart.
Continue knitting the body in the lace pattern (12 sts, 2 rows) and maintaining the band ribbing. Knit from the armholes until the body length reaches 21 (21) 21 (28) cm (roughly 8.3″ to 11″), which is about 7 cm (2.8″) shorter than your final desired length.
Buttonholes:
- Sizes 1 (2) 3: In rows 49, 65, 81, 97 (RS), knit as per chart to the last 5 sts, YO, K2tog, P1, K2.
- Size 4: In rows 61, 79, 97, 115, 133 (RS), knit as per chart to the last 5 sts, YO, K2tog, P1, K2.
Bottom Ribbing
Switch to 4 mm (US 6) needles.
- Setup Row (RS): Knit 8 band sts, P2tog, K1, P1, K1, P2tog, (K1, P1, K1, P1, K1, P2tog, K1, P1, K1, P2tog) until the last 8 sts, knit 8 band sts.
- Ribbing Row (WS): sl1 K, (P1, K1) to the last 2 sts, P2.
- Ribbing Row (RS): sl1 K, (K1, P1) to the last 2 sts, K2.
Repeat these two ribbing rows until the ribbing measures 7 cm (approx 2.8″) or 18 rows. Cut yarn and bind off using the tubular method.
The Sleeves
Left Sleeve: Using 5 mm (US 8) needles, pick up sts from the left armhole: 5 (1) (2) (0) sts under the arm, 30 (38) 38 (47) sts from the front, transfer 6 sts from the shoulder, 19 (27) 23 (30) sts from the back, and 0 (0) 3 (1) sts under the arm. Total: 60 (72) 72 (84) sts.
Right Sleeve: Pick up sts from the right armhole: 5 (0) 3 (1) sts under the arm, 19 (27) 23 (30) sts from the back, transfer 6 sts from the shoulder, 30 (38) 38 (47) sts from the front, and 0 (1) (2) (0) sts under the arm. Total: 60 (72) 72 (84) sts.
Sleeve Body: Place a marker and knit in the round. Follow the sleeve chart until the length is 38 cm (15″) or 7 cm (2.8″) shorter than your desired length.
Sleeve Ribbing: Switch to 4 mm (US 6) needles.
- Setup Row: (K1, P1, K1, P1, K1, P2tog, K1, P1, K1, P2tog) repeat to marker.
You will have decreased 10 (12) 12 (14) sts, leaving 50 (60) 60 (70) sts. Knit in (K1, P1) ribbing for 18 rows or until the ribbing measures 7 cm (2.8″). Tubular bind off.
Finishing Touches
Weave in all loose ends. Block the cardigan to the final measurements to open up the lace pattern. Once blocked, sew on the buttons and enjoy your handmade lace cardigan