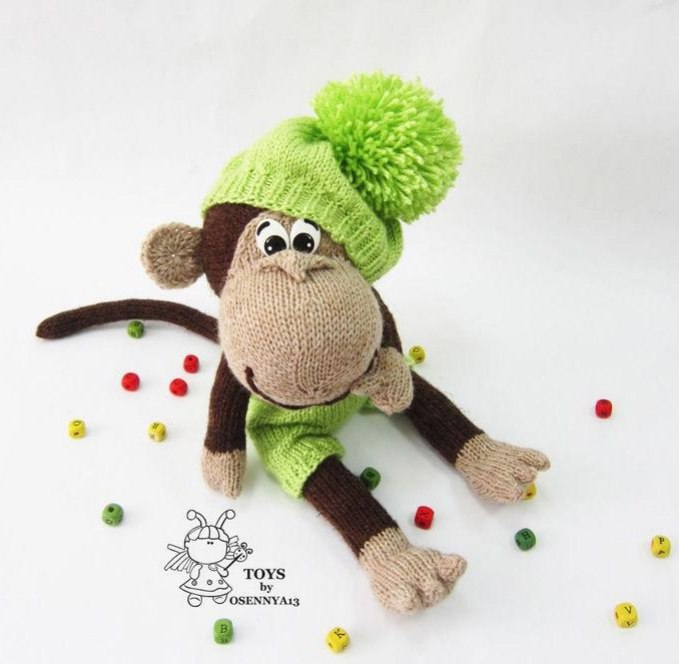
Knitted Monkey Pattern: A Playful Amigurumi
Arms (Make 2)
Using chocolate color yarn, cast on 6 stitches. Work 2 rows in stockinette stitch.
Row 3: Increase 1 stitch at the beginning and end of the row.
Rows 4-6: Work in stockinette stitch.
Repeat rows 3-6 two more times. (12 stitches)
Rows 15-16: Knit all stitches, increasing at the beginning, middle, and end of the row. (18 stitches)
Rows 17-28: Work in stockinette stitch.
Row 29: Knit 6, (knit 2 together, knit 4) twice. (16 stitches)
Rows 30-38: Work in stockinette stitch.
Row 39: Knit 5, (knit 2 together, knit 3) twice, knit 1. (14 stitches)
Rows 40-46: Work in stockinette stitch.
Switch to milk color yarn and work 2 rows in stockinette stitch.
Cast on 6 stitches at the beginning of the next 2 rows for the thumb. (26 stitches)
Work 2 rows in stockinette stitch.
Bind off 4 stitches at the beginning of the next 2 rows. (18 stitches)
Work 2 rows in stockinette stitch.
Fingers
Little finger: Knit 2, increase, knit 1, increase twice, knit 3, increase. Turn and work on these 15 stitches. From the wrong side, purl 6 stitches. Turn and work only on these 6 stitches. Work 5 rows in stockinette stitch. Cut yarn, thread through stitches, pull tight.
Ring finger: Return to 9 stitches on the right needle. Attach milk color yarn. Knit 1, increase from 7 stitches on the left needle. Turn and work with this number. In the next row, purl 6 stitches. Turn and work with 6 stitches. Work 7 rows in stockinette stitch. Cut yarn, thread through stitches, pull tight.
Middle finger: Attach yarn to 6 stitches on the right needle. Knit 1, increase from 5 stitches, knit 5 on the left needle. Turn and work on these 9 stitches. In the next row, purl 6 stitches. Turn and work with 6 stitches. Work 8 rows in stockinette stitch. Cut yarn, thread through stitches, pull tight.
Index finger: Attach yarn to 3 stitches on the right needle and work stitches from the left needle. (6 stitches) In the next row, purl all 6 stitches. Work 8 rows in stockinette stitch. Cut yarn, thread through stitches, pull tight.
Legs (Make 2)
Using chocolate color yarn, cast on 16 stitches. Work 10 rows in stockinette stitch.
Row 11: Knit 4, (increase, knit 5) twice. (18 stitches)
Rows 12-20: Work in stockinette stitch.
Row 21: Knit 4, (increase, knit 6) twice. (20 stitches)
Rows 22-30: Work in stockinette stitch.
Row 31: Knit 5, increase, knit 7, increase, knit 6. (22 stitches)
Rows 32-40: Work in stockinette stitch.
Row 41: Knit 5, increase, knit 8, increase, knit 7. (24 stitches)
Rows 42-54: Work in stockinette stitch.
Bind off 3 stitches at the beginning of the next 2 rows. (18 stitches)
Decrease 1 stitch at the beginning and end of the next row (knit 2 together).
Next row: Purl all stitches.
Repeat the last 2 rows three times. (10 stitches)
Decrease 1 stitch at the beginning and end of the next 2 rows. (6 stitches)
Bind off all stitches, cut yarn, and secure.
Foot (Make 2)
Using milk color yarn, cast on 14 stitches. Work 2 rows in stockinette stitch.
Row 3: Increase, knit 4, increase, knit 1, repeat twice. (18 stitches)
Rows 4-8: Work in stockinette stitch.
Cast on 4 stitches at the beginning and end of the next 2 rows for the big toe. (26 stitches)
Knit the toes the same way as the fingers.
Tail (Make 1)
Using chocolate color yarn, cast on 10 stitches. Work 30 rows in stockinette stitch.
Cut yarn, thread through stitches, pull tight, and secure.
Assembly
Sew all pieces using a mattress stitch with a yarn needle with a large eye. You can also join seams with a crochet hook, but a needle creates neater seams.
Mattress Stitch Instructions
- Place the two pieces you are joining side by side with the right sides facing up.
- Catch the horizontal thread between the first and second stitches of one row.
- On the second piece, catch the first and second horizontal threads.
- Repeat, turning the work from the right side to the wrong side and back.
Body Assembly
Pull the body closed along the lower stitches and sew up to the waist. Stuff with filling, then continue sewing the edge, gradually stuffing the toy.
Head Assembly
Sew the head from top to bottom, gradually stuffing. Attach the head to the body.
Limbs
After sewing the side seams on the arms and legs, attach them to the body. Sew the tail in place.
Face
Sew the face piece to the head, attach the eyes, and stuff the muzzle with filling. Embroider or sew a decorative stitch for the mouth.
Ears
Attach the ears to the sides of the head.
Nose
You can create a nose using a button, bead, or a knitted triangle attached to the muzzle
Congratulations! Your Playful Monkey Is Complete.
You did it! Your beautiful and playful monkey is finished. She is full of personality and ready to be loved.
This lovely monkey is perfect for:
- Gifts – for monkey lovers of all ages
- Decorations – she looks beautiful on a shelf
- Cuddling – she is the perfect size for little hands