Adorable Amigurumi Seagull Crochet Pattern: A Step-by-Step Tutorial
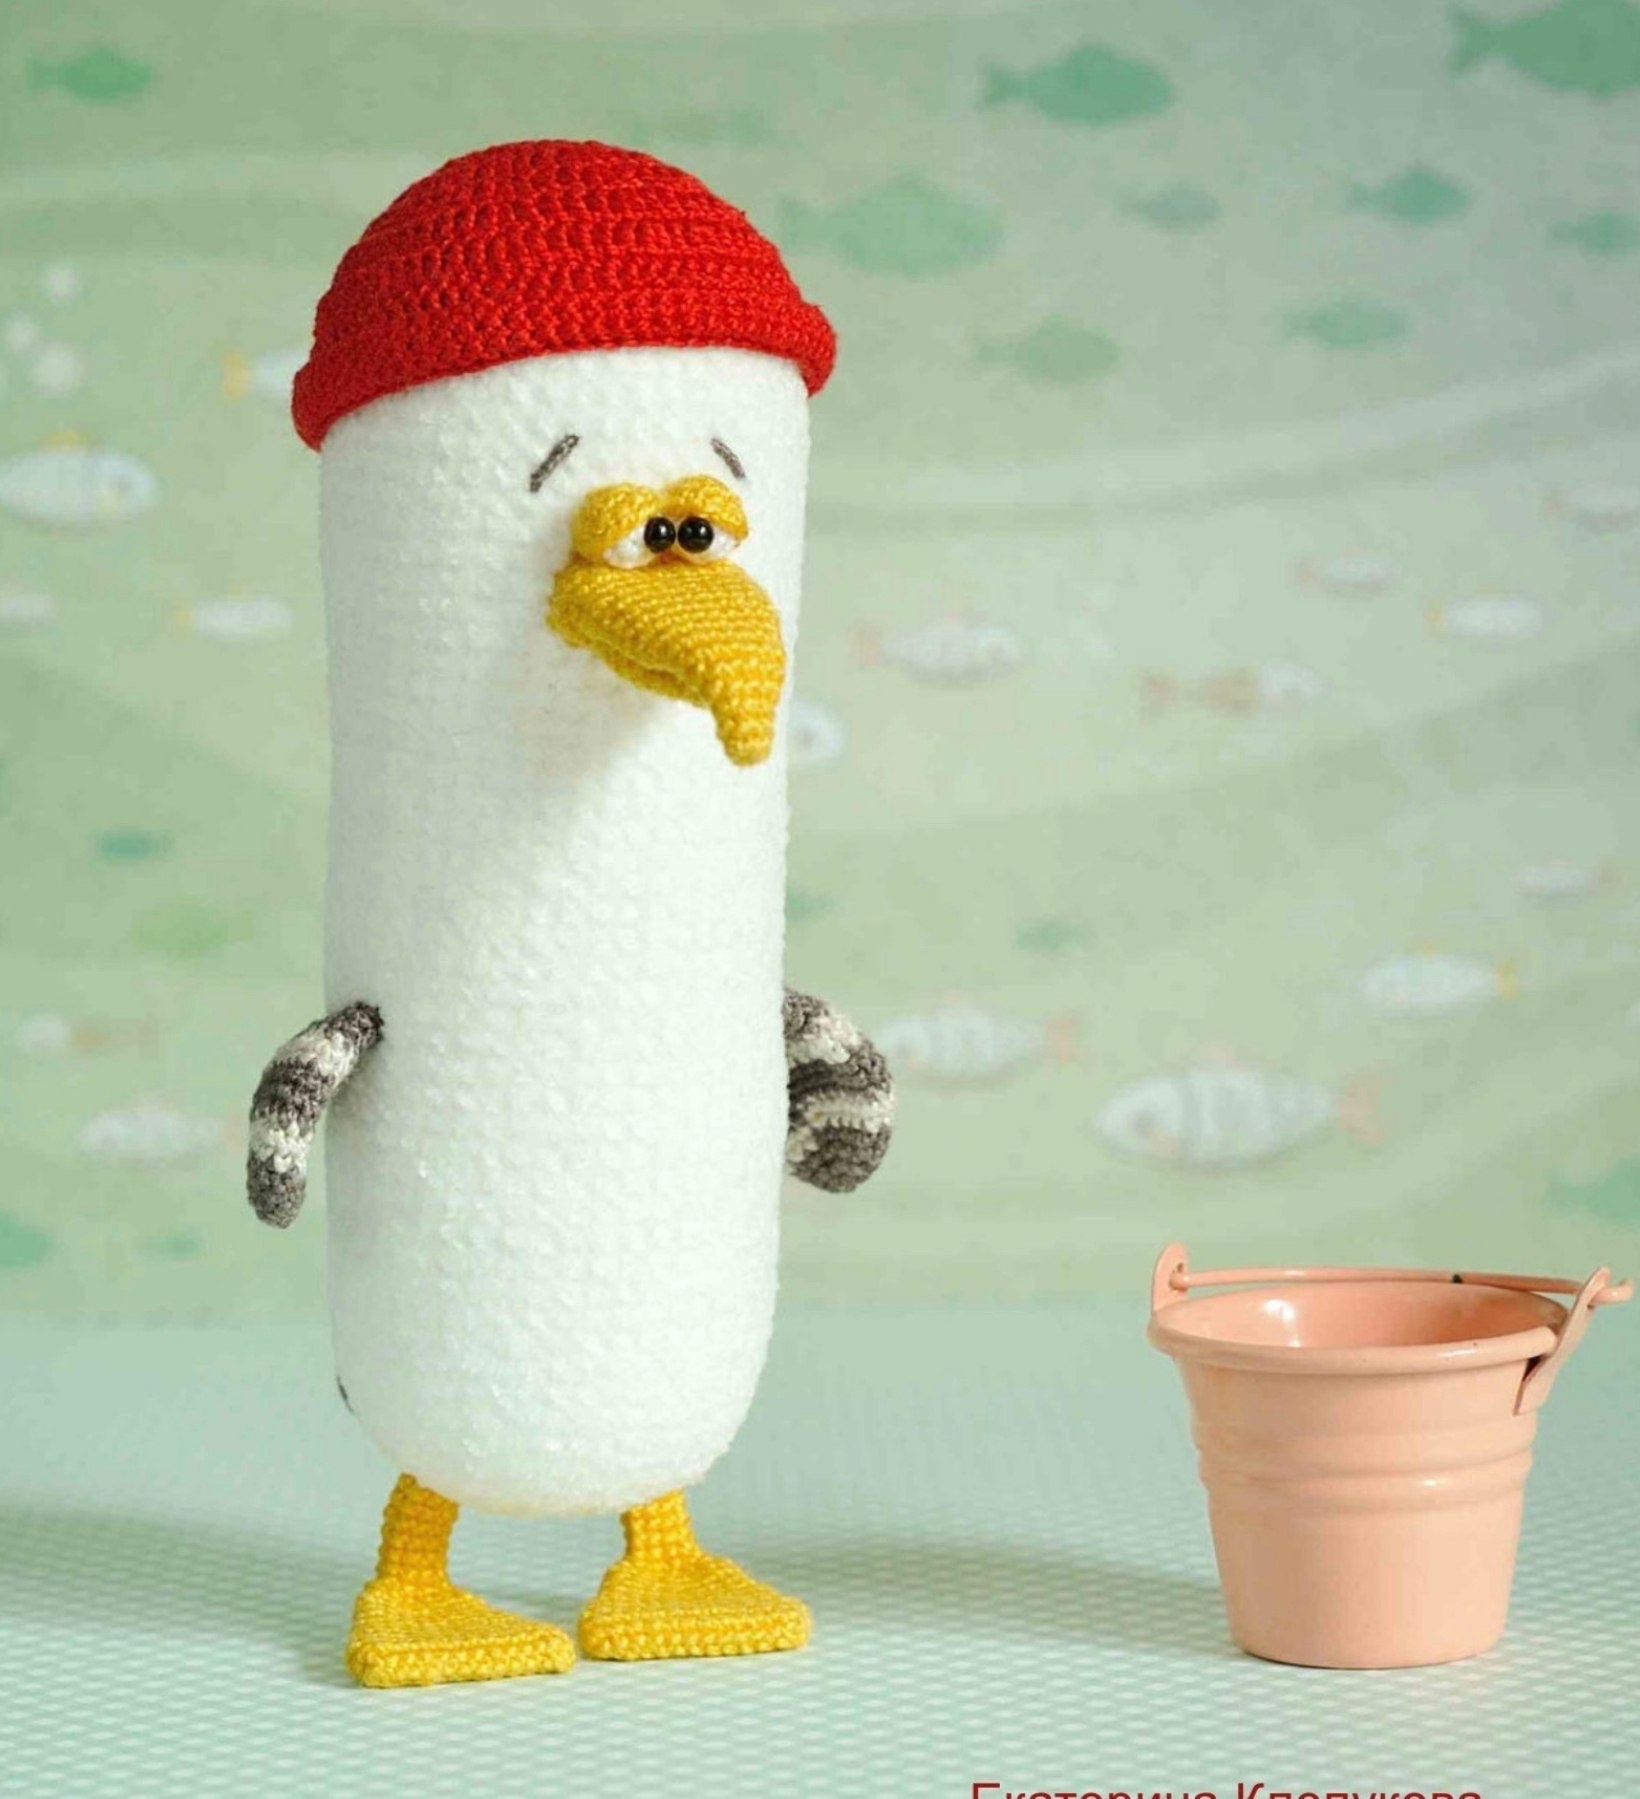
There is something incredibly charming about seaside creatures, and nothing captures that coastal vibe quite like a seagull! If you are looking for a fun, whimsical project to brighten up your home decor or to gift to a little one, this amigurumi seagull is the perfect choice. With its quirky expression and tiny red hat, this little bird is sure to bring a smile to anyone’s face.
This pattern is designed to be beginner-friendly, making it an excellent project for those looking to practice color changes, working with wire for poseability, and assembling multiple small parts. By the time you finish, you’ll have a delightful little friend standing about 5.5 inches tall!
Materials & Abbreviations
To achieve the best results and ensure your seagull reaches the intended size, I recommend using the following materials and tools. You can certainly substitute yarns, but try to find something with a similar weight and texture.
Yarn Requirements
- Body: White micro-velvet or chenille yarn (approx. 1.5mm hook size).
- Feet, Beak, and Eyelids: Yellow cotton yarn (approx. 0.9mm hook size).
- Tail and Wings: Cotton yarn in both Light Gray and Dark Gray (approx. 0.9mm hook size).
- Eyes: White cotton yarn (approx. 0.9mm hook size).
- Hat: Red cotton yarn (approx. 0.9mm hook size).
- Hair/Eyebrows: A small amount of thin, textured brown yarn (such as wool embroidery floss or a fuzzy fiber).
Tools & Notions
- Crochet Hooks: 1.5mm and 0.9mm.
- Stuffing: Poly-fill or similar polyester fiberfill.
- Wire:
- 1mm aluminum wire (approx. 3.5 inches long) for the wings.
- 0.6mm white florist wire (approx. 6 inches long) for the feet.
- Two pieces of wire for the beak: one 3-inch piece and one 2.5-inch piece.
- Eyes: 3mm black half-beads for the pupils.
- Other: Clear craft glue, scissors, sewing needles, pins, wire cutters, and pliers.
- Stuffing Tools: Chopsticks, toothpicks, or skewers to help pack the stuffing into small spaces.
Abbreviations (US Terms)
- MR: Magic Ring
- ch: Chain
- sc: Single crochet
- hdc: Half double crochet
- dc: Double crochet
- sl st: Slip stitch
- inc: Increase
- dec: Decrease
- (…) * n: Repeat the instructions inside the parentheses n times
- The number in parentheses at the end of a row indicates the total stitch count for that row.
Step-by-Step Instructions
The Body
Use white micro-velvet yarn and a 1.5mm hook. Remember to stuff the piece as you go!
Since micro-velvet can be tricky to work into a traditional Magic Ring, try this instead: Chain 2, then work 6 sc into the second chain from your hook.
- Row 1: 6 sc in MR (6)
- Row 2: 6 inc (12)
- Row 3: (1 sc, inc) * 6 (18)
- Row 4: (2 sc, inc) * 6 (24)
- Row 5: (3 sc, inc) * 6 (30)
- Row 6: (4 sc, inc) * 6 (36)
- Row 7: (5 sc, inc) * 6 (42)
- Row 8: (6 sc, inc) * 6 (48)
- Rows 9–50: 48 sc (42 rows total)
- Row 51: (6 sc, dec) * 6 (42)
- Row 52: (5 sc, dec) * 6 (36)
- Row 53: (4 sc, dec) * 6 (30)
- Row 54: (3 sc, dec) * 6 (24)
- Row 55: (2 sc, dec) * 6 (18)
- Row 56: (1 sc, dec) * 6 (12)
- Row 57: 6 dec (6)
Fasten off, pulling the remaining hole closed through the front loops. Weave in your ends inside the body.
The Feet (Make 2)
Use yellow cotton yarn and a 0.9mm hook.
- Row 1: Ch 13. From the 2nd ch from the hook: 11 sc, 3 inc in the last stitch. Working on the other side of the chain: 10 sc, 1 inc (26)
- Rows 2–4: 26 sc (3 rows)
- Row 5: (dec, 11 sc) * 2 (24)
- Row 6: (10 sc, dec) * 2 (22)
- Row 7: 22 sc
Note: Before continuing, take a 6-inch piece of florist wire, bend it into a “V” shape, and insert it into the foot. Continue crocheting around it.
- Row 8: (dec, 9 sc) * 2 (20)
- Row 9: 4 sc, dec, 8 sc, dec, 4 sc (18)
- Rows 10–11: 18 sc (2 rows)
- Row 12: (1 sc, dec) * 6 (12)
- Row 13: (2 sc, dec) * 3 (9)
- Rows 14–20: 9 sc (7 rows)
Fasten off, leaving a long tail for sewing the feet to the body.
The Tail
The tail is made of three parts using dark and light gray cotton yarn and a 0.9mm hook.
The Center Part
- Row 1: 6 sc in MR (6)
- Row 2: 6 inc (12)
- Row 3: (1 sc, inc) * 6 (18)
- Rows 4–5: 18 sc (2 rows) – Use Dark Gray
- Rows 6–7: 18 sc (2 rows) – Switch to Light Gray
- Row 8: (4 sc, dec) * 3 (15) – Switch to Dark Gray
- Rows 9–10: 15 sc (2 rows)
- Row 11: (3 sc, dec) * 3 (12)
- Rows 12–13: 12 sc (2 rows)
- Row 14: (2 sc, dec) * 3 (9)
- Rows 15–16: 9 sc (2 rows)
Stuff firmly and fasten off, leaving a long tail.
The Side Parts (Make 2)
- Row 1: 6 sc in MR (6)
- Row 2: 6 inc (12)
- Row 3: 12 sc
- Rows 4–7: 12 sc (4 rows) – Use Light Gray
- Row 8: (2 sc, dec) * 3 (9) – Switch to Dark Gray
- Rows 9–10: 9 sc (2 rows)
Stuff firmly and fasten off, leaving long tails for assembly.
The Wings (Make 2)
Use dark and light gray cotton yarn and a 0.9mm hook.
- Row 1: 6 sc in MR (6)
- Row 2: 6 inc (12)
- Row 3: (3 sc, inc) * 3 (15) – Use Dark Gray
- Row 4: (4 sc, inc) * 3 (18)
- Row 5: (5 sc, inc) * 3 (21) – Switch to Light Gray
- Row 6: (6 sc, inc) * 3 (24)
- Rows 7–11: 24 sc (5 rows total) – Alternate colors as per the pattern sequence
- Row 12: (6 sc, dec) * 3 (21) – Switch to Dark Gray
- Row 13: (5 sc, dec) * 3 (18)
- Row 14: 18 sc
Note: Do not stuff the wings. Insert a 3.5-inch piece of aluminum wire (folded in half) into the wing before finishing.
The Beak
The beak consists of two parts worked in yellow cotton yarn with a 0.9mm hook.
Lower Part
- Row 1: 6 sc in MR (6)
- Row 2: (1 sc, inc) * 3 (9)
- Row 3: (2 sc, inc) * 3 (12)
- Row 4: (3 sc, inc) * 3 (15)
- Row 5: (4 sc, inc) * 3 (18)
- Rows 6–7: 18 sc (2 rows)
Fasten off. Do not stuff.
Upper Part
- Row 1: 6 sc in MR (6)
- Row 2: 6 sc
- Row 3: (2 sc, inc) * 2 (8)
- Row 4: (3 sc, inc) * 2 (10)
- Row 5: (4 sc, inc) * 2 (12)
- Row 6: (5 sc, inc) * 2 (14)
- Row 7: (6 sc, inc) * 2 (16)
- Row 8: (7 sc, inc) * 2 (18)
- Row 9: (8 sc, inc) * 2 (20)
- Rows 10–14: 20 sc (5 rows)
Do not fasten off. Lay the lower part on top of the upper part and work 8 sc through both layers to join them. Then continue working in the round:
- Row 15: (2 sc, inc) * 4 on the top part, and 10 sc on the bottom part (26)
- Rows 16–17: 26 sc (2 rows)
Fasten off, leaving a long tail. Insert a 3-inch wire into the upper part and a 2.5-inch wire into the lower part. Secure the wire tips with a stitch of yellow yarn.
Eyes, Eyelids, and Face
Use white and yellow cotton yarn with a 0.9mm hook.
Eyes (Make 2)
- Row 1: 6 sc in MR (6)
- Row 2: 6 inc (12)
- Row 3: 12 sc
- Row 4: 6 dec (6)
Stuff lightly and fasten off.
Eyelids (Make 2)
- Row 1: 6 sc in MR (6)
- Row 2: 6 inc (12)
- Row 3: (5 sc, inc) * 2 (14)
Fasten off, leaving a long tail.
Finishing
Assembly
- The Beak: Position the beak on the face between rows 17 and 21 of the body. The upper wire entry should be between rows 18 and 19 (about 4 sc apart), and the lower wire entry between rows 20 and 21 (about 2 sc apart). Sew it securely.
- The Eyes & Eyelids: Place the white eyes close together just above the beak. Place the yellow eyelids over the eyes at an angle for a “half-closed” look. Glue or sew the 3mm black beads onto the center of the white eyes to create pupils.
- The Eyebrows: Using dark gray yarn, embroider eyebrows above the eyes using a long stitch, then use backstitches to add a little volume.
- The Hair: Take three 1.5-inch pieces of thin brown yarn. Fold them in half, pull them through the center of the top of the head using a 0.9mm hook, and secure them by pulling the ends through the loop. Repeat for the other two hairs.
- The Wings: Sew the wings onto the body at an angle. The bottom wire entry should be between rows 34 and 35, and the top entry between rows 35 and 36 (4 sc apart). Bend the wire to your liking.
- The Tail: Sew the center tail piece to the body at approximately row 11 from the bottom. Position it centered between the feet. Sew the two side pieces to the center piece, about one row lower.
- The Hat: Use red cotton yarn and a 0.9mm hook.
- Row 1: 10 sc in MR (10)
- Row 2: 10 inc in dc (20)
- Row 3: (1 dc, inc) * 10 (30)
- Row 4: (2 dc, inc) * 10 (40)
- Row 5: (3 dc, inc) * 10 (50)
- Row 6: (4 dc, inc) * 10 (60)
- Row 7: (5 dc, inc) * 10 (70)
- Row 8: 70 dc
- Row 9: 68 dc, 1 hdc, 1 sc (70)
- Row 10: 70 sc in front loops only
- Rows 11–12: 70 sc (2 rows)
Fasten off and weave in ends. For a stylish look, fold the last three rows of the hat upward to create a brim.
Tips
- Tension is Key: When working with very fine hooks (0.9mm), keep your tension consistent to ensure the stuffing doesn’t peek through.
- Wire Safety: Always use pliers to bend your wires and ensure the ends are tucked away safely so they don’t poke through the crochet fabric.
- Color Changes: To make color changes look professional, change yarn on the last pull-through of the stitch before the new color.
- Poseability: Don’t be afraid to experiment with the angles of the wings and feet once they are attached to find the perfect “personality” for your seagull!