DIY Adorable Little Lamb Baby Comforter Pattern
Creating a handmade lovey or comforter for a newborn is one of the most rewarding projects a maker can undertake. These soft, comforting toys become a baby’s favorite security object, providing a sense of safety and warmth during naps and cuddles. Today, we are walking through the creation of this precious Little Lamb Baby Comforter.
This project combines classic knitting techniques with a beautiful textured “wool” effect to create a toy that is as tactile as it is cute. Whether you are preparing a baby shower gift or making something special for your own little one, this detailed guide will help you every step of the way. This pattern is designed for those who enjoy a cozy, tight stitch to ensure the stuffing stays securely inside, making it safe and durable for baby use.
Materials & Abbreviations
To get started, gather the following materials. We recommend using a soft, baby-safe acrylic or wool blend that is machine washable, as baby toys tend to see a lot of action!
Materials Needed
- Yarn: Medium weight (DK or Light Worsted) in two colors: White (for the head, ears, and limbs) and Beige (for the wool cap and body).
- Knitting Needles: 2.0mm (US 0) knitting needles. You will need these for the amigurumi-style parts and a circular needle for the body.
- Safety Eyes: A pair of black plastic safety eyes.
- Stuffing: High-quality polyester fiberfill.
- Tools: A tapestry needle for sewing, a pair of scissors, and a lighter (to secure the eye posts).
Abbreviations Used (US Terms)
- K: Knit stitch
- P: Purl stitch
- Inc: Increase (creating a new stitch from the loop below)
- Dec: Decrease (knitting two stitches together)
- YO: Yarn Over
- St(s): Stitch(es)
- Rep: Repeat
Step-by-Step Instructions
The Head (White Yarn)
The head is worked in the round to create a seamless sphere. Cast on 20 stitches. Leave a long tail (about 12 inches) for sewing the cast-on edge closed and for attaching the head to the body later.
- Rows 1-3: Knit all stitches. (20 sts)
- Row 4: (1 K, Inc) repeat 10 times. (30 sts)
- Rows 5-6: Knit all stitches. (30 sts)
- Row 7: (2 K, Inc) repeat 10 times. (40 sts)
- Rows 8-16: Knit all stitches. (40 sts)
- Row 17: Knit all stitches. While knitting, place markers at the 18th and 23rd stitches; these are where the eyes will go.
- Rows 18-27: Knit all stitches. (40 sts)
- Row 28: (2 K, Dec) repeat 10 times. (30 sts)
- Rows 29-30: Knit all stitches. (30 sts)
Now, use your tapestry needle to sew the initial cast-on edge closed by weaving through the stitches and pulling them tight. Insert the safety eyes into the marked stitches and snap the fasteners in place. For extra safety, carefully melt the ends of the eye posts with a lighter and press them flat against the inside of the head.
- Row 31: (1 K, Dec) repeat 10 times. (20 sts)
- Rows 32-33: Knit all stitches. (20 sts)
- Row 34: Perform 10 decreases across the row. (10 sts)
Cut the yarn, thread it through the remaining 10 stitches, and pull tight. Fill the head firmly with fiberfill and secure the thread with a knot.
The Woolly Cap (Beige Yarn)
The cap creates the “fluffy” look of the sheep. Cast on 40 stitches and work in the round.
- Row 1: (1 K, 1 P) repeat 20 times. (40 sts)
- Row 2: (1 K, slip 1 P with a YO) repeat 20 times. (40 sts)
- Row 3: (1 P, slip the YO stitch with another YO) repeat 20 times. (40 sts)
- Row 4: (1 K, Purl the YO stitch) repeat 20 times. (40 sts)
Repeat Rows 1 through 4 a total of 6 more times (reaching 24 rows total). This creates the chunky, textured wool pattern.
- Row 25: Perform 20 decreases. (20 sts)
- Row 26: Perform 10 decreases. (10 sts)
- Row 27: Perform 5 decreases.
Cut the yarn, weave it through the remaining stitches, and pull tight to close the top.
The Ears (White Yarn – Make 2)
Cast on 9 stitches and work in the round.
- Rows 1-2: Knit all stitches. (9 sts)
- Row 3: (Inc, 2 K) repeat 3 times. (12 sts)
- Row 4: Knit all stitches. (12 sts)
- Row 5: (3 K, Inc) repeat 3 times. (15 sts)
- Rows 6-13: Knit all stitches. (15 sts)
- Row 14: 7 Dec, 1 K. (8 sts)
- Row 15: 4 Dec.
Cut the yarn, weave through the remaining stitches, and pull closed. Leave a tail for sewing.
The Limbs (White Yarn – Make 4)
These small spheres act as the arms and legs. Cast on 10 stitches and work in the round.
- Row 1: Knit all stitches. (10 sts)
- Row 2: Purl all stitches. (10 sts)
- Row 3: (1 K, YO) repeat 10 times. (20 sts)
- Row 4: Purl all stitches. (Ensure you purl the YO stitches tightly so no holes form). (20 sts)
- Row 5: Knit all stitches. (20 sts)
- Row 6: Purl all stitches. (20 sts)
Repeat Rows 5 and 6 five more times (10 rows total). Then:
- Row 17: Perform 10 decreases using knit stitches. (10 sts)
- Row 18: Purl all stitches. (10 sts)
Sew the cast-on edge closed and stuff the ball. Finally, perform 5 decreases in Row 19, then pull the yarn through the remaining loops and secure.
The Body (Beige Yarn)
The body is a textured rectangle worked flat on circular needles. Cast on 40 stitches. The first and last stitches of every row are edge stitches (do not count them in the pattern repeats).
- Row 1: Edge st, (1 K, 1 P) repeat 18 times, Edge st. (40 sts)
- Row 2: Edge st, (1 K, slip 1 P with a YO) repeat 18 times, Edge st. (40 sts)
- Row 3: Edge st, (slip the YO stitch with another YO, then K the P stitch) repeat 18 times, Edge st. (40 sts)
- Row 4: Edge st, (K the P stitch, then Purl the double-YO stitch) repeat 18 times, Edge st. (40 sts)
Repeat these four rows 19 more times for a total of 76 rows. Finish with one final row as worked in Row 1, then bind off all stitches.
Finishing
Now comes the magic part—assembling your little lamb!
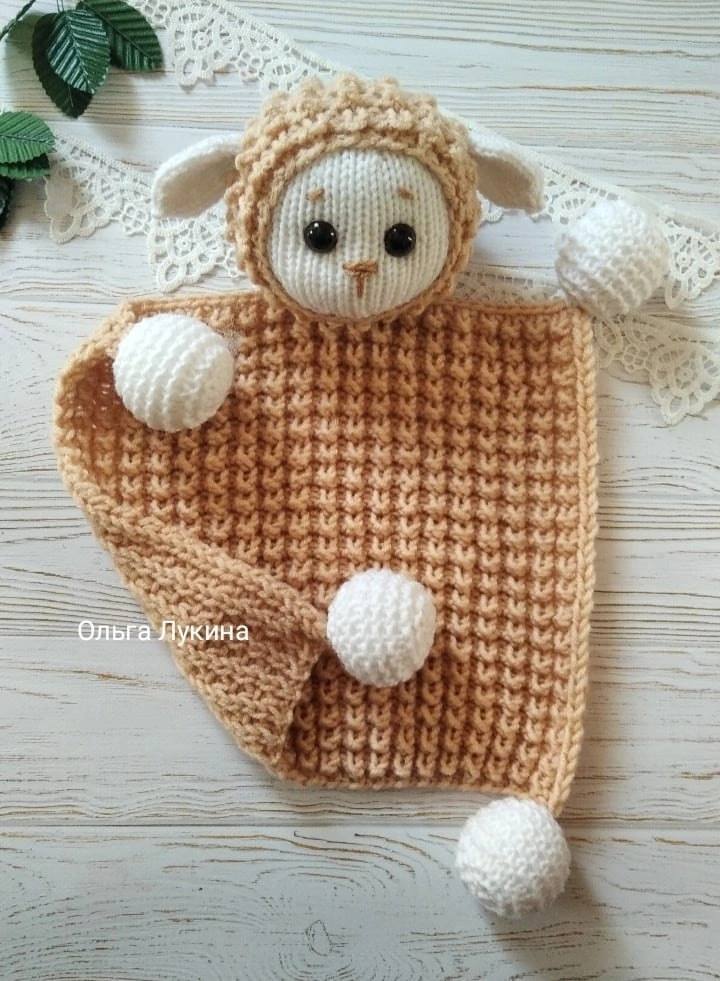
- The Head: Sew the beige woolly cap onto the top of the white head. Attach the two ears to the sides of the head, just beneath the edge of the cap.
- The Body: Sew the head securely to the top center of the beige rectangular body.
- The Limbs: Sew two balls to the upper corners of the body (arms) and two balls to the bottom corners (legs).
- The Face: Using a slightly darker beige or brown yarn, embroider a small “V” shape for the nose and two small straight lines above the eyes for eyebrows. This gives the lamb its sweet, innocent expression.
Tips for Success
- Tension is Key: Because this is a baby toy, keep your tension tight. If your stitches are too loose, the stuffing may peek through.
- Secure Your Knots: Always double-knot your yarn when finishing a piece and weave the ends deep into the stuffing for maximum security.
- Safety First: If you are making this for a very young infant, consider embroidering the eyes with black yarn instead of using plastic safety eyes to eliminate choking hazards.
- Blocking the Body: If the rectangular body curls at the edges, lightly steam it with an iron (without touching the fabric directly) to help it lay flat and soft.