Cute Crochet Duckling Pattern: A Complete Amigurumi Tutorial
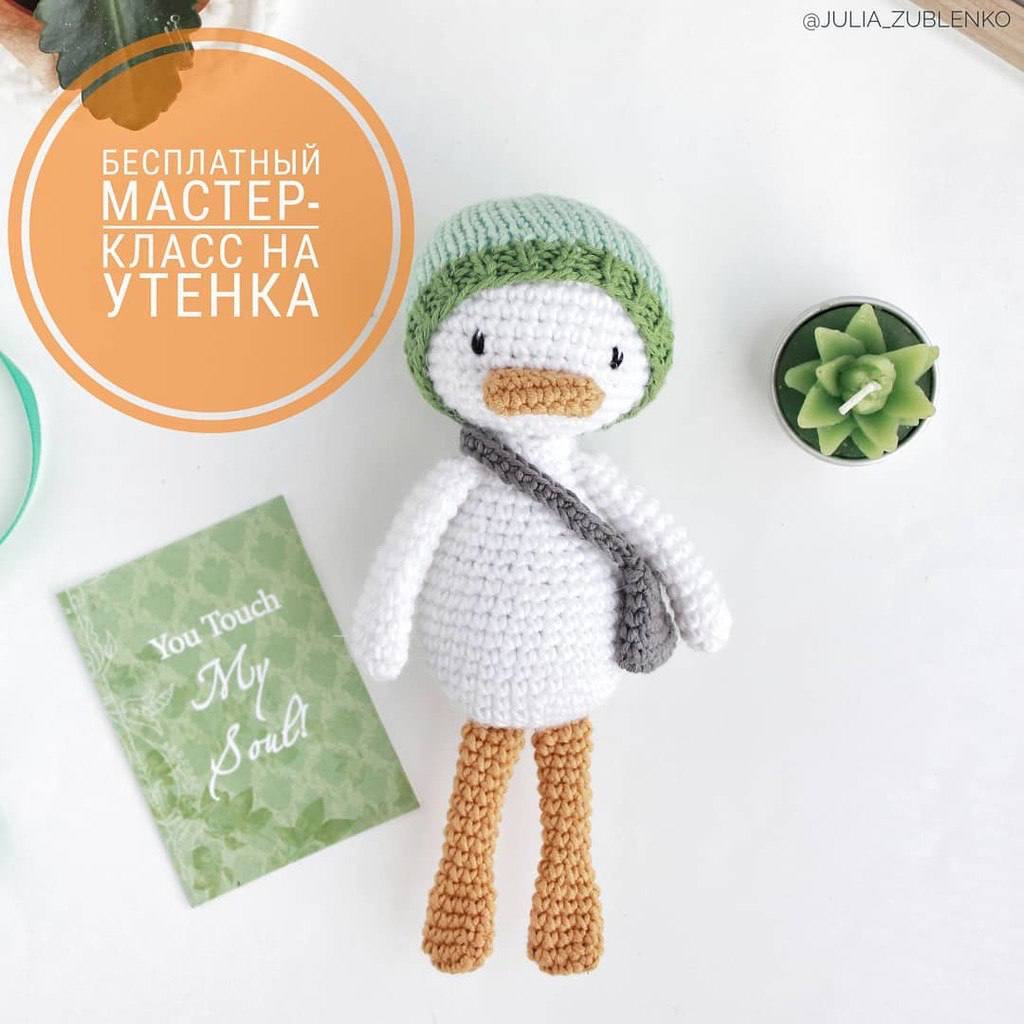
Are you looking for your next adorable amigurumi project? There is nothing quite as charming as a tiny, handmade animal to brighten up a nursery, a desk, or a bookshelf. Today, we are diving into a delightful tutorial for creating a tiny, stylish crochet duckling! This little duckling comes complete with a cozy knitted hat and even a cute little crossbody bag, making it the perfect keepsake or gift for any crochet lover.
This project is designed to be beginner-friendly, utilizing standard amigurumi techniques. Whether you are a seasoned pro or just picking up a hook for the first time, this step-by-step guide will walk you through every stitch. Let’s grab our yarn and get started on this feathered friend!
Materials & Abbreviations
Before we begin, let’s make sure you have everything you need. Because this is a mixed-media project (combining crochet and knitting), you will need a few different tools.
What You’ll Need
- Yarn: Medium weight (worsted) yarn in white (for the body), mustard or yellow (for the beak and feet), green (for the hat), and grey (for the bag).
- Crochet Hook: A 2.5mm or 3.0mm hook works well for amigurumi to keep stitches tight.
- Knitting Needles: A pair of small circular knitting needles (approximately 2.0mm) for the tiny hat.
- Safety Eyes: Small plastic safety eyes (ensure they are the size appropriate for your duck’s head).
- Stuffing: Poly-fill or any soft toy stuffing.
- Tapestry Needle: For sewing the pieces together and weaving in ends.
- Scissors.
Abbreviations (US Terms)
Please ensure you are using US crochet terminology to follow this pattern accurately:
- MR: Magic Ring
- ch: Chain
- sc: Single crochet
- inc: Increase (2 sc in one stitch)
- dec: Decrease (sc 2 stitches together)
- st(s): Stitch(es)
- ( ) x 6: Repeat the instructions inside the parentheses 6 times.
Step-by-Step Instructions
The Head
The head is worked in a continuous spiral. Remember not to slip stitch between rounds unless otherwise stated!
- MR, 6 sc in ring (6)
- (inc) x 6 (12)
- (sc, inc) x 6 (18)
- (2 sc, inc) x 6 (24)
- (3 sc, inc) x 6 (30)
- (4 sc, inc) x 6 (36)
- (5 sc, inc) x 6 (42)
- 8-13. 42 sc for 6 rows (42)
Note on Eyes: Before you start closing the head, insert your safety eyes between rows 11 and 12. Make sure they are spaced exactly 7 stitches apart.
- (5 sc, dec) x 6 (36)
- (4 sc, dec) x 6 (30)
- (3 sc, dec) x 6 (24)
- (2 sc, dec) x 6 (18)
Stuff the head firmly with poly-fill.
- (sc, dec) x 6 (12)
Fasten off, leaving a long tail for sewing the head to the body.
The Beak
The beak is a small, flat piece that gives our duckling its personality.
- Ch 8. In the 2nd ch from the hook, work: 2 sc, 5 sc, and in the last ch, work 4 sc. Now, work 4 sc along the other side of the chain (17)
- 2-3. 18 sc for 2 rows (18)
Fasten off, leaving a tail for sewing. You will attach this to the bottom of the head at row 14.
The Body
The body is slightly larger than the head to give the duckling a cute, pear-shaped look.
- MR, 6 sc in ring (6)
- (inc) x 6 (12)
- (sc, inc) x 6 (18)
- (2 sc, inc) x 6 (24)
- (3 sc, inc) x 6 (30)
- (4 sc, inc) x 6 (36)
- 7-13. 36 sc for 7 rows (36)
- 14. (3 sc, dec) x 7, 1 sc (29)
- 15-16. 29 sc for 2 rows (29)
- 17. (2 sc, dec) x 7, 1 sc (22)
- 18-19. 22 sc for 2 rows (22)
- 20. (sc, dec) x 6, 4 sc (16)
- 21-22. 16 sc for 2 rows (16)
Stuff the body firmly. Leave a long tail for sewing to the head.
The Wings (Make 2)
The wings are simple flat pieces that you will fold and close.
- MR, 6 sc in ring (6)
- (inc) x 6 (12)
- 3-14. 12 sc for 12 rows (12)
Do not stuff the wings. Fold the piece in half and use your crochet hook to stitch the two open edges together. Leave a tail for sewing to the sides of the body.
The Feet (Make 2)
- Ch 6. In the 2nd ch from the hook, work: 1 sc, 3 sc, and in the last ch, work 2 sc. Now, work 4 sc along the other side of the chain (10)
- 2-4. 10 sc for 3 rows (10)
- 5. (3 sc, dec) x 2 (8)
- 6-14. 8 sc for 9 rows (8)
Do not stuff the feet. Fold them in half and stitch the edges together. Leave a tail for sewing to the bottom of the body.
The Knitted Hat
For a professional look, we are going to knit a tiny beanie! This adds a wonderful texture contrast to the crochet body.
Using 2.0mm circular needles:
- Cast on 38 stitches.
- Work 3 rows of 1×1 ribbing (knit 1, purl 1).
- Switch to stockinette stitch (knit every row).
- Row 4: Knit 6 stitches, then work an increase in the 7th stitch.
Now, perform decreases in every subsequent row to shape the hat:
- Next row: Knit 5 stitches, then knit 6-7 stitches together.
- Next row: Knit 4 stitches, then knit 5-6 stitches together.
- Next row: Knit 3 stitches, then knit 4-5 stitches together.
- Next row: Knit 2 stitches, then knit 3-4 stitches together.
- Final row: Knit 1 stitch, then knit 2-3 stitches together.
The finished hat should be approximately 1.75 inches tall before closing the stitches. Bind off and weave in ends.
The Crossbody Bag
Every stylish duckling needs an accessory! We will crochet a tiny little pouch with a strap.
- Ch 10. In the 2nd ch from the hook, work: 1 sc, 7 sc, and in the last ch, work 3 sc. Now, work 8 sc along the other side of the chain (19)
- 2-6. 19 sc for 5 rows (19)
The Strap: Without cutting your yarn, chain 36. Attach the chain to the second side of your bag. Work 36 sc back along the chain. Secure the strap to the opposite side of the bag, fasten off, and hide your yarn tail.
Finishing
Now comes the fun part—assembly! This is where your duckling truly comes to life.
- Attach the Head: Use a tapestry needle to sew the head onto the top of the body. Make sure it is centered.
- Attach the Beak: Sew the beak to the face, just below and between the eyes.
- Attach the Limbs: Sew the wings to the sides of the body and the feet to the bottom.
- Add the Hat: Gently place the knitted hat on the duckling’s head and secure it with a few small stitches if needed.
- Final Touch: Place the little bag over the duckling’s shoulder!
Tips for Success
To ensure your duckling looks as professional as the one in the photo, keep these tips in mind:
- Maintain Tension: Amigurumi looks best when the stitches are tight. This prevents the stuffing from peeking through the holes. If you find your work is too loose, try using a slightly smaller crochet hook.
- Consistent Increases: When working increases or decreases, make sure you aren’t accidentally adding or losing stitches. Counting your stitches at the end of every row is a lifesaver!
- Perfect Stuffing: Stuff your pieces firmly but avoid overstuffing to the point where the shape becomes distorted. Try to distribute the stuffing evenly so there are no lumps.
- Invisible Ends: When weaving in your ends, work the needle through the center of the stitches to make the tails completely invisible.
Happy crocheting! We can’t wait to see your adorable little duckling creations!