Adorable Amigurumi Cow Crochet Pattern: A Step-by-Step Tutorial
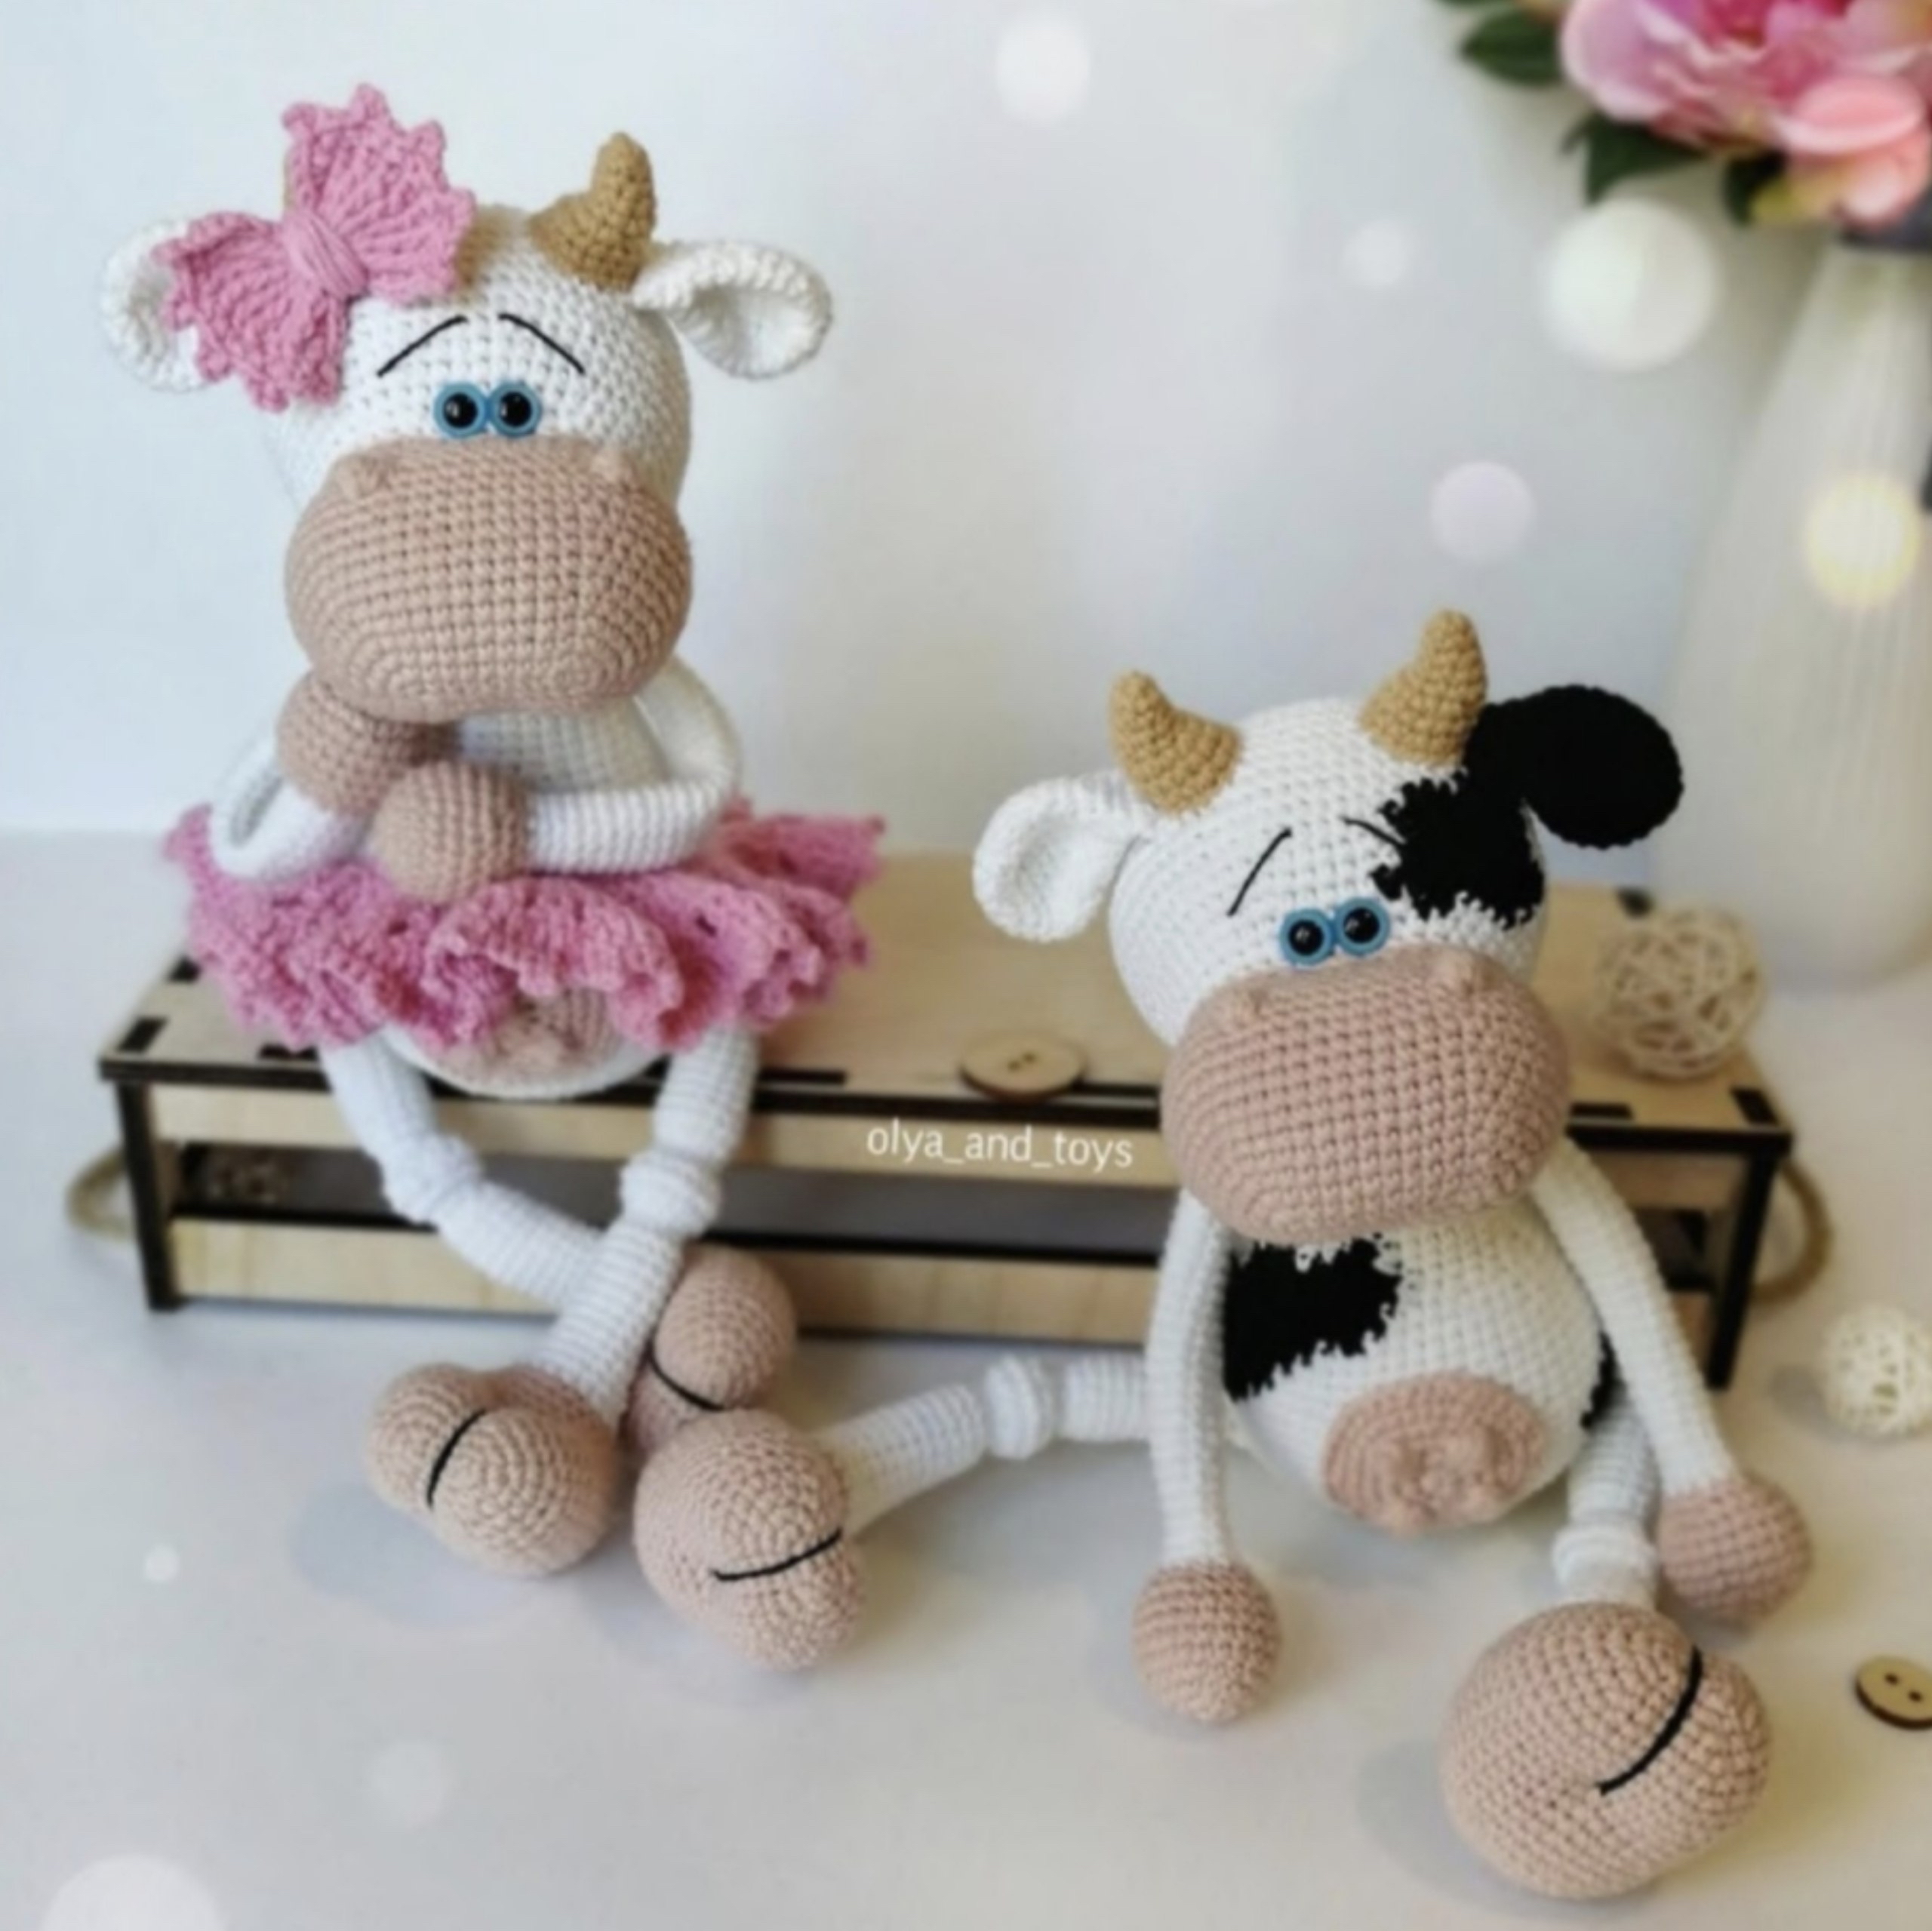
Are you looking for your next heartwarming crochet project? This adorable amigurumi cow is the perfect addition to any nursery, a wonderful gift for a little one, or a charming piece of decor for your own home. This pattern creates a soft, expressive little cow with sweet features, expressive eyes, and even some cute accessories like a little pink bow or a ruffled skirt!
This project is designed to be beginner-friendly, though it does involve some color changes to create those classic cow spots. If you can master the magic ring and single crochet, you are well on your way to creating this precious plushie. Once finished, your cow will stand approximately 11 inches tall and measure about 7 inches when sitting down.
Materials & Abbreviations
To ensure your cow turns out exactly like the photos, I recommend using the following materials. If you cannot find these specific brands, any high-quality cotton or cotton-blend yarn in similar weights will work beautifully.
- Yarn:
- White (Main color): 1 ball of cotton yarn (e.g., YarnArt Jeans 01)
- Beige (Horns): Cotton yarn (e.g., YarnArt Jeans 07)
- Nude/Flesh (Hooves, snout, udder): Cotton yarn (e.g., Alize Cotton Gold 161)
- Black (Spots and one ear): Cotton yarn (e.g., YarnArt Jeans 53)
- Pink (Optional accessories): Cotton yarn for the bow or skirt
- Hook: 2.0mm (or a size appropriate for your yarn to ensure tight stitches)
- Eyes: 8-9mm safety eyes
- Stuffing: Fiberfill or polyester stuffing
- Other: Black embroidery thread (for eyebrows/details), sewing needle, and stitch markers
US Crochet Abbreviations
Please note that this pattern uses standard US crochet terminology:
- MR: Magic Ring
- ch: Chain
- sc: Single crochet
- inc: Increase (2 sc in one stitch)
- dec: Decrease (sc 2 together)
- dc: Double crochet
- hdc: Half double crochet
- tr: Treble crochet
- sl st: Slip stitch
- pico: Pico stitch
- Bobble: 5 dc in one stitch with a single top
- Spot Color Change: When the pattern indicates a spot (e.g., “Spot: 3sc”), switch to black yarn for that specific number of stitches.
Step-by-Step Instructions
The Head
We begin the head using the beige/nude color to create the snout texture.
R1: MR 6 (6)
R2: 6 inc (12)
R3: (1sc, inc) x6 (18)
R4: 1sc, inc, (2sc, inc) x5, 1sc (24)
R5: (3sc, inc) x6 (30)
R6: 2sc, inc, (4sc, inc) x5, 2sc (36)
R7: (5sc, inc) x6 (42)
R8: 3sc, inc, (6sc, inc) x5, 3sc (48)
R9: (7sc, inc) x6 (54)
R10: 4sc, inc, (8sc, inc) x5, 4sc (60)
R11: (9sc, inc) x6 (66)
R12: 5sc, inc, (10sc, inc) x5, 5sc (72)
Adding Nostril Texture: In R13, work 15sc, attach the left leg (6sc), switch to black for a spot (3sc), continue 27sc, attach the right leg (6sc), and finish with 15sc (72).
Note: As you continue the following rounds, follow the pattern’s instructions for creating the black spots. This involves switching to black yarn for the specified number of stitches and then switching back to white. For a cleaner edge, when changing colors, pull the new color through the last loop of the previous color.
After completing the shaping rounds (decreasing toward the chin), switch to the main white color. Work the remaining rounds, following the pattern to incorporate the large black spots. Once the head is complete, remember to insert your safety eyes between rounds 19 and 20, placing them close together.
The Body
The body is worked in the main white color.
R1: MR 6 (6)
R2: 6 inc (12)
R3: (1sc, inc) x6 (18)
R4: 1sc, inc, (2sc, inc) x5, 1sc (24)
R5: (3sc, inc) x6 (30)
R6: 2sc, inc, (4sc, inc) x5, 2sc (36)
R7: (5sc, inc) x6 (42)
R8: 3sc, inc, (6sc, inc) x5, 3sc (48)
R9: (7sc, inc) x6 (54)
R10: 4sc, inc, (8sc, inc) x5, 4sc (60)
R11: (9sc, inc) x6 (66)
R12: 5sc, inc, (10sc, inc) x5, 5sc (72)
Attaching Legs and Spots: In R13, work 15sc, attach the left leg (6sc), work a black spot (3sc), continue 27sc, attach the right leg (6sc), and finish with 15sc (72). Continue working the rounds, incorporating the black spots as directed by the pattern. As you work, begin stuffing the body firmly.
Attaching Arms: In R36, work 7sc, attach an arm (5sc), continue 12sc, attach the second arm (5sc), and finish with 7sc (36). Continue with shaping rounds as instructed.
The Legs & Feet
The legs are worked in two parts: the foot (hoof) and the lower leg.
The Foot (Hoof)
Work in the nude/flesh color.
R1: Ch 5. From the 2nd ch: inc, 2sc, 3sc in one stitch, 3sc on the other side of the chain (10).
R2: 2 inc, 2sc, 3 inc, 2sc, 1 inc (16)
R3: (1sc, inc) x2, 2sc, (1sc, inc) x3, 3sc, 1 inc (22)
R4: (2sc, inc) x2, 2sc, (2sc, inc) x3, 4sc, 1 inc (28)
R5: 28sc (28)
R6: (3sc, inc) x2, 2sc, (3sc, inc) x3, 5sc, 1 inc (34)
R7: 3sc, inc, 16sc, inc, 13sc (36)
R8-15: 36sc (8 rows)
Creating the Leg Opening: To create the hole where the leg attaches, in R16, work 8sc, 1 hdc, ch 8 (skip 8 stitches), 1 hdc, 18sc (36). After R17, begin decreasing (R18-22) to shape the foot. Stuff the foot lightly through the opening, then pull the opening closed and finish the shape.
The Lower Leg
Switch to the main white color and work from the foot opening upwards.
R1: 3sc on the chain, 1 dec (working into the chain/side), 8sc, 1 dec (side/chain), 3sc on the chain (16).
R2-3: 16sc (16)
R4: 3sc, 1 dec, 6sc, 1 dec, 3sc (14)
R5-12: 14sc (8 rows)
R13: 7 dec (7)
R14: 7 inc (14)
R15: (1sc, inc) x7 (21)
R16: 21sc (21)
R17: (1sc, dec) x7 (14)
R18: 7 dec (7)
R19: 7 inc (14)
R20-25: 14sc (6 rows)
R26-30: Complete the final shaping rounds as indicated. Fold the leg in half and sew the seam with 6sc to close.
The Udder, Ears, and Horns
The Udder: Worked in nude color. Use a magic ring (MR 8), then use bobble stitches in R3 to create the characteristic texture. Follow the remaining rounds to shape and finish.
The Ears: One ear is worked in white, and the other in black (to match the spots). Work in an oval shape using the MR, increasing, and then decreasing to create a teardrop shape. Fold and sew the seam.
The Horns: Worked in beige. Use a magic ring (MR 6) and work several rounds of increases to create a small cone shape. Stuff lightly before closing.
Finishing
Now for the fun part—assembling your cow!
- Attach the Head: Sew the head to the body between rounds 18 and 31. Make sure to stuff the neck area firmly during assembly to help the head stand upright.
- Attach the Ears: Sew the ears directly underneath the horns.
- Attach the Horns: Sew the horns between rounds 26 and 33 of the head, spacing them about 6 stitches apart.
- Attach the Legs: Sew the legs to the sides of the body, ensuring they are positioned symmetrically.
- Attach the Arms: Sew the arms to the sides of the body.
- The Face: Use thin black embroidery thread to sew on the eyebrows between rounds 21 and 24. You can also use thread to pull in the snout area to create a cute, indented look.
- Accessories: If you want a more feminine look, you can crochet a small pink bow or a ruffled pink skirt to add to your cow!
Tips for Success
- Tension Matters: Everyone crochets with a different tension. If your pieces look a little different in size than the pattern, don’t panic! You can often add or subtract a few stitches to make everything fit perfectly.
- Use Stitch Markers: Since amigurumi is worked in continuous rounds, always use a stitch marker to identify the first stitch of each row.
- Color Changes: To get those crisp, clean edges on the black spots, pull the new color through the final loop of the last stitch of the previous color before starting the new color.
- Stuffing: Don’t be afraid to stuff! A well-stuffed amigurumi holds its shape much better, especially for parts like the head and body.