How to Crochet a Cute Amigurumi Chinchilla: A Step-by-Step Pattern
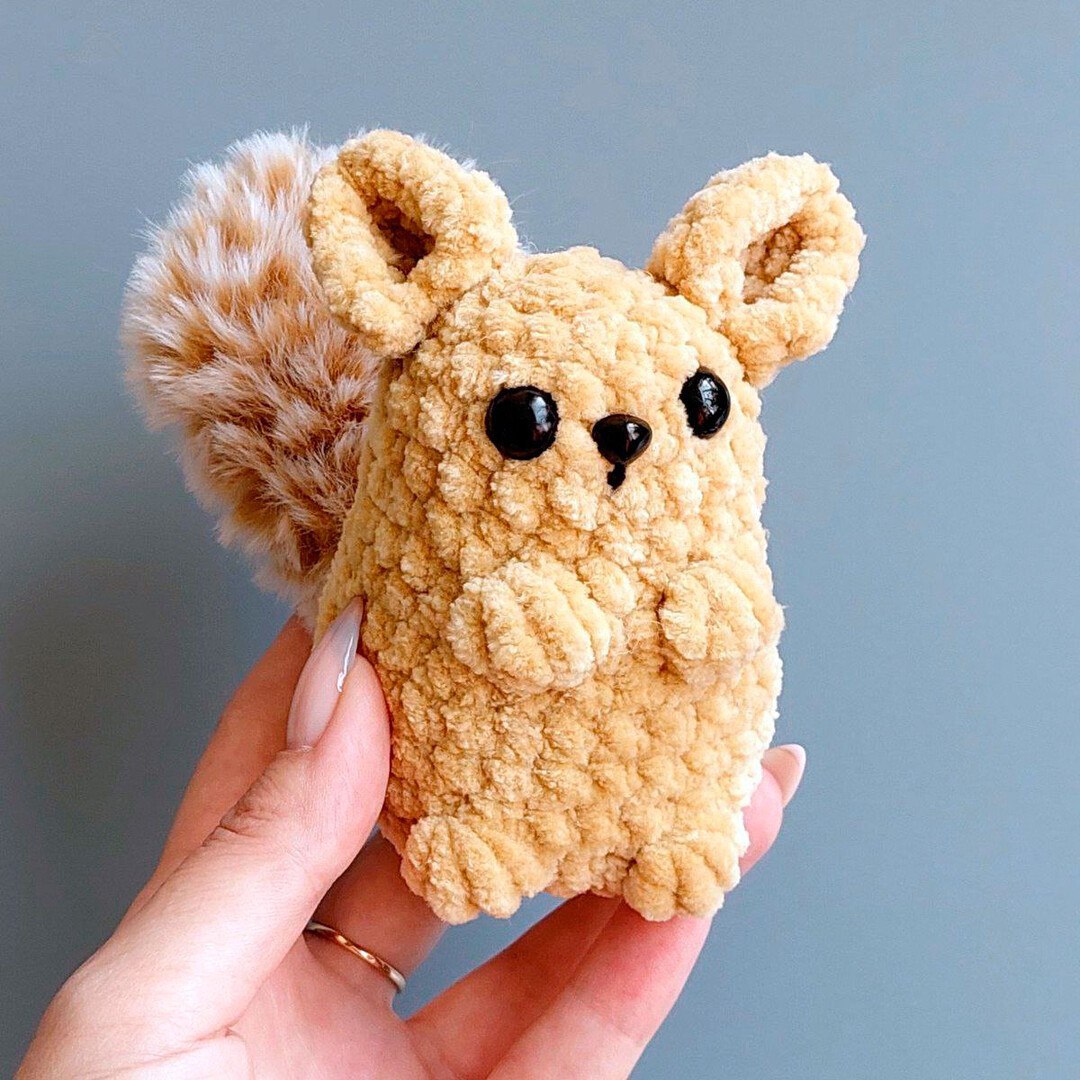
Are you looking for a soft, cuddly, and absolutely adorable crochet project? This amigurumi chinchilla is the perfect addition to your collection of handmade stuffed animals. With its fluffy faux-fur tail and velvety plush body, this little creature is designed to be as fun to make as it is to snuggle. Whether you are looking to create a unique gift for a baby shower, a nursery decoration, or simply want to treat yourself to a new desk companion, this pattern is a wonderful choice.
This tutorial is designed to be beginner-friendly. We will guide you through the process of working with specialty yarns, including plush chenille and faux fur, to achieve that professional, high-end look. Grab your hooks and let’s get started on making your very own tiny chinchilla!
Materials & Abbreviations
To ensure your chinchilla turns out perfectly, it is important to use the right materials. Because this pattern uses “plush” and “fur” yarns, your tension and hook sizes are specific to these textures.
What You Will Need
- Plush Yarn: Approximately 130 yards (120m) of soft chenille-style plush yarn (approx. 100g).
- Faux Fur Yarn: Approximately 60 yards (55m) of long-pile faux fur yarn (approx. 100g) for the tail.
- Crochet Hooks:
- 3.75mm (approx. E/F) hook for the plush yarn body.
- 5mm (approx. H) hook for the faux fur tail.
- Safety Eyes: 8mm safety eyes.
- Nose: 6x8mm glue-on nose.
- Stuffing: Poly-fill fiberfill.
- Other Essentials: Stitch marker, tapestry needle, scissors, and black embroidery thread for facial details.
U.S. Crochet Abbreviations
This pattern uses standard United States crochet terminology. Please ensure you are familiar with these before beginning.
- MR: Magic Ring
- Ch: Chain
- Sc: Single Crochet
- Inc: Increase (2 single crochets in one stitch)
- Dec: Decrease (Decrease two stitches into one)
- Sl st: Slip stitch
- Dc: Double Crochet
- Bobble Stitch: A textured stitch created by working multiple stitches into a single base stitch to create a raised bump.
- St(s): Stitch(es)
Step-by-Step Instructions
Before you begin, remember that for amigurumi, it is best to work in a continuous spiral. Use a stitch marker to keep track of the beginning of each round. For the body, we will be working from the bottom up.
The Fluffy Tail
Use the faux fur yarn and a 5mm crochet hook. Stuff the tail lightly as you go.
Round 1: 6 sc in a magic ring (6)
Round 2: 6 inc (12)
Rounds 3–4: Sc in each stitch around (12) — 2 rounds total
Round 5: (1 sc, 1 dec) repeat 4 times (8)
Round 6: 8 sc (8)
Round 7: 4 dec (4)
Round 8: 4 sc (4)
Note: To finish the tail, fold the piece in half so the opening is closed, and crochet 2 sc through both layers (the front and back walls) to seal it shut.
The Ears
Use the plush yarn and a 3.75mm hook. These are worked in rows (flat) rather than rounds.
Row 1: Ch 2. In the second chain from the hook, work 4 sc. Ch 1, then turn your work. (4)
Row 2: 4 inc, ch 1, turn (8)
Row 3: (1 sc, 1 inc) repeat 4 times (12)
Note: Fasten off, leaving a long tail for sewing. When you attach the ears, you will sew the corners of the ears together first to give them a slightly curved, natural shape before sewing them to the head.
The Body and Head
Use the plush yarn and a 3.75mm hook. Stuff the body firmly as you progress.
Round 1: 8 sc in a magic ring (8)
Round 2: 8 inc (16)
Round 3: (3 sc, 1 inc) repeat 4 times (20)
Round 4: (4 sc, 1 inc) repeat 4 times (24)
Round 5: 5 sc, 1 inc, 1 Bobble Stitch, 3 sc, 1 Bobble Stitch, 1 inc, (5 sc, 1 inc) repeat 2 times (28)
Round 6: 22 sc. Next, join the tail to the body by crocheting 2 sc together with the tail (work through the body stitch and the tail stitch simultaneously), then finish with 4 sc (28)
Rounds 7–8: Sc in each stitch around (28) — 2 rounds total
Round 9: (5 sc, 1 dec) repeat 4 times (24). End the round with 1 sl st to close the spiral.
Round 10: 4 sc, 1 dec, 1 Bobble Stitch, 2 sc, 1 Bobble Stitch, 1 dec, (4 sc, 1 dec) repeat 2 times (20)
Rounds 11–13: Sc in each stitch around (20) — 3 rounds total
Round 14: (3 sc, 1 dec) repeat 4 times (16)
Round 15: 16 sc (16)
Round 16: (2 sc, 1 dec) repeat 4 times (12). Stop here to insert your 8mm safety eyes between rounds 14 and 15.
Round 17: 6 sc (6). Fasten off, weave the tail through the remaining stitches to close the hole, and hide the end inside the body.
Finishing
Now comes the most rewarding part—bringing your chinchilla to life! Follow these steps carefully to ensure a professional finish.
Assembly Steps
- Attach the Ears: Take your ears and pinch the corners together. Use your tapestry needle to sew the corners to each other, creating a little “cup” shape. Then, sew the base of the ears to the top of the head.
- Facial Details: Using your black embroidery thread, sew a small vertical line or “bridge” between the eyes and the nose area to give the chinchilla a cute, expressive face.
- The Nose: Use a small amount of fabric glue to attach the 6x8mm nose piece in the center of the face, just below the eye line.
Tips for Success
Crocheting with specialty yarns can be tricky. Here are a few tips to help you achieve the best results:
Mastering the Bobble Stitch
The bobble stitch is what gives your chinchilla its unique texture. To make a standard bobble, yarn over, insert your hook, pull up a loop, yarn over, and pull through two loops (this is a half-double crochet). Repeat this until you have 4 loops on your hook, then yarn over and pull through all 4 loops at once. This creates a lovely, raised bump!
Working with Plush Yarn
Plush/chenille yarn can be difficult to see. We highly recommend using a stitch marker for every single round. Because the fibers are thick, it can be easy to accidentally skip a stitch or add an extra one, which will change the shape of your chinchilla. If you find it hard to see your stitches, try working in bright, natural light.
Managing Tension and Stuffing
When working with amigurumi, aim for a tight tension to ensure that the stuffing doesn’t peek through the holes. When stuffing the body, push the fiberfill into the corners and extremities (like the head and bottom) first to ensure a smooth, rounded shape. Avoid overstuffing the tail, as it should remain soft and flexible.
Your adorable crochet chinchilla is now complete! Enjoy your new handmade friend!