Adorable Crochet Baby Goat Pattern: A Step-by-Step Amigurumi Tutorial
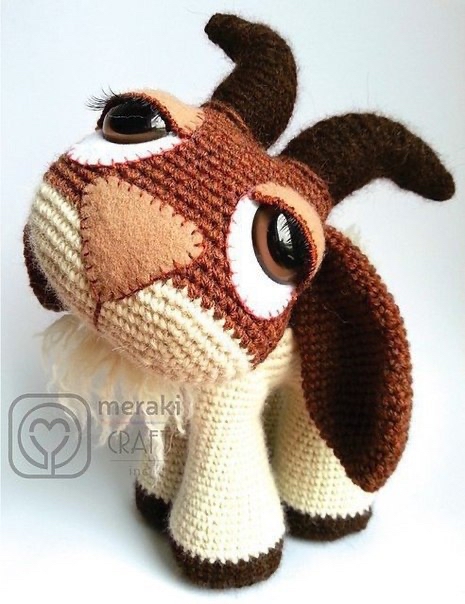
Are you looking for your next cozy crochet project? There is nothing quite as charming as a wide-eyed, floppy-eared animal to brighten up your home or serve as a perfect gift for a little one. In this tutorial, I will walk you through the process of creating this incredibly cute, realistic baby goat amigurumi. This little guy features soft, fuzzy details like a beard and tail, making him look absolutely precious.
This pattern is designed to be beginner-friendly, though you should be comfortable with basic amigurumi techniques such as working in a continuous spiral and making increases and decreases. By the end of this guide, you will have a sturdy, standing goat that is perfect for nursery decor or as a whimsical companion for any crochet lover.
Materials & Abbreviations
Before we dive into the stitches, let’s make sure you have everything you need on your crochet hook!
Materials Needed
- Crochet Hook: A hook appropriate for your chosen yarn weight (to ensure tight stitches so stuffing doesn’t show).
- Yarn: You will need three main colors: White, Chocolate (medium brown), and Dark Brown. You can experiment with different color combinations like grey and black for a unique look!
- Safety Eyes: Ready-made amigurumi safety eyes.
- Felt: White and beige felt for creating the eye patches, eyelids, and nose.
- Stuffing: High-quality polyester fiberfill.
- Optional: Wire (if you want to pose the horns) and small cardboard or plastic circles (to place inside the soles for extra stability).
- Other: Yarn needle, scissors, and a stitch marker.
Abbreviations (US Terms)
- ch: chain
- sc: single crochet
- inc: increase (2 sc in one stitch)
- dec: decrease (sc 2 stitches together)
- sl st: slip stitch
- MR: magic ring
- BLO: back loops only
- FLO: front loops only
- st(s): stitch(es)
Step-by-Step Instructions
Note: This pattern is worked in a continuous spiral. Use a stitch marker to keep track of the beginning of each round. Always stuff your pieces firmly as you work to maintain their shape.
The Head
We begin the head with white yarn. We will create an oval base using a chain.
- Make a magic ring and ch 12. Starting from the 2nd ch from the hook: sc in the next 10 ch, 3 sc in the very last ch. Now, rotate your work to crochet along the bottom of the chain: sc in the next 10 ch, 3 sc in the last ch (26).
- (10 sc, inc) x 2 (Wait, following the specific math provided: 10 sc, inc x 3, then repeat for the other side to reach 32). Let’s follow the exact counts: (10 sc, inc x 3) x 2 (32).
- (10 sc, (inc, sc) x 3) x 2 (38).
- (10 sc, (inc, 2 sc) x 3) x 2 (44).
- (10 sc, (inc, 3 sc) x 3) x 2 (50).
- (10 sc, (inc, 4 sc) x 3) x 2 (56).
- 2 sc, 8 sc through BLO (back loops only), 46 sc (56).
- Rounds 8–11: sc around (56). At the start of Round 9, switch to chocolate yarn.
- 20 sc, dec, 26 sc, dec, 6 sc (54).
- sc around (54).
- (13 sc, dec, (4 sc, dec) x 2) x 2 (48).
- Rounds 15–19: sc around (48). Eye Placement: If using screw-in safety eyes, insert them between rounds 17 and 18, approximately 14 stitches apart. Remember to leave space for the white felt eye patches underneath.
- (dec, 6 sc) x 6 (42).
- Rounds 21–24: sc around (42).
- Division for Horns: 8 sc, skip 18 stitches, 3 sc, skip 18 stitches, 5 sc, sl st to close. Fasten off.
The Horns
Use the darkest brown yarn. You will work into the skipped stitches from the head.
- Work 18 sc into the first skipped section.
- Rounds 1–2: sc around (18).
- Rounds 3–8: sc around through BLO (18).
- 9) (dec, 4 sc through BLO) x 3 (15).
- Rounds 10–11: sc around through BLO (15).
- 12) (dec, 3 sc through BLO) x 3 (12).
- Rounds 13–14: sc around through BLO (12).
- 15) (dec, 2 sc through BLO) x 3 (9).
- Rounds 16–17: sc around through BLO (9).
- 18) (dec, sc) x 3 (6). Fasten off and sew the small hole closed.
- Repeat the entire process for the second horn.
The Ears
Make 2 pieces using chocolate yarn. Do not stuff the ears.
- 6 sc in MR (6).
- (inc, sc) x 3 (9).
- (inc, 2 sc) x 3 (12).
- (inc, 3 sc) x 3 (15).
- (inc, 4 sc) x 3 (18).
- (inc, 5 sc) x 3 (21).
- (inc, 6 sc) x 3 (24).
- (inc, 7 sc) x 3 (27).
- (inc, 8 sc) x 3 (30).
- Rounds 10–12: sc around (30).
- (dec, 3 sc) x 6 (24).
- Rounds 14–20: sc around (24).
- (dec, 2 sc) x 6 (18).
- Rounds 22–25: sc around (18).
- (dec, sc) x 6 (12).
- Rounds 27–28: sc around (12). Fasten off. Fold the ear slightly and sew to the head so they point slightly forward. Position the top of the ear 2 rounds below where the horns begin.
The Body & Belly
Start with chocolate yarn. We will work from the neck downwards.
- 6 sc in MR (6).
- inc around (12).
- (inc, sc) x 6 (18).
- sc around through BLO (18). Note: This creates the neck seam where you will later attach the head.
- Rounds 5–9: sc around (18).
- (sc, 3 sc in one) x 3, 12 sc (24).
- (3 sc, 3 sc in one) x 3, 12 sc (30).
- (5 sc, 3 sc in one) x 3, 12 sc (36).
- (7 sc, 3 sc in one) x 3, 7 sc, 5 sc through BLO (36). Note: The front loops are left exposed here to attach the chest hair later.
- 9 sc, 3 sc in one, 7 sc, 2 sc through BLO, 3 sc in one through BLO, 2 sc through BLO, 7 sc, 3 sc in one, 12 sc (48). Note: The back loops are left for the tail attachment.
- 11 sc, 3 sc in one, 10 sc, 1 sc through BLO, 3 sc in one through BLO, 1 sc through BLO, 10 sc, 3 sc in one, 12 sc (54).
- Switch to white yarn.
- (13 sc, 3 sc in one) x 3, 12 sc (60).
- (9 sc, inc) x 6 (66).
- (10 sc, inc) x 6 (72).
- (11 sc, inc) x 6 (78).
- (12 sc, inc) x 6 (84).
- Rounds 21–25: sc around (84).
The Belly Detail
To create the white belly patch, we will work into the existing body stitches.
- Skip 18 sc, (3 sc in one) x 4 (12).
- dec around (6). Fasten off and sew the opening closed.
The Legs & Soles
Make 4 legs. Each leg is worked separately using the 18 stitches left from the body opening.
- Work 18 sc around the opening.
- Rounds 1–4: sc around (18).
- (inc, 5 sc) x 3 (21).
- Rounds 6–7: sc around (21).
- (inc, 6 sc) x 3 (24).
- Rounds 9–10: sc around (24).
- (inc, 7 sc) x 3 (27).
- Rounds 12–13: sc around (27).
- (inc, 8 sc) x 3 (30).
- Rounds 15–16: sc around (30).
- (inc, 9 sc) x 3 (33).
- Switch to horn color (dark brown).
- Rounds 18–19: sc around (33).
- (inc, 10 sc) x 3 (36). Stuff firmly and fasten off. Tip: Insert a small circle of cardboard into the bottom for better standing stability.
The Soles (Make 4)
Use the dark brown (horn color) yarn.
- 6 sc in MR (6).
- inc around (12).
- (inc, sc) x 6 (18).
- (inc, 2 sc) x 6 (24).
- (inc, 3 sc) x 6 (30).
- (inc, 4 sc) x 6 (36).
- Fasten off. Sew these to the bottom of each leg, ensuring the legs are stuffed tightly before attachment.
The Fluffy Details: Tail, Beard, & Chest Hair
To give your goat its signature fuzzy look, follow these simple steps:
- The Tail: Cut 16 strands of white yarn, each approximately 3 inches long. Attach them to the back loops of the body. Use a needle or a small brush to “fluff” the yarn out. Trim with scissors to create a neat V-shape.
- The Beard: Cut 10 strands of white yarn to your desired length. Sew or crochet them onto the chin area. Fluff them out just like the tail.
- Chest Hair (Optional): For extra realism, cut 10 strands of white yarn, approximately 3 inches long. Attach them to the front loops of the body at Round 13 and fluff them out.
Finishing
Now for the magic of assembly! This is where your goat truly comes to life.
- Face Details: Cut your white and beige felt into shapes for the eye patches, eyelids, and nose. Carefully stitch the edges of the felt with embroidery thread to prevent fraying, then sew them onto the face.
- Head Attachment: Sew the head to the body using the front loops of the neck area.
- Final Assembly: Sew the ears, legs, and soles into place. Ensure the goat is balanced so it can stand on its own.
Tips for Success
- Tension is Key: When working amigurumi, try to keep your tension consistent and relatively tight. This ensures that the stuffing stays hidden inside the toy.
- Don’t Overstuff the Neck: When stuffing the body, be careful not to overstuff the neck area. If the neck is too firm, the head might tilt upward toward the ceiling!
- Use Stitch Markers: Since amigurumi is worked in a continuous spiral, it is incredibly easy to lose your place. Always use a marker to identify your starting stitch.
- Wire for Posing: If you want your goat’s horns to have a specific curve, you can insert a small piece of craft wire inside them before you finish stuffing.