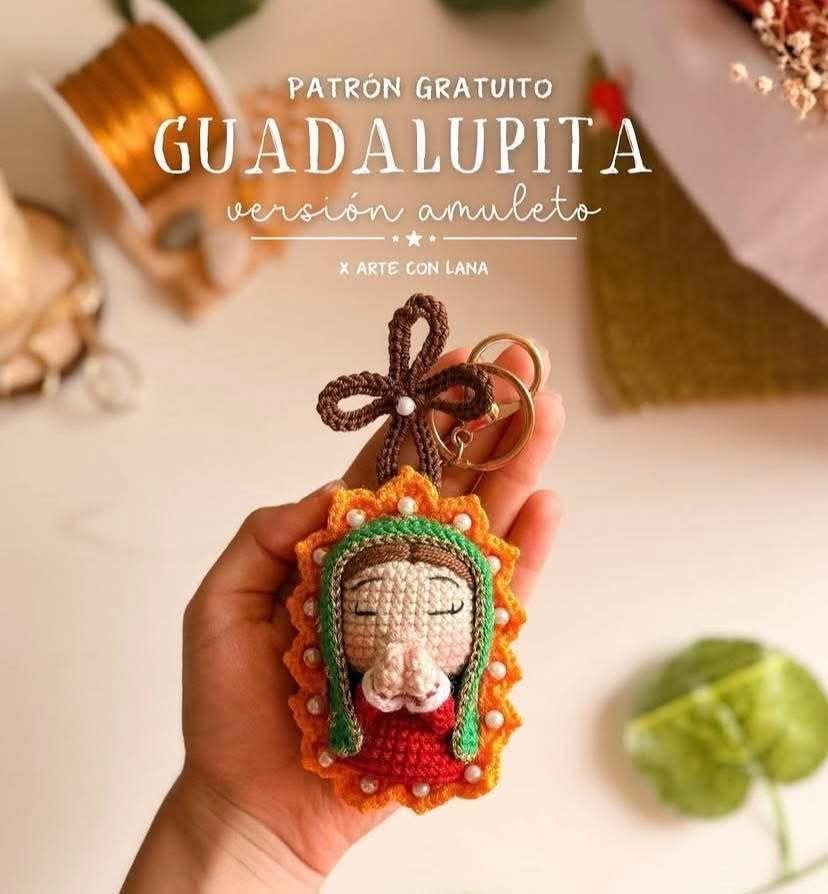
Crochet Our Lady of Guadalupe Keychain Pattern: A DIY Amuleto Tutorial
Are you looking for a meaningful, small-scale crochet project that combines tradition with adorable amigurumi style? This crochet Our Lady of Guadalupe keychain—often referred to as a “Guadalupita amuleto”—is the perfect project. Whether you are making it as a protective charm for your keys or a beautiful gift for a loved one, this little talisman is sure to bring a smile to anyone’s face.
This pattern is designed to be beginner-friendly, focusing on basic stitches and simple assembly. Once finished, your little charm will stand approximately 4 inches tall, making it the ideal size to hang on a backpack, purse, or set of keys. Let’s dive into this heartwarming tutorial!
Materials and Abbreviations
Before we pick up our hooks, let’s make sure you have everything you need. To achieve the clean, polished look seen in the photos, we recommend using a tight tension and high-quality cotton or acrylic macrame-style thread.
What You Will Need
- Crochet Hook: 2mm (ideal for tight stitches to keep stuffing hidden).
- Yarn: Cotton or acrylic macrame-style thread in the following colors:
- Skin tone
- Black (for facial details)
- Brown (for hair and cross)
- Green (for the mantle)
- Yellow (for the sunflower border)
- Red (for the body)
- Gold (for mantle accents)
- Stuffing: Polyester fiberfill.
- Embellishments: Small white pearls, a keychain ring, and optional blush for the cheeks.
- Tools: Yarn needle, stitch markers, silicone glue, and scissors.
Abbreviations (US Terms)
- MR: Magic Ring
- Ch: Chain
- Sl st: Slip stitch
- Sc: Single crochet
- Inc: Increase (2 sc in the same stitch)
- Dec: Decrease (sc 2 together)
- Dc: Double crochet
- Tr: Treble crochet
- BLO: Back loop only
- CDC: Color change
- Rnd: Round
Step-by-Step Instructions
The Head
Worked in skin tone.
- Rnd 1: Make a MR and work 6 sc into the ring (6).
- Rnd 2: Inc in every stitch around (12).
- Rnds 3-7: Sc in each stitch (12) for 5 rounds. Note: To get a cleaner look, work these rounds so the “wrong side” of the fabric is facing out.
- Rnd 8: BLO, (1 sc, inc) repeat 6 times (18).
- Rnd 9: 1 sc, inc, (2 sc, inc) repeat 5 times, 1 sc (24).
- Rnd 10: (3 sc, inc) repeat 6 times (30).
- Rnd 11: 2 sc, inc, (4 sc, inc) repeat 5 times, 2 sc (36).
- Rnds 12-20: Sc in each stitch (36) for 9 rounds.
- Rnd 21: 2 sc, dec, (4 sc, dec) repeat 5 times, 2 sc (30).
- Rnd 22: (3 sc, dec) repeat 6 times (24).
Facial Details
Before finishing the head, let’s add the personality! Use black thread for embroidery.
Eyes: Embroider the eyes on Round 16. Use 2 stitches for each eye, leaving a 4-stitch gap between them.
Nose: Embroider the nose using 2 stitches, positioned approximately above Round 14. Ensure it is centered.
Eyebrows: Count 3 rounds above the eyes. Starting above Round 3, create an eyebrow that is 3 stitches wide and 1 round deep. Leave 4 stitches of space between the two eyebrows.
The Hair
Worked in brown. Embroider the hair before stuffing the head.
- Rnd 23: 1 sc, dec, (2 sc, dec) repeat 5 times, 1 sc (18).
Hair Embroidery Technique:
Starting from the center, just above Round 22, embroider an inverted “V” shape. From that center point, work 3 to 4 stitches toward each side and go 4 rounds downward. Repeat this pattern 3 times to create volume. Finally, repeat the sequence one more round below the previous one. If you see gaps, pass the thread through multiple times to ensure the hair looks full.
Now, stuff the head firmly with fiberfill.
Finishing the Head:
- Rnd 24: (1 sc, dec) repeat 6 times (12).
- Rnd 25: Dec 6 times (6).
- Fasten off and weave in your ends.
The Body and Arms
Body: Worked in red.
- Rnd 1: MR, 8 sc (8).
- Rnd 2: Inc in every stitch (16).
- Rnd 3: (2 inc, 2 sc) repeat 4 times (24).
- Rnd 4: 1 sc, 2 inc, (4 sc, 2 inc) repeat 3 times, 3 sc (32).
- Rnd 5: BLO, 32 sc.
- Rnds 6-8: 32 sc (3 rounds).
- Rnd 9: 1 sc, dec, (2 sc, dec) repeat 7 times, 1 sc (24).
- Rnd 10: 24 sc.
- Rnd 11: (1 sc, dec) repeat 8 times (16).
- Rnd 12: 16 sc.
- Rnd 13: Dec 8 times (8).
- Rnds 14-16: 8 sc (3 rounds).
- Fasten off and weave in ends.
Arms (Make 2): Worked in skin tone.
- Rnd 1: MR, 6 sc (6).
- Rnds 2-3: 6 sc (CDC to red here to create a small red sleeve effect).
- Rnd 4: 6 sc.
- Rnd 5: BLO, 6 sc.
- Rnds 6-8: 6 sc (3 rounds). Leave a long tail for sewing.
Detail: Attach a white thread to the BLO of Round 5 and work 6 sc around to create the little hands.
The Mantle (Cloak)
Worked in green. Note: Rounds 1 through 8 are worked in BLO.
Start by making 16 ch. From the second chain from the hook, work 15 sc.
- V1: 14 sc, 2 inc, 14 sc (32).
- V2: 15 sc, 2 inc, 15 sc (34).
- V3: 16 sc, 2 inc, 16 sc (36).
- V4: 17 sc, 2 inc, 17 sc (38).
- V5: 18 sc, 2 inc, 18 sc (40).
- V6: 19 sc, 2 inc, 19 sc (42).
- V7: 16 sc, 1 inc, 3 sc, 2 inc, 3 sc, 1 inc, 16 sc (46).
- V8-15: 46 sc (8 rounds).
At the end of Round 15, change color to gold (CDC). Work one round of sc around the entire mantle in BLO (46 sc). Fasten off, weave in ends, and turn the mantle to the right side.
Mantle Stars: Embroider small stars on the middle of Rounds 13 and 14 of the mantle. Start with a vertical line of 2 stitches, then create small crosses. Ensure they are centered and skip 2 stitches between each star.
Sunflower Border and Cross
Sunflower Border: Worked in yellow.
Make a circle with 60 ch and join with a sl st. Repeat the following sequence around:
Ch 3, 1 dc, (2 tr, ch 1, 2 tr, 1 dc), 1 ch, sl st in the next available stitch.
Once finished, you can decorate the petals with a bit of makeup or glue/sew small white pearls into the center of each one. This border will be sewn to the back of the mantle.
The Cross: Worked in brown.
Make a circle with 75 ch and join with a sl st. Work sl st in every chain around. Embroider 4 petals into the center of the circle, ensuring they are the same size, and add a pearl to the center of each. Glue or sew the cross to the top of the figure, then attach your keychain ring.
Finishing
Now it is time to bring your amuleto to life! Assembly is key to a professional look:
- Assemble the Body: Sew the arms to the body diagonally to give them a natural, slightly outstretched pose. Join the hands together.
- Attach the Head: Sew the head onto the body, ensuring it is centered.
- Apply the Mantle: Wrap the green mantle around the body and head. Secure it in place.
- Add the Sunflower: Sew the yellow sunflower border to the back of the mantle, behind the embroidered stars.
- Final Touches: Use a tiny bit of blush on the cheeks for a soft, realistic look. Glue the cross to the top of the head.
- Hardware: Insert your keychain ring through the top of the cross.
Tips for Success
- Tension Matters: Because this is a small item that will be handled often, keep your stitches tight. This prevents the stuffing from peeking through the holes.
- Clean Embroidery: When embroidering the eyes and nose, use a very fine needle so you don’t create large holes in your crochet fabric.
- Perfecting the Hair: Don’t be afraid to go back and forth with the thread when embroidering the hair. The more “passes” you make, the more luscious and voluminous the hair will look.
- Symmetry is Key: When working on the face and the mantle stars, use your stitch markers to keep track of the center so everything stays balanced.