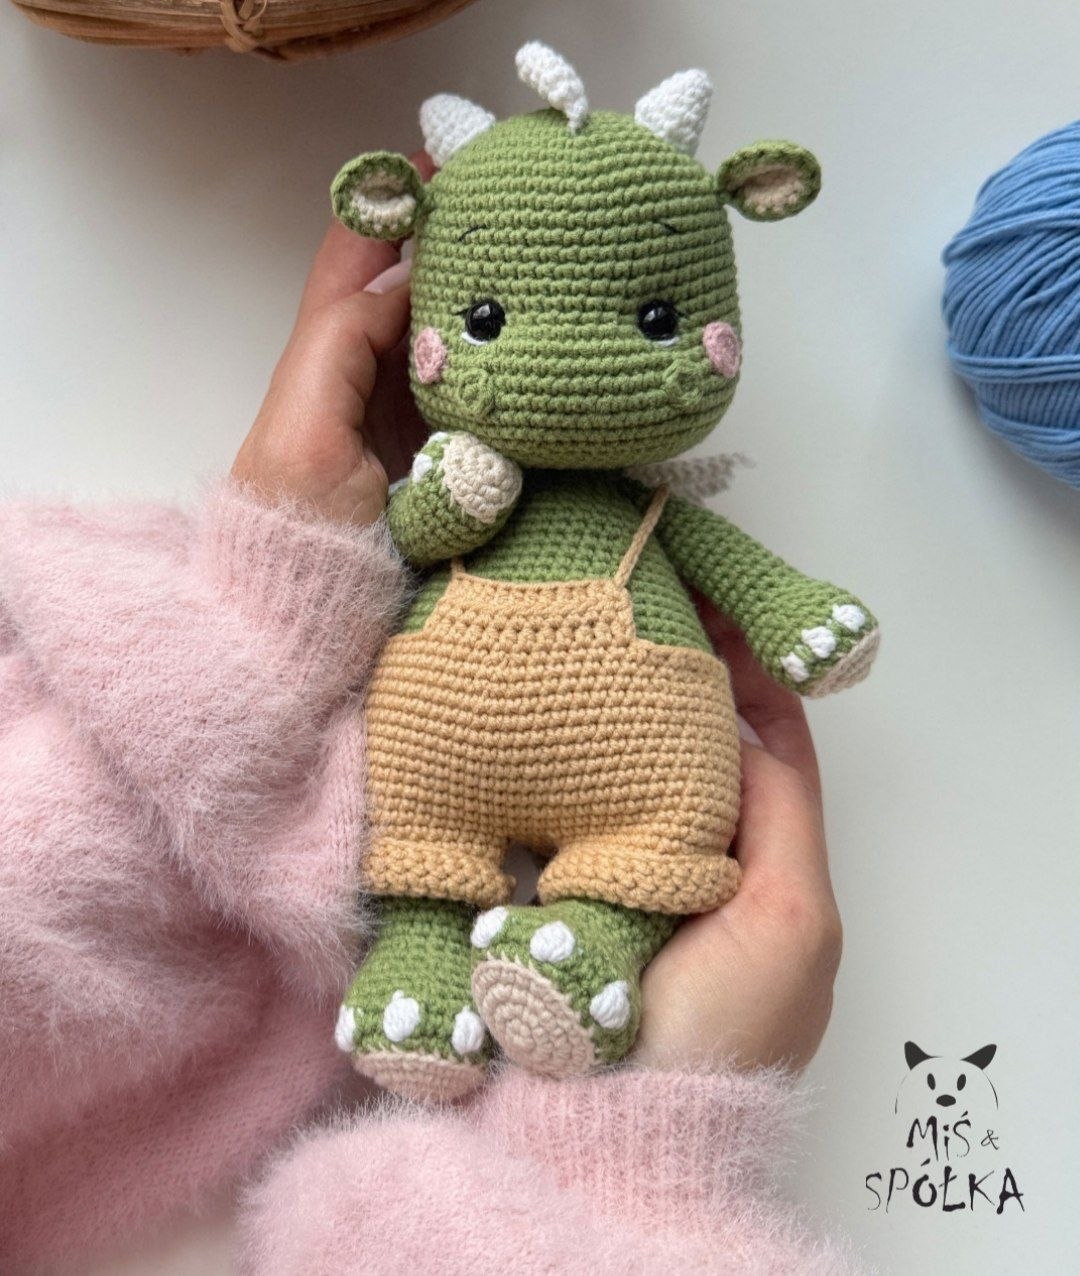
Crochet Rio the Dragon: A Complete Amigurumi Pattern Tutorial
Are you looking for your next adorable amigurumi project? Meet Rio, a charming little green dragon wearing his favorite pair of tiny overalls! This dragon is perfect for anyone looking to practice their crochet skills, from working in the round to mastering the art of facial sculpting. With his tiny white spikes, little horns, and expressive eyes, Rio makes for a wonderful nursery decoration or a unique gift for dragon lovers.
In this detailed tutorial, we will walk through every step of the process. Whether you are a beginner looking to level up or an experienced crocheter searching for a fun new character, this pattern is designed to be accessible and rewarding. Let’s grab our hooks and get started on creating your very own Rio!
Materials and Abbreviations
To ensure Rio turns out looking just like the photos, you will want to gather the following supplies. While you can experiment with different colors, using similar weights of yarn will help you achieve the intended size.
Required Materials
- Yarn (Medium weight/Worsted):
- Green (Main body color)
- Beige (Legs, arms, and overalls)
- White (Spikes, horns, claws, and wings)
- Warm Beige (Overalls)
- Powder Pink (Face patches)
- Crochet Hook: 2.2 mm
- Safety Eyes: 10 mm black safety eyes
- Embroidery Thread: Black and white for facial details
- Stuffing: Soft fiberfill
- Tools: Stitch marker, scissors, and a large tapestry needle for sewing
Finished Size: Approximately 9.5 inches tall (depending on your tension and yarn choice).
Crochet Abbreviations (US Terms)
- MR: Magic Ring/Circle
- ch: Chain
- st: Stitch
- sc: Single Crochet
- inc: Increase (2 sc in one stitch)
- dec: Decrease (sc two stitches together)
- hdc: Half Double Crochet
- dc: Double Crochet
- sl st: Slip Stitch
- blo: Back Loop Only
- flo: Front Loop Only
- BO: Bobble Stitch (4-dc version unless otherwise noted)
- R: Round
Note: Unless otherwise stated, work in a continuous spiral. Use a stitch marker to keep track of the beginning of each round.
Step-by-Step Instructions
The Head
Using the green yarn, start by creating a magic ring. We will build the head in a continuous spiral.
- R1: 6 sc in magic ring (6)
- R2: 6 inc (12)
- R3: (1 sc, inc) x6 (18)
- R4: (2 sc, inc) x6 (24)
- R5: (3 sc, inc) x6 (30)
- R6: (4 sc, inc) x6 (36)
- R7: (5 sc, inc) x6 (42)
- R8: (6 sc, inc) x6 (48)
- R9: (7 sc, inc) x6 (54)
- R10-18: 1 sc in each st (54)
- R19: 21 sc, 12 inc, 21 sc (66)
- R20-25: 1 sc in each st (66)
- R26: (9 sc, dec) x6 (60)
- R27: (8 sc, dec) x6 (54)
Eye Placement: Before continuing, insert your 10 mm safety eyes between rounds 18 and 19. Ensure they are spaced 7 visible stitches apart.
- R28: (7 sc, dec) x6 (48)
- R29: (6 sc, dec) x6 (42)
- R30: (5 sc, dec) x6 (36)
- R31: (4 sc, dec) x6 (30)
- R32: (3 sc, dec) x6 (24)
- R33: (2 sc, dec) x6 (18)
Fasten off, leaving a long tail for sewing. Fill the head firmly with stuffing.
Nostrils and Ears
Nostrils: Using green yarn, make a magic ring with 5 sc. Close with a slip stitch in the first st. Fasten off, leaving a tail. Sew these onto the head between rounds 21–23, about 2 rounds below the eyes, keeping roughly 10 stitches of space between them.
Ears: You will make two sets of ears. First, make the inner part in beige yarn.
- R1: Magic ring with 5 sc (5)
- R2: 5 inc (10)
- R3: (1 sc, inc) x5 (15)
Fasten off and weave in the ends. Next, make the outer part in green yarn.
- R1: Magic ring with 5 sc (5)
- R2: 5 inc (10)
- R3: (1 sc, inc) x5 (15)
Do not fasten off. Weave in the starting tail, then join the inner and outer ear pieces together by crocheting 15 sc through both edges. Fold the ear in half and sew it shut. Finally, sew the ears to the head between rounds 11 and 12.
Spikes and Horns
Spikes: Make 3 spikes using white yarn.
- R1: Magic ring with 6 sc (6)
- R2: (1 sc, inc) x3 (9)
- R3: (2 sc, inc) x3 (12)
- R4: (3 sc, inc) x3 (15)
- R5: 1 sc in each st (15)
- R6: 7 sc through both sides of the piece to the end (7)
Do not stuff. Sew these along the center of the head, spacing them 5 rounds apart, starting with the first spike between rounds 2 and 6.
Horns: Make 2 horns using white yarn.
- R1: Magic ring with 6 sc (6)
- R2: 1 sc in each st (6)
- R3: (1 sc, inc) x3 (9)
- R4: (2 sc, inc) x3 (12)
- R5: 1 sc in each st (12)
Lightly stuff and sew them to the head between rounds 5 and 9.
Face Details and Sculpting
To give Rio his character, we will add pink face patches and sculpt his eyes. First, make two small circles in pink yarn (Magic ring with 9 sc, sl st to close) and sew them to the head between rounds 20–22, about 2 stitches away from the nostrils.
Sculpting the Eyes: This is a professional amigurumi secret! Take a long piece of green thread and a sharp needle. Insert the needle very close to the safety eye, pull the thread through the head, and tighten it slightly. This pulls the fabric inward, creating a realistic “eye socket” look. Repeat for both eyes, then embroider facial details with your black and white thread.
Legs and Body
We will start with the legs and join them to form the body. Begin with beige yarn.
- R1: Magic ring with 6 sc (6)
- R2: 6 inc (12)
- R3: (1 sc, inc) x6 (18)
- R4: (2 sc, inc) x6 (24)
Change color to green, cut beige, and continue:
- R5: blo (3 sc, inc) x6 (30)
- R6: 10 sc, change to white, 1 BO, change to green, 3 sc, change to white, 1 BO, change to green, 3 sc, change to white, 1 BO, change to green, 11 sc (30)
- R7: 1 sc in each st (30)
- R8: (3 sc, dec) x6 (24)
- R9: 1 sc in each st (24)
- R10: (2 sc, dec) x6 (18)
- R11: 1 sc in each st (18)
- R12: (4 sc, dec) x3 (15)
- R13-14: 1 sc in each st (15)
- R15: (4 sc, inc) x3 (18)
- R16-18: 1 sc in each st (18)
Stuff the leg firmly. Make a second leg exactly the same way, but do not cut the yarn. Join them together:
- R19: On the second leg, make 8 additional sc, then ch 6. Join to the first leg by inserting the hook into the end point of the first leg. Crochet 18 sc around the first leg, 6 sc in the chain, and the remaining 10 sc on the second leg (48).
- R20: 8 sc, (1 sc, inc) x3, 18 sc, (1 sc, inc) x3, 10 sc (54)
- R21: (26 sc, inc) x2 (56)
- R22-25: 1 sc in each st (56)
- R26: (13 sc, inc) x4 (60)
- R27-32: 1 sc in each st (60)
Stuff the body firmly. Continue the decrease pattern to close the body:
- R33: (dec, 8 sc) x6 (54)
- R34-35: 1 sc in each st (54)
- R36: (dec, 7 sc) x6 (48)
- R37-38: 1 sc in each st (48)
- R39: (dec, 6 sc) x6 (42)
- R40-41: 1 sc in each st (42)
- R42: (dec, 5 sc) x6 (36)
- R43: 1 sc in each st (36)
- R44: (4 sc, dec) x6 (30)
- R45: 1 sc in each st (30)
- R46: (3 sc, dec) x6 (24)
- R47: 1 sc in each st (24)
- R48: (2 sc, dec) x6 (18)
- R49: 1 sc in each st (18)
Fasten off and sew the body to the head.
Arms and Claws
Make two arms using beige and green yarn. Start with beige.
- R1: Magic ring with 6 sc (6)
- R2: 6 inc (12)
- R3: (3 sc, inc) x3 (15)
Change to green and continue:
- R4: blo (4 sc, inc) x3 (18)
For the claws, we will use a 2-dc bobble stitch (BO): Yarn over, insert hook, yarn over, pull up a loop, yarn over, pull through two loops. Repeat this 2 times in the same stitch. Change to green, yarn over, and pull through all loops on the hook. Push the bobble outward.
- R5: 7 sc, change to white, 1 BO, change to green, 1 sc, change to white, 1 BO, change to green, 1 sc, change to white, 1 BO, change to green, 6 sc (18)
- R6-7: 1 sc in each st (18)
- R8: (4 sc, dec) x3 (15)
- R9: (3 sc, dec) x3 (12)
- R10-21: 1 sc in each st (12)
- R22: 1 sc in each st (12) + 5 extra sc to ensure claws face forward.
Stuff the arms and sew them to the sides of the body between rounds 47 and 48.
The Tail and Wings
Tail: Using green yarn, work from a magic ring (6 sc) through several rounds of increases until you reach 28 stitches. Follow the specific increase pattern in the pattern to create the tapered shape. Stuff and sew to the back between rounds 27 and 35.
Wings: These are worked in rows rather than rounds. Using white yarn, chain 17. Starting in the second chain from the hook:
- R1: 16 sc, ch 1, turn
- R2: 14 sc, ch 1, turn
- R3: 14 sc, ch 1, turn
- R4: 12 sc, ch 1, turn
- R5: 12 sc, ch 1, turn
- R6: 10 sc, ch 1, turn
- R7: 10 sc
Make two wings, join them by crocheting about 7 sc along the edge, and sew them to the back below the head.
The Cute Overalls
The final touch is Rio’s outfit! Use warm beige yarn.
- R1-7: Create two separate trouser legs using a magic ring (30 ch, join into circle, 1 sc in each st for 7 rounds).
- R8: Join the legs by adding 15 sc to the first leg, ch 3, 30 sc around the join, 3 sc in the chain, and 15 sc on the second leg (66).
- R9-14: 1 sc in each st (66)
- R15: 44 sc, ch 14 (this creates the tail opening), skip 14 st, 8 sc (66)
- R16-18: 1 sc in each st (66)
- R19: (9 sc, dec) x6 (60)
- R20: 1 sc in each st (60)
- R21: (8 sc, dec) x6 (54)
Suspenders: Crochet a small front flap (12 hdc) and connect it to the back of the pants using two 26-chain straps. Sew the overalls onto the dragon’s body.
Finishing
Once all pieces are assembled, do a final check of your tension. Ensure all limbs are securely attached and that the stuffing is even so there are no lumps. Weave in all remaining yarn tails carefully using your tapestry needle to ensure a neat, professional finish.
Tips for Amigurumi Success
- Tension is Key: Amigurumi should be worked with slightly tighter tension than typical garments to prevent the stuffing from showing through the stitches.
- Use Stitch Markers: Especially when working in a continuous spiral, it is very easy to lose your place. A marker is your best friend!
- Stuffing Technique: Stuff your pieces in small increments. This allows you to push the stuffing into the corners and crevices, resulting in a smoother shape.
- Color Changes: To get a clean color change, always change the yarn during the final pull-through of the last stitch of the previous color.