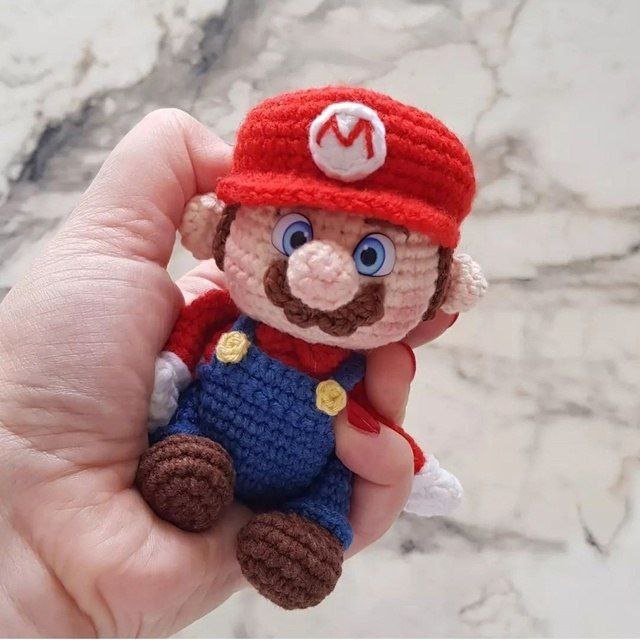
Crochet Mini Mario Amigurumi Pattern: A Step-by-Step Tutorial
Are you looking for a fun, nostalgic project to add to your crochet collection? This mini Mario amigurumi is the perfect desk buddy, keychain, or gift for any gaming enthusiast! This pattern is designed to be beginner-friendly, focusing on basic stitches like single crochet and increases, making it a great way to practice your amigurumi skills.
In this tutorial, we will walk through the process of creating this tiny iconic hero from head to toe. Whether you are making this for yourself or as a handmade gift, this little plumber is sure to bring a smile to anyone’s face. Grab your hook and let’s get started!
Materials & Abbreviations
To ensure your Mario looks just right, I recommend using a medium-weight cotton yarn for a clean, stitch-defined look. For this project, you will need the following supplies:
- Yarn Colors:
- Blue (for overalls)
- Brown (for shoes and hair)
- Beige/Skin tone (for face and neck)
- Red (for shirt and hat)
- White (for gloves and hat logo)
- Dark Brown (for mustache and sideburns)
- Yellow (a small amount for buttons)
- Crochet Hook: 2mm (or the size needed to achieve a tight tension)
- Eyes: 6mm safety eyes or 8mm glue-on eyes
- Stuffing: Polyfill or similar fiberfill
- Notions: Sewing needle, pins, scissors, and dark blue/white embroidery thread
Abbreviations (US Terms)
- MR: Magic Ring
- ch: chain
- sl st: slip stitch
- sc: single crochet
- inc: increase (2 sc in one stitch)
- dec: decrease (sc 2 together)
- hdc: half double crochet
- dc: double crochet
- BLO: back loop only
- FLO: front loop only
Step-by-Step Instructions
The Head
Using beige yarn, start with a Magic Ring.
- 6 sc in MR (6)
- 6 inc (12)
- (1 sc, inc) * 6 (18)
- (2 sc, inc) * 6 (24)
- (3 sc, inc) * 6 (30)
- (4 sc, inc) * 6 (36)
- 7-9. 36 sc (3 rows)
- 10. 17 sc, ch, skip 1 stitch, 4 sc, ch, skip 1 stitch, 13 sc. (Note: This creates gaps for the eyes. If using glue-on eyes, skip the chain/skipping steps and simply place eyes between rounds 9 and 10).
- 11. 13 sc, (inc, sc) * 2, inc, 4 sc, (inc, sc) * 2, inc, 9 sc (42)
- 12-14. 42 sc (3 rows)
- 15. (5 sc, dec) * 6 (36)
- 16. (4 sc, dec) * 6 (30)
- 17. (3 sc, dec) * 6 (24)
- 18. (2 sc, dec) * 6 (18)
Fasten off, leaving a long tail for sewing. Stuff the head firmly. Use dark blue thread to embroider the iris/rainbow part of the eyes and white thread for the whites of the eyes.
Ears and Nose
Make 3 identical pieces using beige yarn (one for the nose, two for the ears).
- 5 sc in MR (5)
- 5 inc (10)
- 10 sc
- 5 dec (5)
Fasten off, leaving a tail for sewing. Stuff one piece (the nose) and sew it to the center of the face. Sew the other two pieces to the sides for ears. Don’t forget to embroider the eyebrows!
Hair, Sideburns, and Mustache
Hair (Make 5 pieces): Using dark brown yarn, ch 26. Starting in the 2nd ch from hook, work 25 sc. Fasten off, leaving a long tail.
Sideburns (Make 2 pieces): Using dark brown yarn, ch 7. Starting in the 2nd ch from hook, sl st, then 5 sc. Fasten off, leaving a long tail.
Mustache: Using dark brown yarn, ch 10. Starting in the 3rd ch from hook, work (hdc, ch, sl st, ch) * 4. Fasten off, leaving a long tail. Sew this just under the nose.
The Iconic Red Hat
Using red yarn, start with a Magic Ring.
- 6 sc in MR (6)
- 6 inc (12)
- (1 sc, inc) * 6 (18)
- (2 sc, inc) * 6 (24)
- (3 sc, inc) * 6 (30)
- (4 sc, inc) * 6 (36)
- (5 sc, inc) * 6 (42)
- (6 sc, inc) * 6 (48)
- 9-11. 48 sc (3 rows)
- 12. (dec, 5 sc) * 4, dec, 17 sc (43)
- 13. (dec, 4 sc) * 4, dec, 17 sc (38)
- 14. 2 dc, 2 sc, 2 hdc-inc, 2 dc-inc, 2 dc, 1 hdc-inc, 2 dc, 2 hdc-inc, 2 hdc-inc, 2 sc, 2 sl st.
Fasten off. To make the logo, use white yarn: in a MR, work 2 ch, 10 hdc, and sl st to the first stitch. Sew this to the front of the hat, then embroider a red “M” on top.
The Body and Overalls
Body: Start with blue yarn in a Magic Ring.
- 6 sc in MR (6)
- 6 inc (12)
- (1 sc, inc) * 6 (18)
- (2 sc, inc) * 6 (24)
- (3 sc, inc) * 6 (30)
- (4 sc, inc) * 6 (36)
- 7-10. 36 sc (4 rows)
Switch to red yarn:
- 11. BLO 36 sc
- 12. 36 sc
- 13. 4 sc, (dec, 2 sc) * 5, dec, 10 sc (30)
- 14. (8 sc, dec) * 3 (27)
- 15. (7 sc, dec) * 3 (24)
- 16. (6 sc, dec) * 3 (21)
- 17. (5 sc, dec) * 3 (18)
Switch to beige yarn:
- 18. BLO 18 sc. Stuff the body firmly.
The Collar and Bib
Collar: Turn the body so the neck is facing you. Using red yarn, work in the FLO of round 17: 7 sc, 1 hdc, 1 dc, ch 2, sl st, ch 2, 1 dc, 1 hdc, 6 sc. Sew this to the top of the body.
Overalls Bib: Using blue yarn, work in the FLO of round 10 (starting from the back): 12 dc, ch, (7 sc, ch, turn) * 3, 2 dc on the side, then 17 dc along the edge of round 10. Fasten off.
Arms and Legs
Arms (Make 2): Use white yarn for the hands/sleeves.
- 6 sc in MR (6)
- 6 inc (12)
- 12 sc
- 5 sc, 3 dc in one stitch, 6 sc (12)
- 4 sc, 1 small decorative picot/bump, 2 sc (9)
Switch to red yarn:
- 6. BLO 9 sc
- 7-11. 9 sc (5 rows)
- 12. dec, 7 sc (8)
- 13. dec, 6 sc (7)
- 14. dec, 5 sc (6)
Do not stuff the arms. Finish by working a row of sc in the FLO of round 5 using white yarn.
Legs (Make 2): Start with brown yarn.
- 4 ch, starting in 2nd ch from hook: inc, sc, 3 sc in the last stitch, 2 sc on the other side of the chain (8)
- 2 inc, sc, 3 dec, sc, inc (14)
- 2 inc, (1 sc, inc) * 3, (inc, sc) * 3 (22)
- 4-5. 22 sc (2 rows)
- 6. 7 sc, 4 decreases (working into 3 stitches each), 3 sc (14)
- 7. 7 sc, 2 dec, 3 sc (12)
- 8. 12 sc
Switch to blue yarn:
- 9. BLO 12 sc
- 10-14. 12 sc (5 rows). Stuff lightly.
- 15. 6 dec (6)
Fasten off. Finish by working a row of sc in the FLO of round 8 using blue yarn.
Finishing
Now it is time to assemble your Mario!
- Buttons: Using yellow yarn, make 2 small circles: 5 sc in MR. Fasten off and sew them to the front of the overalls.
- Legs: Sew the legs to the body, approximately 2 rows below the waistline.
- Arms: Sew the arms to the body, approximately 1 row below the collar.
- Hat: Place the hat on the head. It should sit about 5 rows above the last row of the head at the back and 1 row above the eyebrows at the front. Sew it in place.
- Final Touches: Sew the hair pieces onto the head in a spiral pattern, then attach the sideburns right under the hat. Finally, sew the head onto the body, adding extra stuffing into the neck area to ensure it stays upright and sturdy.
Tips
To make your Mario look as professional as possible, keep these tips in mind:
- Tension is everything: When working with amigurumi, try to keep your stitches tight. This prevents the stuffing from peeking through the gaps in your stitches.
- Use Stitch Markers: Since amigurumi is worked in continuous spirals, it is very easy to lose your place. Always use a stitch marker at the beginning of each round.
- Assembly is Key: Before you sew anything permanently, use plenty of pins to position the eyes, nose, and hat. This allows you to step back and check the symmetry before making it permanent.
- Stuffing Technique: When stuffing the head and body, push the fiberfill into all the corners. This prevents lumps and gives your character a smooth, rounded shape.