How to Knit a Cute Teddy Bear: A Step-by-Step Beginner Pattern
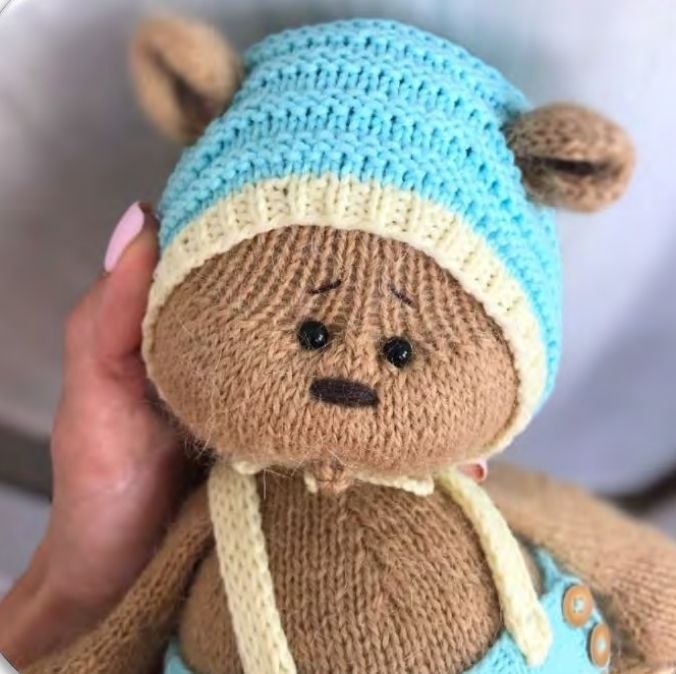
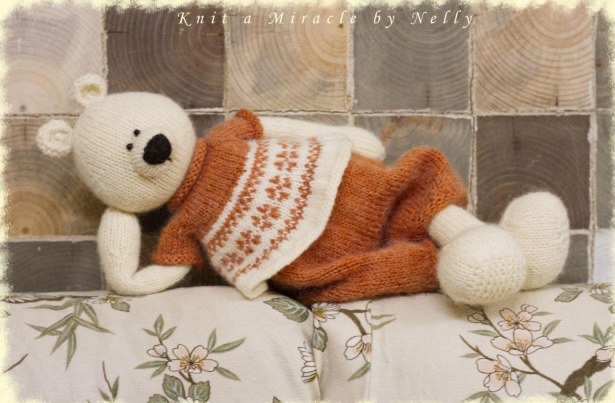
There is nothing quite as heartwarming as a handmade toy. Whether you are looking to create a special gift for a little one or want to add a charming companion to your own shelf, knitting a teddy bear is a rewarding project that combines skill-building with pure creativity. In this tutorial, we will walk you through the process of creating a “Northern Princess” style teddy bear—a soft, cuddly white bear dressed in a cozy terracotta sweater and matching shorts.
This pattern is designed to be beginner-friendly, focusing on basic stitches like knitting and purling, while introducing you to small sections of colorwork and shaping. By the end of this guide, you will have a beautiful, 14-inch tall friend ready for adventures!
Materials & Abbreviations
Before you pick up your needles, make sure you have all your supplies ready. Since this bear features different textures and colors, having everything organized will make the process much smoother.
Yarn Requirements
- Main Body Color: White alpaca or wool blend (approx. 100-150 yards).
- Clothing Color: Terracotta/rust colored wool (approx. 100 yards).
- Sweater Detail Color: White wool (approx. 50 yards).
- Accent Color: A small amount of dark brown yarn for the nose embroidery.
Tools & Notions
- Needles: Circular needles and Double Pointed Needles (DPNs). You will likely need a set ranging from 2.25mm (US 1) for the clothing to approximately 3mm or 3.5mm for the body.
- Stuffing: High-quality polyester fiberfill.
- Eyes: Small black beads.
- Other: Stitch markers, tapestry needle, scissors, and sewing pins.
Abbreviations (US Terms)
- st(s): stitch(es)
- MR: Magic Ring
- k: knit
- p: purl
- kfb: knit front and back (increase)
- k2tog: knit two together (decrease)
- yo: yarn over (creates an eyelet/hole)
- inc: increase
- dec: decrease
Step-by-Step Instructions
The Head
We begin knitting from the bottom of the head and work our way up. Start by making a Magic Ring (MR) and working 6 stitches into it. Place a marker to denote the start of the round.
- Round 1: 6 kfb (12 sts)
- Round 2: 12 k
- Round 3: (1 k, kfb) repeat 6 times (18 sts)
- Round 4: 18 k
- Round 5: (2 k, kfb) repeat 6 times (24 sts)
- Round 6: 24 k
- Round 7: (3 k, kfb) repeat 6 times (30 sts)
- Round 8: 30 k
- Round 9: (3 k, kfb) twice, 1 k, kfb, 10 k, kfb, 1 k, (kfb, 3 k) twice (36 sts)
- Round 10: 36 k
- Round 11: (4 k, kfb) twice, 1 k, kfb, 12 k, kfb, 1 k, (kfb, 4 k) twice (42 sts)
- Round 12: 42 k
- Round 13: (5 k, kfb) twice, 1 k, kfb, 14 k, kfb, 1 k, (kfb, 5 k) twice (48 sts)
- Round 14: 48 k
- Round 15: (6 k, kfb) twice, 1 k, kfb, 16 k, kfb, 1 k, (kfb, 6 k) twice (54 sts)
- Rounds 16–23: 54 k
- Round 24: (6 k, k2tog) twice, 1 k, k2tog, 16 k, k2tog, 1 k, (k2tog, 6 k) twice (48 sts)
- Rounds 25–26: 48 k
- Round 27: (5 k, k2tog) twice, 1 k, k2tog, 14 k, k2tog, 1 k, (k2tog, 5 k) twice (42 sts)
- Rounds 28–29: 42 k
- Round 30: (4 k, k2tog) twice, 1 k, k2tog, 12 k, k2tog, 1 k, (k2tog, 4 k) twice (36 sts)
- Rounds 31–32: 36 k
- Round 33: (3 k, k2tog) twice, 1 k, k2tog, 10 k, k2tog, 1 k, (k2tog, 3 k) twice (30 sts)
- Rounds 34–35: 30 k
- Round 36: (2 k, k2tog) twice, 1 k, k2tog, 8 k, k2tog, 1 k, (k2tog, 2 k) twice (24 sts)
- Rounds 37–39: 24 k
- Round 40: 12 k2tog (12 sts)
Fasten off, thread the yarn through the remaining stitches, and pull tight to close.
The Muzzle
The muzzle gives the bear its character. Create a small, slightly rounded piece.
- Make a Magic Ring and work 6 stitches into it. Distribute onto 3 needles and join in the round. Place a marker.
- Round 1: 6 kfb (12 sts)
- Round 2: 12 k
- Round 3: (1 k, kfb) repeat 6 times (18 sts)
- Rounds 4–7: 18 k
Fasten off, leaving a long tail for sewing. Stuff the muzzle lightly so it holds its shape without being too hard. Pin it between the “cheeks” of the head before sewing it on.
The Ears (Make 2)
Ears are simple but essential for that classic bear look.
- Cast on 16 stitches.
- Round 1: 16 k
- Round 2: 16 p
- Round 3: 16 k
Fasten off, leaving a long tail. Bind off the remaining stitches and pull the yarn tight to shape. Pin them to the head where you want them and sew securely.
The Body
The body is the largest part of your bear. Work in the round starting from the top.
- Cast on 18 stitches and join in the round with a marker.
- Round 1: 18 k
- Round 2: (2 k, kfb) repeat 6 times (24 sts)
- Round 3: 24 k
- Round 4: (3 k, kfb) repeat 6 times (30 sts)
- Round 5: 30 k
- Round 6: (4 k, kfb) repeat 6 times (36 sts)
- Rounds 7–15: 36 k
- Round 16: (5 k, kfb) repeat 6 times (42 sts)
- Round 17: 42 k
- Round 18: (6 k, kfb) repeat 6 times (48 sts)
- Rounds 19–22: 48 k
- Round 23: (7 k, kfb) repeat 6 times (54 sts)
- Rounds 24–50: 54 k
- Round 51: (7 k, k2tog) repeat 6 times (48 sts)
- Round 52: 48 k
- Round 53: (6 k, k2tog) repeat 6 times (42 sts)
- Rounds 54–55: 42 k
Fasten off, leaving a long tail for sewing.
The Arms (Make 2)
Arms should be stuffed lightly, just above the midpoint, to allow for movement.
- Start with a Magic Ring and work 6 stitches into it. Join in the round.
- Round 1: (1 k, kfb) repeat 3 times (9 sts)
- Round 2: 9 k
- Round 3: 9 kfb (18 sts)
- Rounds 4–14: 18 k
- Round 15: k2tog, 5 k, k2tog, k2tog, 5 k, k2tog (14 sts)
- Rounds 16–50: 14 k
Fasten off, leaving a long tail. Stuff lightly and sew to the sides of the body.
The Legs & Feet
The legs are worked in two parts: the foot and then the leg itself using 4 needles/DPNs.
The Foot
- Cast on 7 stitches.
- Rounds 1–14: 7 k
- Round 15: k2tog, 3 k, k2tog (5 sts)
- Rounds 16–17: 5 k
The Leg
Distribute the foot stitches onto 4 needles. The layout should be: 5 sts on needle 1, 14 sts on needle 2, 7 sts on needle 3, and 14 sts on needle 4.
- Rounds 1–9: 40 k
- Round 10: 18 k, k2tog, 5 k, k2tog, 13 k (38 sts)
- Round 11: 17 k, k2tog, 4 k, k2tog, 13 k (36 sts)
- Round 12: 17 k, k2tog, 2 k, k2tog, 13 k (34 sts)
- Round 13: 17 k, k2tog, k2tog, 13 k (32 sts)
- Round 14: 16 k, k2tog, k2tog, 12 k (30 sts)
- Round 15: 15 k, k2tog, k2tog, 11 k (28 sts)
- Round 16: 12 k, (k2tog, k2tog) twice, 8 k (24 sts)
- Round 17: 10 k, (k2tog, k2tog) twice, 6 k (20 sts)
- Round 18: 10 k, k2tog, k2tog, 6 k (18 sts)
- Rounds 19–50: 18 k
Fasten off, leaving a long tail. Stuff the leg firmly to help the bear sit.
The Tail
A tiny detail that completes the look.
- Make a Magic Ring and work 8 stitches into it.
- Round 1: 8 kfb (16 sts)
- Rounds 2–9: 16 k
- Round 10: 8 k2tog (8 sts)
- Round 11: 8 k
Fasten off, stuff lightly, and sew to the back of the body.
The Sweater (Colorwork)
This piece uses terracotta and white yarn to create a festive pattern. Use the terracotta for the base and white for the pattern.
- Cast on 33 stitches in terracotta.
- Round 1: 33 k
- Round 2: 33 p
- Repeat Rounds 1 & 2 twice.
- Round 7 (Buttonhole): 1 k, yo, 3 p, yo, 1 k, yo, 5 k, yo, 1 k, yo, 10 k, yo, 1 k, yo, 5 k, yo, 1 k, yo, 5 k.
- Round 8: 42 p
- Round 9 (Raglan shaping): 6 k, yo, 1 k, yo, 7 k, yo, 1 k, yo, 12 k, yo, 1 k, yo, 7 k, yo, 1 k, yo, 6 p.
- Round 10: 50 p
- Round 11: 7 k, yo, 1 k, yo, 9 k, yo, 1 k, yo, 14 k, yo, 1 k, yo, 9 k, yo, 1 k, yo, 7 k. (Distribute sts onto 3 or 4 needles and join in the round).
- Round 12: 58 k
- Round 13: 8 k, yo, 1 k, yo, 11 k, yo, 1 k, yo, 16 k, yo, 1 k, yo, 11 k, yo, 1 k, yo, 8 k.
- Round 14: 66 k
- Round 15: 9 k, yo, 1 k, yo, 13 k, yo, 1 k, yo, 18 k, yo, 1 k, yo, 13 k, yo, 1 k, yo, 9 k.
- Round 16: 74 k
- Round 17: 10 k, transfer 17 sts to a holder, k5, 20 k, transfer 17 sts from holder, k5, 10 k.
- Round 18: 50 k
- Round 19: (1 k, kfb) repeat 25 times (75 sts)
- Switch to white yarn.
- Round 20: 75 k
- Round 21: 3 p, (6 k, kfb) repeat 9 times, 9 k (84 sts)
Following the pattern’s visual chart for rounds 22–36 will complete the decorative motif. Use the white yarn for the pattern and the terracotta for the base.
The Shorts (Breeches)
Use 2.25mm needles for this section to ensure a tight, professional look.
- Cast on 68 stitches and join in the round.
- Rounds 1–7: (1 k, 1 p) repeat to end (68 sts).
- Switch to 3mm needles.
- Round 8: (1 k, kfb) repeat to end.
- Rounds 9–25: 102 k
- At the end of Round 25: Turn the work to create the crotch opening.
- Round 26: 102 p, turn.
- Round 27: 102 k, turn.
- Round 28: 102 p, turn.
- Round 29: 102 k, continue in the round.
- Rounds 30–37: 102 k
For the leg openings, transfer 51 stitches to a holder. Distribute the remaining stitches across 3 needles to work the legs in the round. Complete by knitting 10 rounds of 51 k, then a decrease round (k2tog 25 times, 1 k), and finish with 15 rounds of 26 p.
Finishing
Assembly
Now for the most exciting part: bringing your bear to life!
- Body & Legs: Place the body face up. Sew the legs to the bottom of the body, passing the thread through both the body and leg stitches for a secure attachment. Sew the crotch opening shut.
- Arms: Pin the arms to the sides of the body. Ensure they are symmetrical. Sew them in place.
- Head: Sew the head onto the top of the body.
- Face: Use dark brown yarn to embroider a small triangle for the nose. Use a “fan” stitch technique, starting from the bottom of the triangle and working outwards to create a slight 3D effect. Finally, sew your beads onto the head to create the eyes.
Tips
- Achieving the Perfect Sit: If you want your bear to sit easily and move its limbs, stuff the bottom of the body and the limbs slightly less firmly. If you want it to stand upright, stuff the legs and body very firmly.
- Symmetry is Key: Use sewing pins to position the ears, muzzle, and eyes before you sew them. This allows you to step back and check that everything looks balanced.
- Blocking: For the best finish, especially on the sweater, steam block your pieces. Lay the sweater on a flat surface and use steam from an iron (held a few inches away) through a damp cloth to smooth out any wrinkles. This also makes the knitted fabric feel much softer.
- Button Detail: Don’t forget to sew a tiny button onto the back of the sweater collar for that extra touch of charm!