Amigurumi Pug Crochet Pattern Tutorial: How to Make a Cute Poseable Pug Dog
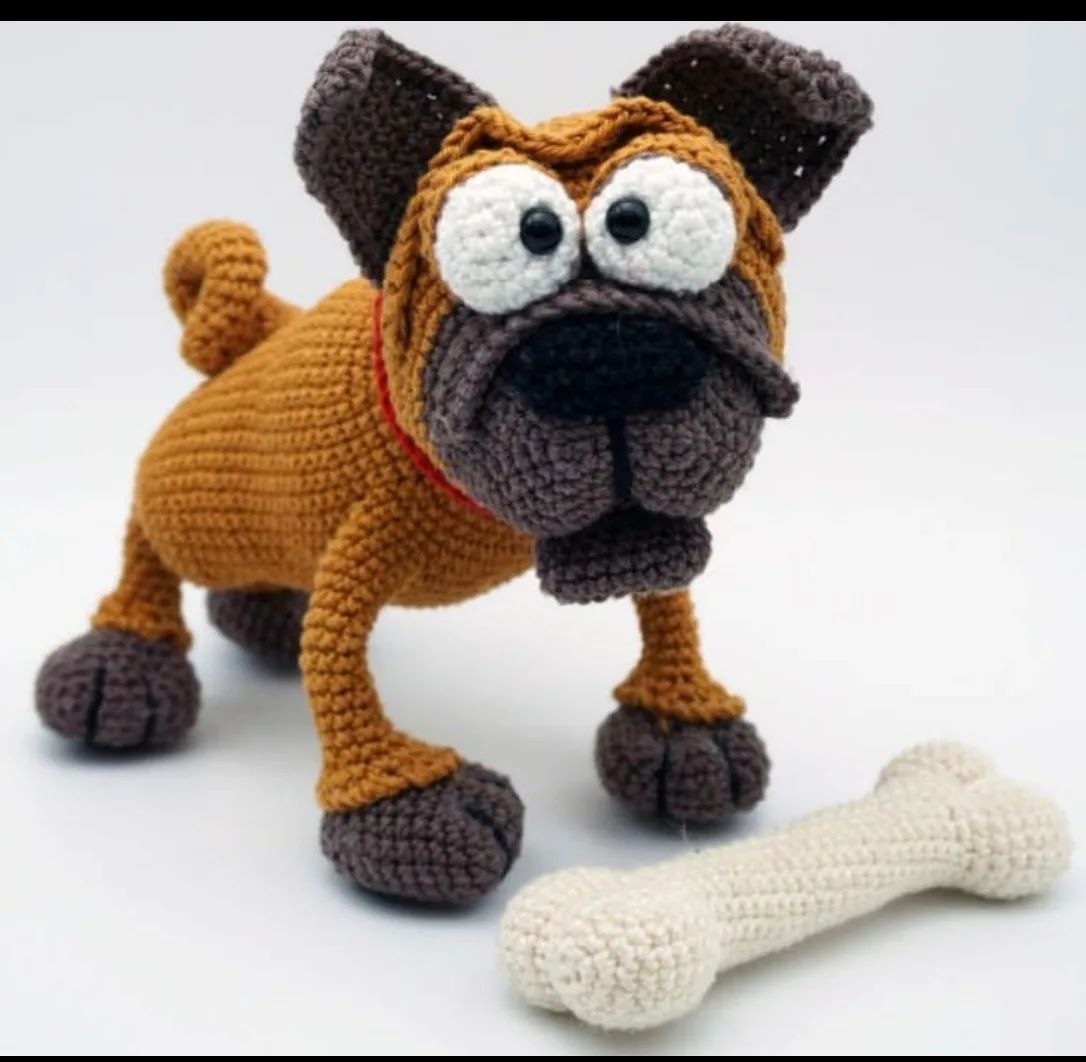
If you are looking for a crochet project that captures a huge amount of personality in a small package, look no further! This adorable amigurumi Pug is more than just a cute desk companion; thanks to a clever internal wire frame, this little pup is fully poseable. Whether he is sitting proudly or lounging next to his favorite bone, this pattern allows you to bring your crochet pet to life in a way that standard stuffed toys simply cannot.
This tutorial is perfect for intermediate crocheters who want to challenge themselves with body shaping and wire integration. Don’t worry, though—I will walk you through every step, from the wrinkly brow to the little wagging tail. Let’s dive into the world of pug-making!
Materials & Abbreviations
Before we pick up our hooks, let’s make sure you have everything you need. Because this pug features a wire skeleton, you will need a few extra supplies beyond just yarn and stuffing.
Materials Needed:
- Yarn (Medium/Worsted Weight): Dark brown (for muzzle, nose, and ears), Tan or Ginger (for the body, legs, and eyelids), White (for eyes), Cream or Off-white (for the bone), and Red (for the collar).
- Crochet Hook: A suitable size for your yarn (typically 3.5mm or 4.0mm).
- Stuffing: Polyester fiberfill.
- Wire: Approximately 20 inches of sturdy craft or floral wire.
- Safety Eyes or Beads: Small black beads or safety eyes for the pupils.
- Other: Tapestry needle, scissors, and electrical tape (to secure the wire).
Abbreviations (US Terms):
- MR: Magic Ring
- ch: Chain
- sc: Single crochet
- sl st: Slip stitch
- inc: Increase (2 sc in one stitch)
- dec: Decrease (sc 2 together)
- dc: Double crochet
- hdc: Half double crochet
- st(s): Stitch(es)
- R: Round or Row
Step-by-Step Instructions
The Muzzle
We will start with the muzzle using dark brown yarn. Note: Do not stuff this part!
R1: Ch 6. Starting from the 2nd ch from the hook: 4 sc, 3 sc in the last ch, 3 sc, inc (12)
R2: inc, 3 sc, inc * 3, 3 sc, inc * 2 (18)
R3: 18 sc (18)
Fasten off, leaving a tail to sew later.
The Head & Wire Frame
The head is the most complex part of this project. It requires color changes and a wire frame to support the weight and allow for posing.
Base Shaping
Using dark brown yarn:
R1: Ch 6. Starting from the 2nd ch from the hook: 4 sc, 3 sc in the last ch, 3 sc, inc (12)
R2: inc, 3 sc, inc * 3, 3 sc, inc * 2 (18)
R3: (sc, inc), 3 sc, (sc, inc) * 3, 3 sc, (sc, inc) * 2 (24)
R4: (2 sc, inc), 3 sc, (2 sc, inc) * 3, 3 sc, (2 sc, inc) * 2 (30)
R5: (3 sc, inc), 3 sc, (3 sc, inc) * 3, 3 sc, (3 sc, inc) * 2 (36)
R6: (4 sc, inc), 3 sc, (4 sc, inc) * 3, 3 sc, (4 sc, inc) * 2 (42)
R7-9: 42 sc (42)
Creating the Mouth & Color Change
In R11, we will incorporate the mouth feature. This involves working into the loops created by the mouth stitches to give the face depth.
R11: 4 sc, 9 sc together with the mouth loops, 5 sc along the head loops, 22 sc in the back loops only, 2 sc in both loops (42)
R12: 4 sc, 9 sc along the remaining mouth loops, 7 sc along the head loops, (sc, inc) * 9, 4 sc (51)
Switch to tan/ginger yarn:
R13: 20 sc, (2 sc, inc) * 9, 4 sc (60)
R14-21: 60 sc (60)
R22: (8 sc, dec) * 6 (54)
R23: (7 sc, dec) * 6 (48)
R24: (6 sc, dec) * 6 (42)
R25: (5 sc, dec) * 6 (36)
The Wire Frame Integration
In R26, we create the exit point for the wire. R26: 4 sc, dec, ch 2, skip one stitch, 3 sc, dec, (4 sc, dec) * 4 (31). This creates an opening. Take your 20-inch wire, fold it in half, and shape it to match the head’s silhouette. Secure the center with electrical tape and thread the wire through the opening in the head.
Stuff the head firmly with fiberfill before continuing.
R27: 3 sc, dec, 1 sc in the ch-2 space, 2 sc, dec, (3 sc, dec) * 4 (24)
R28: (2 sc, dec) * 6 (18)
R29: (sc, dec) * 6 (12)
R30: dec * 6 (6)
Fasten off and close the remaining hole with a slip stitch. Use a black thread to make one large stitch through the center to create the facial indentation/dimple as shown in the reference photos.
The Nose & Eyes
The Nose: Using black yarn, follow the same steps as the muzzle: MR 6, R2: 4 sc, 3 sc in one st, 3 sc, inc (12), R3: inc, 3 sc, inc * 3, 3 sc, inc * 2 (18), R4: 18 sc. Stuff lightly and sew to the center of the muzzle.
The Eyes: Make two pieces in white yarn. R1: MR 6, R2: inc * 6 (12), R3: (sc, inc) * 6 (18), R4: 18 sc, R5: (sc, dec) * 6 (12). Fasten off.
The Eyelids: Make two pieces in tan yarn. R1: Ch 11, R2: 10 sc, turn, R3: dec, 2 sc, dec, 2 sc, dec (7), R4: dec * 3, sl st. Stuff lightly, sew over the white eyes, and glue black beads onto the white part for the pupils.
The Ears & Tail
Ears (Make 2): Using dark brown yarn. R1: Ch 2, R2: 3 sc in one st (3), R3: inc, sc, inc, turn (5), R4: 5 sc, turn (5), R5: sc, inc, sc, inc, sc, turn (7), R6-7: 7 sc, turn (7), R8: sc, inc, 3 sc, inc, sc, turn (9), R9-12: 9 sc, turn (9), R13: sc, inc, 5 sc, inc, sc, turn (11), R14-15: 11 sc. Fasten off and sew to the head.
Tail: Using tan yarn. R1: MR 3, R2: inc * 3 (6), R3-5: 6 sc, R6: 5 sc, inc (7), R7: 7 sc, R8: 6 sc, inc (8), R9: 8 sc, R10: 7 sc, inc (9), R11: 9 sc, R12: 8 sc, inc (10), R13: 10 sc, R14: 9 sc, inc (11), R15: 11 sc, R16: 10 sc, inc (12), R17-24: 12 sc. Fasten off.
The Legs & Body Assembly
This project uses an integrated body method where the legs and tail are crocheted directly into the body to ensure stability.
Back Legs (Make 2)
Using tan yarn. R1: MR 18 (do not tighten the ring!), R2: (sc, dec) * 6 (12), R3: (2 sc, dec) * 3 (9), R4-9: 9 sc, R10: inc * 5, 4 sc (14), R11: (sc, inc) * 5, 4 sc (19), R12: (2 sc, inc) * 5, 4 sc (24), R13: (3 sc, inc) * 5, dec * 2 (27), R14: dec, 2 sc, inc, (4 sc, inc) * 4, dec (30), R15-17: 30 sc, R18: inc * 2, 11 sc, dec * 2, 13 sc (30), R19: 30 sc. Fasten off.
Front Legs (Make 2)
Using tan yarn. R1: MR 18 (do not tighten), R2: (sc, dec) * 6 (12), R3: (2 sc, dec) * 3 (9), R4-11: 9 sc, R12: 8 sc, inc (10), R13-16: 10 sc. Fasten off.
The Body
Using tan yarn. R1: Ch 13, R2: 11 sc, 3 sc in one st, 10 sc, inc (26), R3: inc, 10 sc, inc * 3, 10 sc, inc * 2 (32).
R4 (Integrating Back Legs): 3 sc, 10 sc worked together with the right back leg and body, 4 sc, 10 sc worked together with the left back leg and body, 5 sc (32).
R5: 3 sc, 20 sc along the free loops of the right leg, 4 sc, 20 sc along the free loops of the left leg, 5 sc (52).
R6 (Integrating Tail): 22 sc, 6 sc worked together with the tail, 24 sc (52).
R7: 3 sc, dec, 17 sc, 6 sc along the tail, (18 sc, dec, 4 sc) (50).
R8: 2 sc, dec, 40 sc, dec, 4 sc (48), R9-11: 48 sc.
Stuff the body firmly.
R12: (7 sc, inc) * 6 (54), R13-18: 54 sc.
R19 (Integrating Front Legs): 5 sc, 5 sc worked together with the right front leg and body, 33 sc, 5 sc worked together with the left front leg and body, 6 sc (54).
R20: 5 sc, 5 sc along the free loops of the right front leg, 33 sc, 5 sc along the free loops of the left front leg, 6 sc (54).
R21: 3 sc, (5 sc, dec) * 3, 6 sc, (5 sc, dec) * 3, 3 sc (48), R22: 3 sc, (4 sc, dec) * 3, 6 sc, (4 sc, dec) * 3, 3 sc (42), R23: 3 sc, (3 sc, dec) * 3, 6 sc, (3 sc, dec) * 3, 3 sc (36), R24: 36 sc, R25: 3 sc, (2 sc, dec) * 3, 6 sc, (2 sc, dec) * 3, 3 sc (30), R26-29: 30 sc. Fasten off.
Note: Use a needle to create “neck wrinkles” by stitching and pulling the thread through the neck area to create folds.
The Collar & Bone
Collar: Using red yarn. R1: Ch 45, R2: 44 sc, R3: 44 sc. Fasten off and sew around the neck.
The Bone: Using cream yarn. R1: Ch 8, R2: 6 sc, 3 sc in one st, 5 sc, inc (16), R3: inc, 5 sc, inc * 3, 5 sc, inc * 2 (22), R4: (sc, inc), 5 sc, (sc, inc) * 3, 5 sc, (sc, inc) * 2 (28), R5-9: 28 sc, R10: (sc, dec), 5 sc, (sc, dec) * 3, 5 sc, (sc, dec) * 2 (22), R11: dec, 5 sc, dec * 3, 5 sc, dec * 2 (16), R12: 2 sc, dec, 6 sc, dec, 4 sc (14), R13-32: 14 sc. After R32, crochet 4 more sc, move your marker, and start increasing again to shape the ends: R33: 2 sc, inc, 6 sc, inc, 4 sc (16), R34: inc, 5 sc, inc * 3, 5 sc, inc * 2 (22), R35: (sc, inc), 5 sc, (sc, inc) * 3, 5 sc, (sc, inc) * 2 (28), R36-40: 28 sc, R41: (sc, dec), 5 sc, (sc, dec) * 3, 5 sc, (sc, dec) * 2 (22), R42: dec, 5 sc, dec * 3, 5 sc, dec * 2 (16). Stuff and sew the ends closed.
Finishing & Assembly
Now it is time to bring your pug together! Follow these steps carefully:
- The Wire Frame: Insert the shaped wire frame into the body and legs. This is what allows the dog to stand or sit in different positions.
- The Head: Attach the head to the body. Use the neck wrinkles we created earlier to hide the seam.
- Face Details: Sew the nose onto the muzzle. Attach the eyes with the eyelids over them.
- Limbs & Tail: Sew the ears to the top of the head. Attach the tail to the back. If you made the legs as separate pieces (for the paws), sew them onto the integrated legs.
- Details: Using black embroidery thread, add small lines to the bottom of the paws to simulate toes and pads.
- Accessories: Put the red collar around the neck and place the bone next to your finished pug!
Tips for Success
- Tension is Key: When working with amigurumi, keep your stitches tight to prevent the stuffing from showing through.
- Wire Safety: Always wrap the ends of your wire with electrical tape or use a bead cap to ensure there are no sharp edges that could poke through the crochet fabric.
- Magic Ring Tip: If you struggle with the magic ring, you can make a chain loop instead, but the magic ring provides a much cleaner finish.
- Don’t Tighten the Legs: When starting the legs, the pattern specifically says not to tighten the magic ring. This leaves a small opening to help integrate the leg into the body more smoothly.
Happy crocheting! You now have a unique, poseable pug that is ready to brighten up any room!