How to Crochet the Cutest Big and Small Sheep Amigurumi Duo
Are you looking for your next adorable crochet project? There is nothing quite as heartwarming as a pair of cuddly animals, and this “Big and Little Sheep” duo is the perfect project for your next afternoon of crafting. Whether you are making a nursery decoration, a gift for a newborn, or a little companion for your bookshelf, these sleepy, sweet-faced sheep are sure to charm everyone who sees them.
This tutorial will guide you through creating two different sizes: a larger, more detailed sheep with a textured “bobble” body and a charming mini version. This pattern is perfect for intermediate beginners who want to practice color changes, shaping, and working with texture.
Materials & Abbreviations
Before we dive into the stitches, let’s make sure you have everything you need on your crochet hook. For the best results, use a smooth cotton or cotton-blend yarn to ensure your stitches are clearly defined.
Materials Needed
- Yarn: Medium weight (worsted) yarn in the following colors:
- Natural (Cream or White)
- Mint (Light pastel green)
- Jade (A deeper, richer green)
- Pink (For the nose and inner ears)
- Dark Gray or Brown (For embroidery/eyebrows)
- Crochet Hook: A size appropriate for your yarn (typically 3.25mm to 4.0mm) to ensure tight, even stitches.
- Stuffing: Polyester fiberfill.
- Eyes: Safety eyes (optional) or black embroidery floss for closed, sleeping eyes.
- Other: Tapestry needle, scissors, and a white ribbon for the bow.
Abbreviations (US Terms)
- MR: Magic Ring
- sc: Single crochet
- inc: Increase (2 sc in one stitch)
- dec: Decrease (sc 2 together)
- bobble stitch: 4 dc (double crochet) in one stitch
- dc: Double crochet
- ch: Chain
- sl st: Slip stitch
- st(s): Stitch(es)
Step-by-Step Instructions: The Large Sheep
The Legs (Natural Color)
Make two identical legs. Do not stuff them fully to keep them firm.
- 6 sc in MR (6)
- 6 inc (12)
- (1 sc, 1 inc) x6 (18)
- (2 sc, 1 inc) x6 (24)
- 24 sc (24)
- (1 dec, 2 sc, 1 inc) x2; 9 sc; (1 dec, 2 sc, 1 inc) x2; 9 sc (24)
- 24 sc (24)
- (1 dec, 2 sc, 1 inc) x2; 9 sc; (1 dec, 2 sc, 1 inc) x2; 9 sc (24)
- 24 sc (24)
- 24 sc (24)
- (1 dec, 2 sc, 1 inc) x2; 9 sc; (1 dec, 2 sc, 1 inc) x2; 9 sc (24)
- 24 sc (24)
Fasten off, leaving a long tail for sewing. For the second leg, repeat the same steps, but in Row 12, work an extra 2 sc (26 sc total) to help with the connection.
The Body (Mint and Jade)
Switch to Mint yarn. Join the two legs together using a chain to create the base of the body. To ensure the legs face inward, join the yarn to the first leg, work 23 sc, ch 6, then join to the second leg. The total stitch count for the round should be 60.
- (1 sc, 1 bobble) x30 (60)
- 60 sc (60)
- (1 sc, 1 bobble) x30 (60)
- 60 sc (60)
- (1 sc, 1 bobble) x30 (60)
- 12 sc, 1 dec, 28 sc, 1 dec, 16 sc (58)
- (1 sc, 1 bobble) x29 (58)
- 12 sc, 1 dec, 27 sc, 1 dec, 15 sc (56)
- (1 sc, 1 bobble) x28 (56)
- 12 sc, 1 dec, 26 sc, 1 dec, 14 sc (54)
- (1 sc, 1 bobble) x27 (54)
- 12 sc, 1 dec, 25 sc, 1 dec, 13 sc (52)
- (1 sc, 1 bobble) x26 (52)
- (1 dec, 10 sc) x4 (48)
- (1 sc, 1 bobble) x24 (48)
- (1 dec, 9 sc) x4 (44)
- (1 sc, 1 bobble) x22 (44)
- (1 dec, 8 sc) x4 (40)
- (1 sc, 1 bobble) x20 (40)
- (3 sc, 1 dec) x8 (32)
- (1 sc, 1 bobble) x16 (32)
Fasten off, leaving a long tail for sewing the head on.
The Head (Natural Color)
The head is worked in a continuous spiral. Stuff firmly as you go.
- 6 sc in MR (6)
- 6 inc (12)
- (1 sc, 1 inc) x6 (18)
- (2 sc, 1 inc) x6 (24)
- (3 sc, 1 inc) x6 (30)
- (4 sc, 1 inc) x6 (36)
- (5 sc, 1 inc) x6 (42)
- (6 sc, 1 inc) x6 (48)
- 48 sc (48)
- (7 sc, 1 inc) x6 (54)
- 54 sc (54)
- (8 sc, 1 inc) x6 (60)
- (9 sc, 1 inc) x6 (66)
- (10 sc, 1 inc) x6 (72)
- 72 sc (72)
- (11 sc, 1 inc) x6 (78)
- 78 sc (78)
- (12 sc, 1 inc) x6 (84)
- 84 sc (84)
- 84 sc (84)
- (12 sc, 1 dec) x6 (78)
- (11 sc, 1 dec) x6 (72)
- (10 sc, 1 dec) x6 (66)
- (9 sc, 1 dec) x6 (60)
- (8 sc, 1 dec) x6 (54)
- (7 sc, 1 dec) x6 (48)
- (6 sc, 1 dec) x6 (42)
- (5 sc, 1 dec) x6 (36)
- (4 sc, 1 dec) x6 (30)
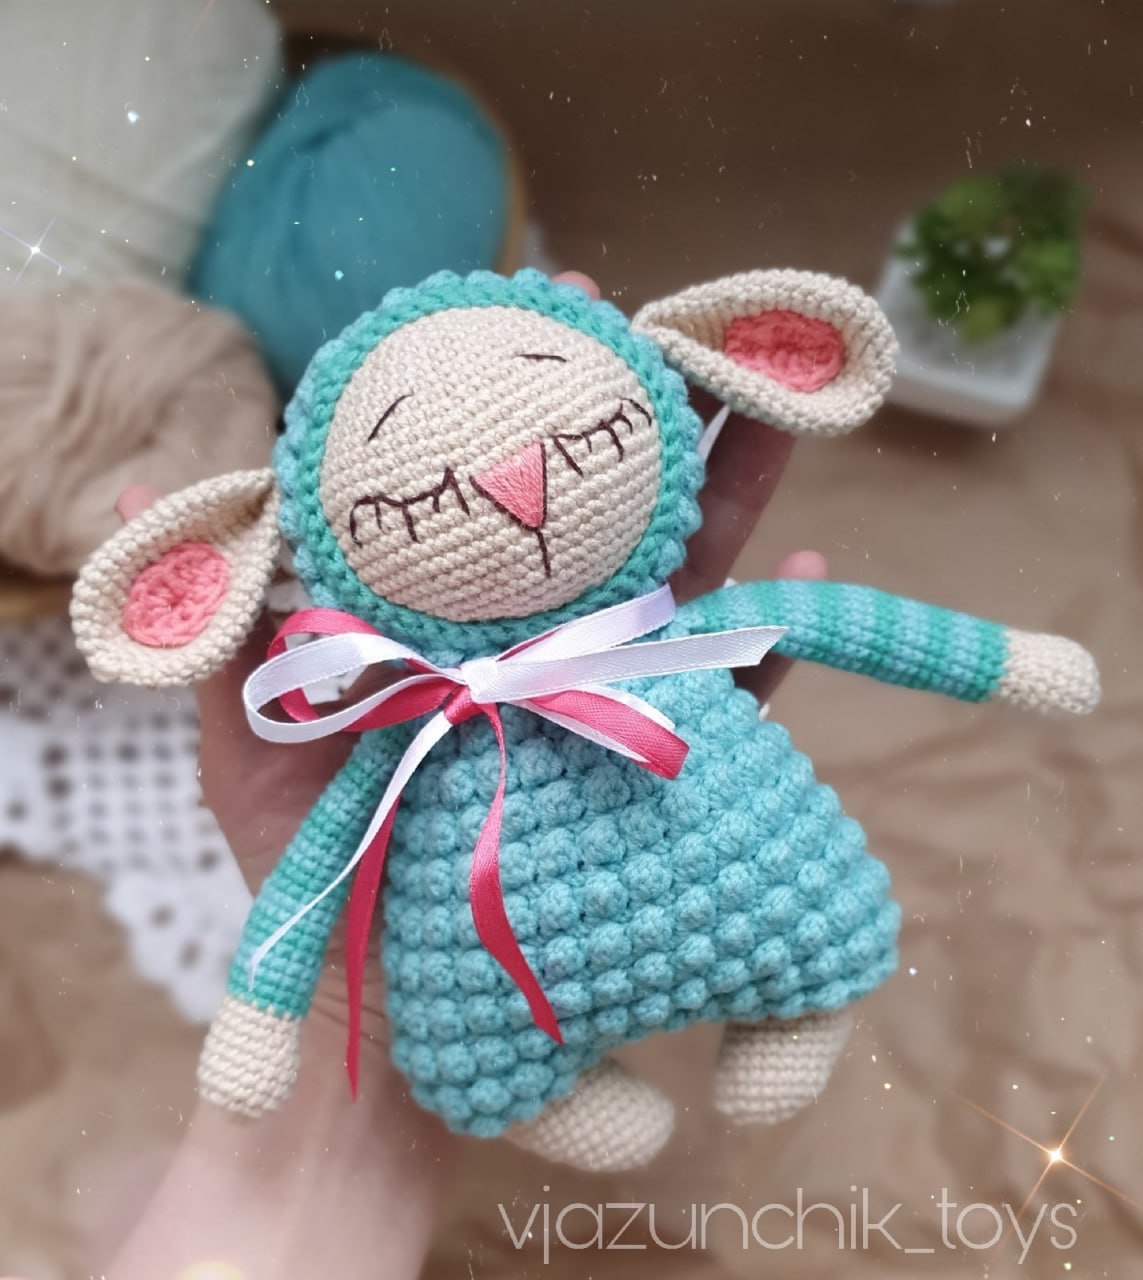
Fasten off, leaving a tail for sewing. Note: Embroider the eyes in rows 18-19. Embroider the nose as seen in the photos, and the eyebrows approximately 4 rows above the eyes.
The Arms (Natural, Mint, and Jade)
These arms feature a lovely striped effect. Do not stuff the arms.
- 6 sc in MR (6)
- 6 inc (12)
- (1 sc, 1 inc) x6 (18)
- Rows 4-7: 18 sc (18)
- (1 dec, 14 sc) x2 (16)
- 16 sc (16)
- Change to Mint: 9 sc, 7 sc (16)
- 16 sc (16)
- Change to Jade: 9 sc, 7 sc (16)
- 16 sc (16)
- Change to Mint: 9 sc, 7 sc (16)
- 16 sc (16)
- Change to Jade: 7 sc, 1 dec, 6 sc (15)
- 15 sc (15)
- Change to Mint: 10 sc, 5 sc (15)
- 15 sc (15)
- Change to Jade: 11 sc, 4 sc (15)
- 15 sc (15)
- Change to Mint: 12 sc, 3 sc (15)
- 15 sc (15)
- Change to Jade: 12 sc, 1 dec, 1 sc (14)
- 14 sc (14)
- Change to Mint: 13 sc, 1 sc (14)
- 14 sc (14)
- Change to Jade: 14 sc (14)
- 14 sc (14)
- Change to Mint: 14 sc (14)
- 14 sc (14)
Fold the arm in half and sc through both layers to close. Make a second arm identically.
The Hood (Mint and Jade)
Start with Mint yarn.
- 10 sc in MR (10)
- (1 sc, 1 bobble) x5 (10)
- 10 inc (20)
- (1 sc, 1 bobble) x10 (20)
- (1 sc, 1 inc) x10 (30)
- (1 sc, 1 bobble) x15 (30)
- (2 sc, 1 inc) x10 (40)
- (1 sc, 1 bobble) x20 (40)
- (3 sc, 1 inc) x10 (50)
- (1 sc, 1 bobble) x25 (50)
- (4 sc, 1 inc) x10 (60)
- (1 sc, 1 bobble) x30 (60)
- 60 sc (60)
- (1 sc, 1 bobble) x30 (60)
- 60 sc (60)
- (1 dec, 13 sc) x4 (56)
- (1 sc, 1 bobble) x28 (56)
- Change to Jade: 56 sc (56)
- (5 sc, 1 dec) x8 (48)
The Ears (Natural and Pink)
Make two ears.
- 6 sc in MR (6)
- 6 inc (12)
- (1 sc, 1 inc) x6 (18)
- (2 sc, 1 inc) x6 (24)
- (3 sc, 1 inc) x6 (30)
- Rows 6-12: 30 sc (30)
- (3 sc, 1 dec) x6 (24)
- Rows 14-15: 24 sc (24)
- (2 sc, 1 dec) x6 (18)
- Rows 17-18: 18 sc (18)
Fold in half and sew together. For the Pink Inner Ear: Ch 5. In the 2nd ch from hook: 1 sc, 2 dc, 5 dc in one stitch. On the other side of the chain: 2 dc, 1 sc, sl st in the first stitch. Sew this to the ear.
Step-by-Step Instructions: The Mini Sheep
The Head (Natural Color)
- 6 sc in MR (6)
- 6 inc (12)
- (1 sc, 1 inc) x6 (18)
- (2 sc, 1 inc) x6 (24)
- (3 sc, 1 inc) x6 (30)
- Rows 6-9: 30 sc (30)
- (3 sc, 1 dec) x6 (24)
- (2 sc, 1 dec) x6 (18)
- (1 sc, 1 dec) x6 (12)
- 6 dec (6)
Stuff firmly and fasten off.
The Legs (Natural Color)
- 4 sc in MR (4)
- 4 inc (8)
- Rows 3-6: 8 sc (8)
Make two. Join them with a chain (4 ch) and work around the legs and chain to create the body: 7 sc on first leg, 4 sc on chain, 8 sc on second leg, 4 sc on chain (23 total). Correction: Ensure the count matches your desired scale, roughly 24 stitches.
- Rows 8-11: 24 sc (24)
- (10 sc, 1 dec) x2 (20)
- 20 sc (20)
- (8 sc, 1 dec) x2 (18)
- 18 sc (18)
- (6 sc, 1 dec) x2 (16)
- 16 sc (16)
- (4 sc, 1 dec) x2 (14)
- 14 sc (14)
- (2 sc, 1 dec) x2 (12)
- 12 sc (12)
The Arms & Ears (Mini)
Arms: 1. 4 sc in MR. 2. 4 inc. 3. (1 dec, 2 sc) x2 (6). Change to Mint for rows 4-9. Fold and sew.
Ears: 1. 6 sc in MR. 2. 6 inc. 3-6. 12 sc. 7. 6 dec. 8. 6 sc. Fold and sew.
Finishing
Assembly is where your little sheep comes to life! Follow these steps carefully:
- Head to Body: Sew the head onto the body. For the large sheep, ensure it is centered.
- Arms: Attach the arms slightly below the connection point of the head and body.
- Ears: Sew the ears to the sides of the head.
- Hood: Place the hood over the head and sew it in place.
- Face: Embroider the eyes (closed/sleeping style), the nose, and the eyebrows.
- Final Touch: Tie a pretty white ribbon around the neck of the large sheep for an extra touch of sweetness.
Tips for Success
Tension is Key: Amigurumi requires very tight stitches so that the stuffing doesn’t show through. If you find gaps, try using a smaller hook.
Color Changes: To keep your color changes looking professional, pull the new color through the last two loops of the final stitch of the previous color. This creates a seamless transition.
Stuffing: Don’t be afraid to stuff! A well-stuffed amigurumi holds its shape much better, especially for the head and body.
Bobble Stitch Tip: When working the bobble stitches, make sure you pull your yarn up through the loops to ensure they are plump and textured. This is what gives the large sheep its signature “fluffy” look.