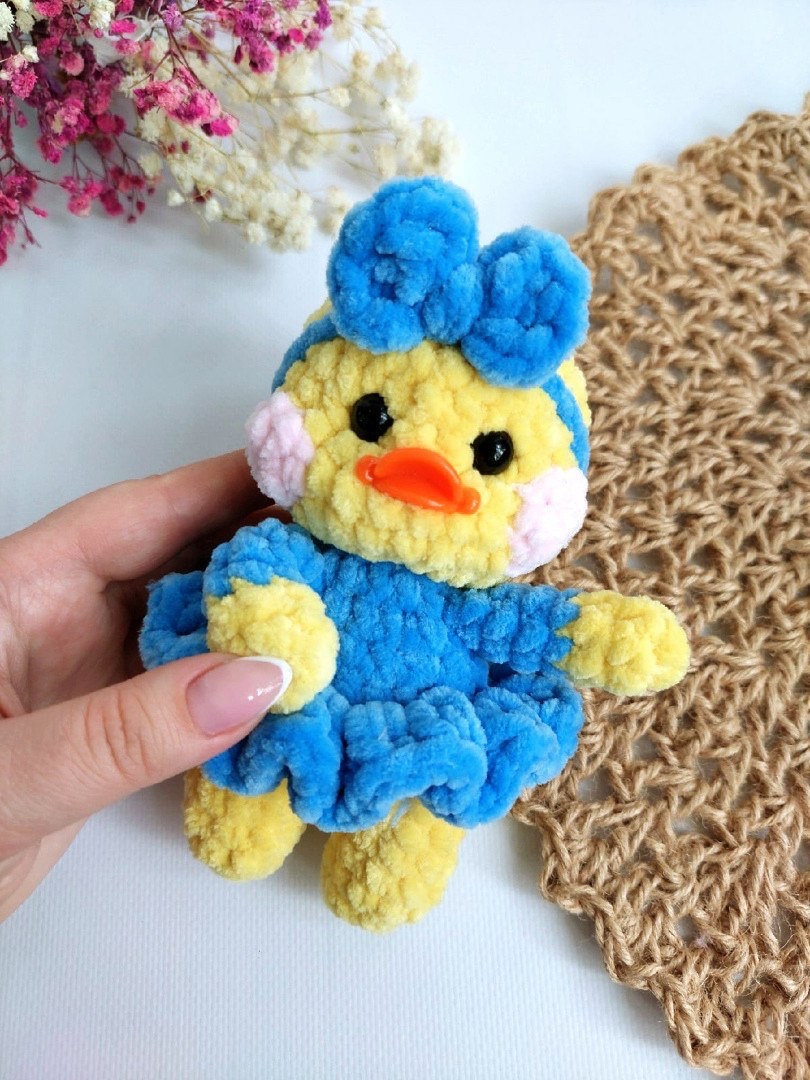
Crochet Lalafanfan Duck Pattern: A Cute and Easy Amigurumi Tutorial
If you have spent any time on social media lately, you have likely seen the adorable, squishy, and incredibly cute Lalafanfan ducks. These little yellow characters have become a viral sensation, and for good reason! They are the perfect combination of “kawaii” aesthetics and cozy crochet charm. Whether you want to make a tiny keychain to hang on your bag or a larger plushie for nursery decor, this crochet pattern is the perfect project.
In this detailed tutorial, I will guide you through every step of creating your very own Lalafanfan-style duck. This pattern is designed to be beginner-friendly, making use of bulky, soft chenille yarn that results in a super huggable finished product. Grab your hook, find your favorite colors, and let’s get started on this delightful amigurumi adventure!
Materials & Supplies
To achieve the classic look and soft texture of this duck, I recommend using a combination of bulky chenille yarn and a thinner cotton yarn for the finer details. This creates a lovely contrast in texture.
- Bulky Chenille Yarn (e.g., Himalaya Dolphin Baby): You will need a generous amount of Yellow for the body, a small amount of Blue for the dress and headband, and a little bit of Pink for the cheeks.
- Cotton Yarn (e.g., YarnArt Jeans): An orange color for the beak.
- Crochet Hooks: A 4.5mm (approx. G/7) hook for the bulky yarn and a 2mm (approx. B/1) hook for the cotton yarn.
- Safety Eyes: 10mm (approx. 3/8 inch) plastic safety eyes.
- Stuffing: High-quality polyester fiberfill (Polyfill).
- Notions: A yarn needle, scissors, stitch markers, and a strong thread (like embroidery floss or iris thread) for the “eye pulling” technique.
- Glue: A strong glue, such as a super glue gel, for securing parts.
- Optional: A ready-made plastic beak (approximately 1 inch wide and 0.4 inches tall).
Note: Following these specific yarn weights and hook sizes will result in a finished duck approximately 6 inches tall.
Abbreviations
This pattern uses standard US crochet terms. Please ensure you are using US terminology to avoid confusion.
- MR: Magic Ring (or Magic Circle)
- sc: Single crochet
- inc: Increase (2 sc in the same stitch)
- dec: Decrease (sc 2 stitches together)
- ch: Chain
- dc: Double crochet
- sl st: Slip stitch
- BLO: Back loops only
- BLO: Back loops only
Step-by-Step Instructions
Work in a continuous spiral unless otherwise noted. Remember to use a stitch marker to keep track of the beginning of your rounds.
The Body and Legs
We will be working the legs and the body as one continuous piece. Start with your Yellow bulky yarn.
Leg 1:
- MR, 6 sc (6)
- (sc, inc) repeat 3 times (9)
- 3-5. 9 sc (9) for 3 rows total
Joining the Legs:
- Do not fasten off the yarn on the first leg. Instead, ch 3. Join the chain to the first leg with a sc.
- Work 9 sc around the first leg.
- Work 3 sc into the 3 chains you just made.
- Work 9 sc around the second leg.
- Work 3 sc into the remaining 3 chains. (Total: 24 stitches)
Body Completion:
- 7-8. 24 sc (24) for 2 rows
- 9. Change color to your Blue yarn (dress color). 24 sc (24)
- 10. 24 sc in the BLO (Back Loops Only) (24)
- 11. (2 sc, dec) repeat 6 times (18)
- 12-13. 18 sc (18) for 2 rows
- 14. (sc, dec) repeat 6 times (12)
Stuff the body firmly with fiberfill as you go.
The Head
Switch back to your Yellow bulky yarn.
- 15. (inc) repeat 12 times (24)
- 16. (5 sc, inc) repeat 4 times (28)
- 17-21. 28 sc (28) for 5 rows
Eye Placement: Before continuing to decrease, insert your 10mm safety eyes between rounds 20 and 21. Space them approximately 2 to 3 stitches apart.
- 22. (5 sc, dec) repeat 4 times (24)
- 23. (2 sc, dec) repeat 6 times (18)
- 24. (sc, dec) repeat 6 times (12)
- 25. (dec) repeat 6 times (6)
Fasten off, leaving a long tail for sewing. Pull the hole closed tightly and hide the yarn tail inside the head.
Arms and Cheeks
Arms (Make 2): Use Yellow bulky yarn for the first part, then switch to Blue.
- MR, 6 sc (6)
- 2-3. 6 sc (6)
- 4-7. Change to Blue yarn. 6 sc (6) for 4 rows.
Leave a long tail for sewing. Do not stuff the arms.
Cheeks (Make 2): Use Pink bulky yarn.
- MR, 6 sc (6)
Leave a long tail for sewing.
The Beak
If you are not using a pre-made plastic beak, you can crochet your own using Orange cotton yarn and a 2mm hook.
- MR, 6 sc (6)
- 2. (inc) repeat 6 times (12)
- 3. (sc, inc) repeat 6 times (18)
Fasten off, leaving a long tail for sewing.
The Ruffled Skirt
To create that signature ruffled look, we go back to the body. In round 10, you worked in the back loops only. We will now work into the front loops that are still exposed.
In each of the remaining front loops from round 10, work 3 dc. This will create a beautiful, voluminous ruffle around the base of the duck.
The Bow and Headband
The Bow: Use Blue yarn.
- Make a magic ring.
- Ch 3, work 3 dc into the ring, ch 3, and finish with a sl st into the ring.
- Pull the ring tight to form a small bow shape.
The Headband: Use Blue yarn.
- Ch 27.
- Join the chain with a sl st to form a loop that fits around the head.
Finishing & Assembly
Assembly is where the magic happens! This is the stage where your duck truly comes to life.
The Eye Pulling Technique (The Secret to the Look)
To get that signature “squishy” facial expression, we use a thread-pulling method. Take a piece of sturdy thread in the main body color.
- For the first eye: Insert your needle into point 1 (just below the eye), pull through to point 2, then to point 3, and finally back to point 1. This creates a “pinch” effect.
- For the second eye: Repeat the process, but use a slightly different path to create more dimension. Insert at point 1, pull through to point 4, then to point 5, and back to point 6.
- Tie the thread off very tightly and hide the ends.
Final Assembly
- Cheeks: Sew the pink cheeks just below and slightly to the outside of the eyes.
- Beak: Sew the beak in the center of the face, between the eyes.
- Arms: Sew the arms to the sides of the body, approximately one row below where the head meets the body.
- Accessories: Attach the headband to the top of the head and sew or glue the little bow onto the headband.
Tips for Success
- Tension is Key: When working with chenille yarn, try to keep your tension even. If you pull too tight, it can be hard to insert your hook; if it’s too loose, the stuffing might show through.
- Stuffing: Don’t be afraid to stuff the body and head firmly. A well-stuffed amigurumi holds its shape much better.
- Color Changes: When changing colors, always pull the new color through the final two loops of the last stitch of the previous color to ensure a clean transition.
- Customization: This pattern is a fantastic base! Feel free to change the colors. A purple duck with a green dress or a mint duck with a white headband can look absolutely stunning.
Congratulations! You have finished your very own Lalafanfan Duck. You can now display it on your desk, give it as a gift, or turn it into a cute keychain!