How to Crochet a Cute Amigurumi Bunny: Free Easy Pattern
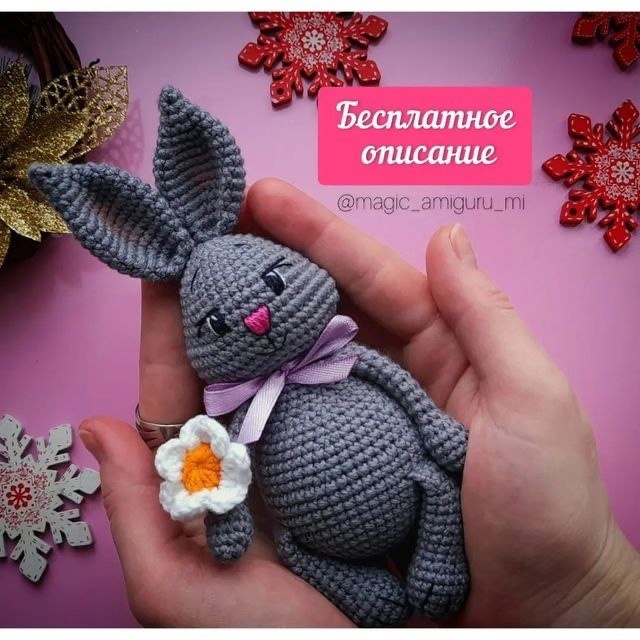
Are you looking for your next adorable crochet project? This step-by-step amigurumi bunny pattern is the perfect weekend craft! Pocket-sized, cuddly, and incredibly sweet, this little plush bunny is perfect for baby showers, Easter baskets, or as a cute handmade gift. Best of all, this pattern is highly customizable—you can choose any color palette to match your style or nursery decor.
In this comprehensive guide, we will walk you through everything you need to know, from selecting your yarn to assembling and embroidering the perfect bunny face. Grab your crochet hook, and let’s get started!
Materials & Abbreviations
Required Materials
- Yarn: Sport weight (Category 2) or DK weight (Category 3) yarn. You will need approximately 80 to 100 yards of your main color (such as soft gray, cream, or beige) and scrap amounts of pink yarn for the nose.
- Crochet Hook: 1.75 mm or US size B-1 (2.25 mm) hook. (Choose a size that allows you to work tight, neat stitches so that the fiberfill stuffing does not show through).
- Safety Eyes: 8 mm (approx. 0.31 inches) plastic safety eyes.
- Stuffing: High-quality polyester fiberfill stuffing.
- Tools: Tapestry needle for sewing pieces together, scissors, stitch markers, and sewing pins.
- Details (Optional): Black and white embroidery floss for the facial features, and a small satin ribbon for a bow.
Abbreviations (US Terms)
- MR: Magic Ring (or Magic Circle)
- sc: Single crochet
- inc: Increase (work 2 single crochets in the same stitch)
- dec: Decrease (invisible decrease recommended)
- st / sts: Stitch / stitches
- ( … ) x 6: Repeat the instructions within the parentheses the indicated number of times
- [ … ]: Total stitch count at the end of the round
Step-by-Step Instructions
Step 1: The Head
The head is worked from the top down. We will use strategic increases to create adorable, chubby cheeks. Stuff the head firmly as you progress.
- Round 1: Work 6 sc in a MR [6]
- Round 2: Work 6 inc [12]
- Round 3: (1 sc, inc) x 6 [18]
- Round 4: (2 sc, inc) x 6 [24]
- Round 5: (3 sc, inc) x 6 [30]
- Round 6-7: Work 30 sc (2 rounds total) [30]
- Round 8: (4 sc, inc) x 6 [36]
- Round 9: (5 sc, inc) x 6 [42]
- Round 10-11: Work 42 sc (2 rounds total) [42]
- Round 12 (Cheek Increase Round): 7 sc, 6 inc, 14 sc, 6 inc, 9 sc [54]
Safety Eye Placement: Insert your 8 mm safety eyes between Rounds 10 and 11, leaving a space of 8 stitches between them. Make sure the cheeks (the increase areas from Round 12) are positioned evenly on either side of the eyes.
- Round 13-15: Work 54 sc (3 rounds total) [54]
- Round 16 (Cheek Decrease Round): 7 sc, 6 dec, 6 sc, 6 dec, 6 sc, 1 dec, 9 sc [41]
- Round 17: 7 sc, 2 dec, 13 sc, 2 dec, 11 sc, 1 dec [36]
- Round 18: Work 18 dec [18]
- Round 19: Work 9 dec [9]
Fasten off, weave in the loose yarn tail, and hide the end inside the head.
Step 2: The Ears (Make 2)
The long, floppy ears do not require stuffing. This keeps them lightweight and easy to shape.
- Round 1: Work 5 sc in a MR [5]
- Round 2: Work 5 sc [5]
- Round 3: Work 5 inc [10]
- Round 4: Work 10 sc [10]
- Round 5: (1 sc, inc) x 5 [15]
- Round 6: (2 sc, inc) x 5 [20]
- Round 7: (3 sc, inc) x 5 [25]
- Round 8-12: Work 25 sc (5 rounds total) [25]
- Round 13: (3 sc, dec) x 5 [20]
- Round 14: Work 20 sc [20]
- Round 15: (2 sc, dec) x 5 [15]
- Round 16: Work 15 sc [15]
- Round 17: Fold the ear flat in half and crochet both layers together with 7 sc. Fold in half once more lengthwise and use your tapestry needle to stitch the base together. Leave a long tail for sewing.
Step 3: The Arms (Make 2)
Stuff only the lower part (the “palm” area) of the arms, leaving the upper arms unstuffed for a natural hang.
- Round 1: Work 6 sc in a MR [6]
- Round 2: Work 6 inc [12]
- Round 3-5: Work 12 sc (3 rounds total) [12]
- Round 6: Work 6 dec [6]
- Round 7-15: Work 6 sc (9 rounds total) [6]
- Round 16: Fold the arm flat and work 3 sc through both layers to close. Fasten off and weave in the ends. These will be crocheted directly into the body later.
Step 4: The Legs (Make 2)
Stuff the legs about two-thirds of the way up.
- Round 1: Work 6 sc in a MR [6]
- Round 2: Work 6 inc [12]
- Round 3: (1 sc, inc) x 6 [18]
- Round 4-6: Work 18 sc (3 rounds total) [18]
- Round 7: (1 sc, dec) x 6 [12]
- Round 8-15: Work 12 sc (8 rounds total) [12]
- Round 16: Fold the leg flat and work 6 sc through both layers to close. Fasten off and weave in the ends. These will also be crocheted directly into the body.
Step 5: The Body
The body is worked from the bottom up. We will join the legs and arms directly to the body as we crochet.
- Round 1: Work 6 sc in a MR [6]
- Round 2: Work 6 inc [12]
- Round 3: (1 sc, inc) x 6 [18]
- Round 4: (2 sc, inc) x 6 [24]
- Round 5: (3 sc, inc) x 6 [30]
- Round 6: (4 sc, inc) x 6 [36]
- Round 7: (5 sc, inc) x 6 [42]
- Round 8: (6 sc, inc) x 6 [48]
- Round 9-11: Work 48 sc (3 rounds total) [48]
- Round 12 (Joining the Legs): 10 sc, 6 sc working through both the body and the flat top of the first leg, 13 sc, 6 sc working through both the body and the flat top of the second leg, 13 sc [48]
- Round 13-15: Work 48 sc (3 rounds total) [48]
- Round 16: (6 sc, dec) x 6 [42]
- Round 17-18: Work 42 sc (2 rounds total) [42]
- Round 19: (5 sc, dec) x 6 [36]
- Round 20-21: Work 36 sc (2 rounds total) [36]
- Round 22: 12 sc, 6 dec, 12 sc [30]
- Round 23: Work 30 sc [30]
- Round 24: (3 sc, dec) x 6 [24]
- Round 25 (Joining the Arms): 6 sc, 3 sc working through both the body and the flat top of the first arm, 6 sc, 3 sc working through both the body and the flat top of the second arm, 6 sc [24]
- Round 26: Work 24 sc [24]
- Round 27: (2 sc, dec) x 6 [18]
- Round 28: Work 9 dec [9]
Fasten off, leaving a long yarn tail (approximately 12 inches) for sewing the body to the head.
Finishing & Assembly
1. Stitching the Pieces Together
Use sewing pins to temporarily position the parts before stitching to ensure everything is perfectly symmetrical.
- Sewing the Ears: Position the folded ears at the top of the head (around Rounds 3 to 5) and stitch them securely into place.
- Sewing the Head to the Body: Add extra stuffing to the neck area of the body to prevent a floppy head. Align the head onto the neck opening and sew securely using a mattress stitch, pulling tight after every few stitches.
2. Facial Details
Bringing your bunny to life is the most rewarding part! Use your embroidery needle and thread to create character:
- Eyebrows and Lashes: Using black embroidery floss, stitch thin, slightly slanted eyebrows above the eyes for an innocent, sweet expression. Add small, delicate eyelashes at the outer corners of the eyes.
- Nose and Mouth: Using pink yarn, embroider a small triangle nose right between the eyes. Create a small mouth line extending vertically down from the nose.
- Ribbon: Tie a decorative pastel-colored ribbon around the bunny’s neck to complete the handmade, vintage toy look.
Tips for Amigurumi Success
- Opt for Invisible Decreases: When executing a decrease (dec), work through the front loops only of the two adjacent stitches. This prevents gaps and creates a smoother, professional-looking surface.
- Use a Stitch Marker: Since amigurumi is worked in a continuous spiral, it’s easy to lose your place. Mark the first stitch of each round with a safety pin or scrap piece of contrast yarn.
- Don’t Over-Stuff the Limbs: Keeping the upper sections of the arms and legs lightly stuffed allows them to lay naturally flat against the body, making the bunny sit nicely.