Cute Amigurumi Penguin Crochet Pattern: A Complete Beginner’s Guide
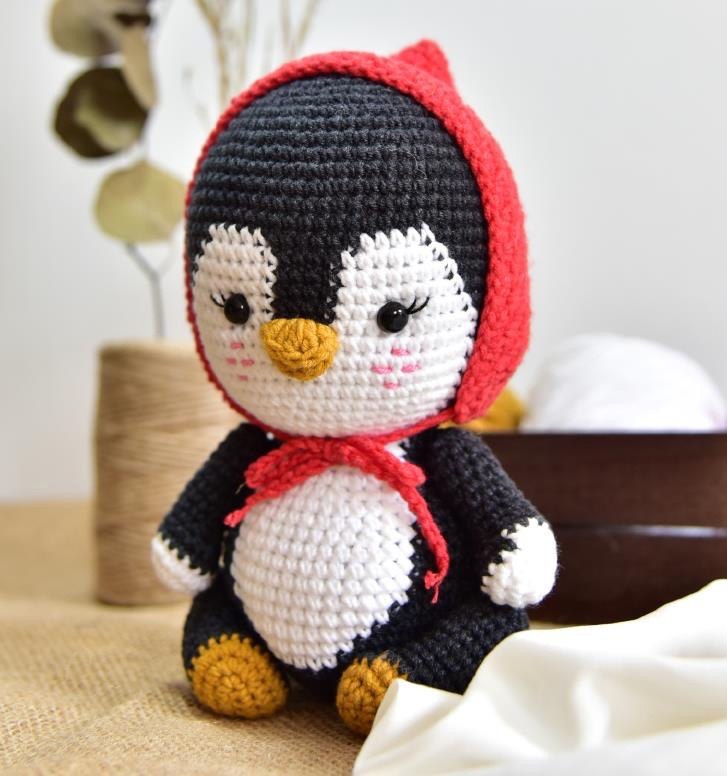
Are you looking for your next adorable crochet project? There is nothing quite as charming as a tiny amigurumi animal, and this little penguin, complete with a cozy red hat, is the perfect addition to your handmade collection. Whether you are looking to create a gift for a child, a whimsical desk companion, or simply want to practice your amigurumi skills, this penguin is designed to be a joy to make.
In this tutorial, we will walk through every single step, from the first magic ring to the final stitch of those sweet rosy cheeks. This pattern is structured to be beginner-friendly, provided you are comfortable with basic crochet stitches and working in the round. Grab your favorite yarn and a cup of tea, and let’s get started on creating your very own little penguin friend!
Introduction
Amigurumi, the Japanese art of knitting or crocheting small, stuffed yarn creatures, has taken the crafting world by storm. This penguin pattern follows the classic amigurumi aesthetic: a large, expressive head, a rounded body, and simplified limbs that give it a “kawaii” or cute appearance. The addition of the red knit-style hat adds a layer of character, making it look like it’s ready for a chilly winter adventure.
This project is excellent for intermediate beginners. You will practice shaping through increases and decreases, working in continuous spirals (the hallmark of amigurumi), and the delicate art of assembly. By the end of this tutorial, you will have a sturdy, professional-looking plushie that can sit proudly on a shelf or nursery mantle.
Materials & Tools
To achieve the best results and ensure your penguin has that tight, professional look where the stuffing doesn’t peek through, I recommend using a slightly smaller hook than what is typically suggested for your yarn weight. Here is what you will need:
- Yarn: Medium weight (DK or Worsted) cotton or acrylic yarn. We will be using four colors:
- Color A: Black
- Color B: White
- Color C: Mustard/Yellow
- Color D: Red
- Crochet Hook: 2.0mm to 2.5mm (US size B-1 to C-2). A smaller hook creates denser stitches, which is vital for amigurumi.
- Safety Eyes: 8mm to 9mm black safety eyes.
- Stuffing: High-quality polyester fiberfill.
- Notions: A yarn needle (tapestry needle), sharp scissors, and a stitch marker.
- Embroidery Thread: A small amount of black and pink thread for the facial details.
Crochet Abbreviations
This pattern uses standard US crochet terms. Please ensure you are familiar with these before beginning:
- MR: Magic Ring
- ch: Chain
- sl st: Slip stitch
- sc: Single crochet
- hdc: Half double crochet
- dc: Double crochet
- tr: Treble crochet
- inc: Increase (2 stitches in one stitch)
- dec: Decrease (join 2 stitches into one)
- BLO: Back loop only
- FLO: Front loop only
Step-by-Step Instructions
Making the Legs (Make 2)
Start with Color C (Mustard/Yellow).
1. Ch 6. Starting in the 2nd ch from the hook: 4 sc, 3 sc in the next st, 3 sc, inc. (11 sts)
2. inc, 3 sc, 3 dec, 3 sc, 2 inc. (14 sts)
3. sc, inc, 3 sc, (sc, inc) x 3, 3 sc, (sc, inc) x 2. (24 sts)
4. 24 sc. Change to Color A (Black).
5. 1 dec, 12 sc. (13 sts)
6. 1 dec, 12 sc. (12 sts)
7-9. 15 sc. (Note: Follow the logic of your tension to maintain shape).
10. (3 sc, dec) x 3. (12 sts)
11-13. 12 sc.
14. 1 dec. (11 sts)
Fasten off, leaving a long tail for sewing. Stuff the legs firmly and close the opening.
Making the Arms (Make 2)
Start with Color B (White).
1. Ch 4. Starting in the 2nd ch from hook: 2 sc, 3 sc in the next st, 1 sc, inc. (7 sts)
2. inc, 1 sc, 3 dec, 1 sc, 2 inc. (8 sts)
3. (6 sc, inc) x 2. Change to Color A (Black).
4. 16 sc.
5. 4 dec, 8 sc. (12 sts)
6. 2 dec, 8 sc. (10 sts)
7-13. 10 sc.
14. 5 dec. (5 sts)
Fasten off, leaving a long tail for sewing. Stuff lightly and close.
Making the Body
Start with Color A (Black).
1. 6 sc in MR. (6 sts)
2. 6 inc. (12 sts)
3. (sc, inc) x 6. (18 sts)
4. sc, inc, (2 sc, inc) x 5, sc. (24 sts)
5. (3 sc, inc) x 6. (30 sts)
6. 2 sc, inc, (4 sc, inc) x 5, 2 sc. (36 sts)
7. (5 sc, inc) x 6. (42 sts)
8. 3 sc, inc, (6 sc, inc) x 5, 3 sc. (48 sts)
9. (7 sc, inc) x 6. (54 sts)
10. 4 sc, inc, (8 sc, inc) x 5, 4 sc. (60 sts)
11. 27 sc, change to Color B (White), 6 sc, change to Color A (Black), 27 sc. (60 sts)
12. 26 sc, 8 sc, 26 sc. (60 sts)
13. 25 sc, 10 sc, 25 sc. (60 sts)
14. 24 sc, 12 sc, 24 sc. (60 sts)
15-16. 23 sc, 14 sc, 23 sc. (60 sts)
17. 11 sc, dec, 6 sc, 14 sc, 6 sc, dec, 11 sc. (58 sts)
18. 7 sc, (sc, dec) x 3, 4 sc, 14 sc, 4 sc, (dec, sc) x 3, 7 sc. (52 sts)
19. 3 sc, dec, 6 sc, dec, 4 sc, 2 sc, dec, 6 sc, dec, 2 sc, 4 sc, dec, 6 sc, dec, 3 sc.
20-21. 15 sc, 12 sc, 15 sc.
22. (sc, dec) x 2, sc, 4 sc, dec, 6 sc, dec, 4 sc, dec, 5 sc, dec. (Approx 45 sts)
23. 13 sc, 11 sc, 12 sc.
24. 2 sc, dec, 4 sc, dec, 3 sc, sc, dec, 4 sc, dec, 2 sc, 2 sc, dec, 4 sc, dec, 2 sc. (Approx 35 sts)
25. 11 sc, 9 sc, 10 sc.
26. (3 sc, dec) x 2, sc, 2 sc, dec, 3 sc, dec, (3 sc, dec) x 2. (Approx 26 sts)
Fasten off, leaving a long tail. Stuff the body firmly.
Making the Head
Start with Color A (Black).
1. 6 sc in MR. (6 sts)
2. 6 inc. (12 sts)
3. (sc, inc) x 6. (18 sts)
4. sc, inc, (2 sc, inc) x 5, sc. (24 sts)
5. (3 sc, inc) x 6. (30 sts)
6. 2 sc, inc, (4 sc, inc) x 5, 2 sc. (36 sts)
7. (5 sc, inc) x 6. (42 sts)
8. 3 sc, inc, (6 sc, inc) x 5, 3 sc. (48 sts)
9. (7 sc, inc) x 6. (54 sts)
10. 4 sc, inc, (8 sc, inc) x 5, 4 sc. (60 sts)
11. 60 sc.
12. (9 sc, inc) x 6. (66 sts)
13-15. 66 sc.
16. 25 sc, 5 sc, 6 sc, 5 sc, 25 sc.
17. 24 sc, 7 sc, 4 sc, 7 sc, 24 sc.
18. 23 sc, 8 sc, 4 sc, 8 sc, 23 sc.
19. 22 sc, 9 sc, 4 sc, 9 sc, 22 sc.
20. 21 sc, 10 sc, 4 sc, 10 sc, 21 sc.
21. 20 sc, 11 sc, 4 sc, 11 sc, 20 sc.
22. 14 sc, dec, 3 sc, 26 sc, 3 sc, dec, 14 sc.
23. 23 sc, 26 sc, 23 sc. (Note: Ensure consistent stitch count for rounding).
24. 14 sc, dec, 3 sc, 26 sc, 3 sc, dec, 14 sc.
25. 12 sc, dec, 2 sc, 26 sc, 2 sc, dec, 12 sc.
26. 8 sc, dec, 7 sc, sc, (dec, 8 sc) x 2, dec, 3 sc, 5 sc, dec, 8 sc, dec.
27. 7 sc, dec, 7 sc, (dec, 7 sc) x 2, dec, 3 sc, 4 sc, dec, 7 sc, dec.
28. 3 sc, dec, 6 sc, dec, 2 sc, 4 sc, dec, 6 sc, dec, 6 sc, dec, 3 sc.
29. (5 sc, dec) x 2, (5 sc, dec) x 2, 3 sc, 2 sc, dec, 5 sc, dec.
30. 2 sc, dec, 4 sc, dec, 2 sc, 2 sc, dec, 4 sc, dec, 4 sc, dec, 4 sc, dec, 2 sc.
31. (3 sc, dec) x 2, (3 sc, dec) x 2, 2 sc, sc, dec, 3 sc, dec.
Fasten off, leaving a long tail. Stuff the head firmly.
Making the Beak
Start with Color C (Mustard/Yellow).
1. Ch 10. Starting in the 2nd ch from hook: sc, (hdc, dc), (tr, hdc), sl st, (hdc, tr), (dc, hdc), sc.
Fold the piece in half and use your yarn needle to sew the sides together, leaving the wide end open for attachment.
Making the Red Hat
Use Color D (Red).
1. Ch 64. Starting in the 2nd ch from hook: sc.
2. sc, (ch 1, skip 1, sc into the chain from previous row) repeat to the end of the row. Turn.
3-24. (ch 1, skip 1, sc into the chain) repeat to the end of the row. Turn. (Total 22 rows).
Fold the rectangle in half and sew the two sides together. Turn it right-side out. To create the ties, chain 90 and attach to the sides of the hat.
Finishing
Now comes the magic part—bringing your penguin to life!
Assembly Steps
- Facial Features: Insert the safety eyes between rows 20 and 21 of the head, ensuring they are spaced approximately 9 stitches apart. Once secure, sew the beak onto the face at row 21, centered between the eyes.
- Details: Using black embroidery thread, stitch small, delicate eyelashes just above the eyes. Use pink thread to add two soft, rosy circles on the cheeks to give him that extra “cute” factor.
- Limbs: Sew the arms to the sides of the body and the legs to the bottom. Refer to your finished photos to get the positioning just right!
- Head and Hat: Sew the head onto the top of the body. Finally, place the red hat on the head, pull the ties, and tie them in a cute little bow under the chin.
Tips
- Tension is Key: If you find your stuffing peeking through the stitches, try switching to a smaller hook or pulling your stitches a bit tighter.
- Invisible Decreases: For a smoother look, try using the “invisible decrease” method (inserting the hook into the front loops only of the next two stitches).
- Stuffing Technique: Stuff your pieces in small increments. This prevents lumps and allows you to push the stuffing into the corners and ends of the pieces.
- Photo Reference: Always keep a photo of the finished product nearby to guide your assembly. Small adjustments in where you sew the limbs can make a big difference in how the penguin “sits.”