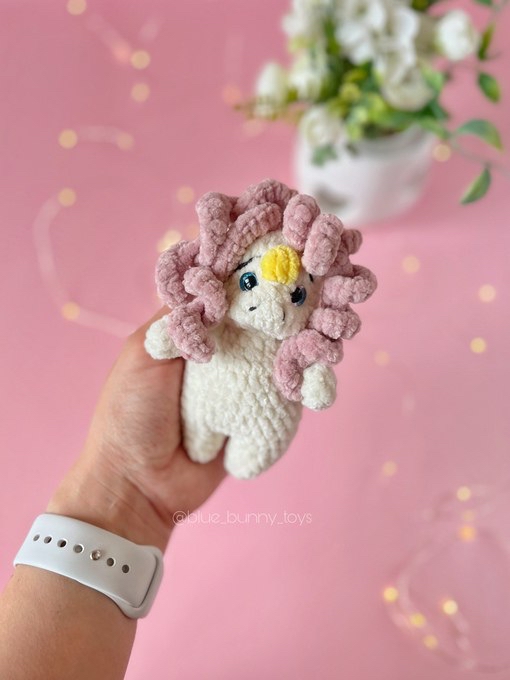
How to Crochet a Cute Amigurumi Unicorn: A Beginner-Friendly Tutorial
If you are looking for a magical new crochet project, you have come to the right place! There is nothing quite as charming as a tiny, chunky amigurumi unicorn. Whether you are looking to create a whimsical gift for a child or a sweet addition to your own shelf decor, this miniature unicorn is the perfect project. Its soft, velvety texture and adorable expressive face make it an instant favorite for crafters of all skill levels.
In this tutorial, we will walk you through every single step, from crafting the tiny limbs to the magical sculpting technique that gives this unicorn its lifelike snout. This pattern is designed to be worked with chenille or velvet-style yarn, which creates that incredibly soft, plush look that everyone loves. Grab your hook and let’s get started on this enchanting adventure!
Materials & Abbreviations
Before we dive into the stitches, let’s make sure you have everything you need on your crafting table. Because this is a small project, you won’t need a huge amount of supplies, but having the right tools will make the process much smoother.
Materials Needed
- Velvet/Chenille Yarn: You will need approximately 1 ounce (25g) of a main color (such as cream or white) and a small amount of yellow yarn for the horn. You will also need a mauve or pinkish shade for the mane and tail.
- Crochet Hook: A 3.0 mm (approx. C/hook) crochet hook is ideal for this yarn weight to ensure your stitches are tight enough to hide the stuffing.
- Safety Eyes: 8 mm to 10 mm safety eyes.
- Stuffing: Polyester fiberfill (hollowfiber) to give your unicorn its shape.
- Embroidery Floss: Black thread (such as YarnArt Jeans) for the tiny eyebrows and nostrils.
- Sculpting Yarn: A matching white or cream thread for the face shaping.
- Other Tools: A long embroidery needle, sharp scissors, and stitch markers.
Abbreviations (US Terms)
Please ensure you are using US terminology to follow this pattern accurately:
- MR: Magic Ring
- sc: Single crochet
- inc: Increase (2 sc in the same stitch)
- dec: Decrease (sc 2 stitches together)
- ch: Chain
- sl st: Slip stitch
- hdc: Half double crochet
- Bobble Stitch: A cluster of stitches (the specific count is provided in the pattern steps)
- (…) * n: Repeat the sequence inside the parentheses n times
Step-by-Step Instructions
Making the Arms
The arms are simple and should not be stuffed. This keeps them floppy and cute!
- Make a MR and work 8 sc into it. (8)
- Work 8 sc. (8)
- (2 sc, dec) * 2. (6)
- Dec, 4 sc. (5)
- Work 5 sc. (5)
Fold the piece in half and crochet 2 sc through both layers together to close the arm. Fasten off, leaving a short tail for sewing later.
The Body and Legs
Unlike the arms, the body and legs should be stuffed as you work to ensure a firm, round shape.
- Make a MR and work 5 sc into it. (5)
- 5 inc. (10)
- Dec, 3 sc, inc, 4 sc. (10)
- Work 10 sc. (10)
Joining the legs: Do not fasten off the second leg. Instead, chain 2 (ch 2) and use a slip stitch to join the first leg to the second leg. This creates the base of the body. Now, work your next round in a continuous spiral around the entire piece: work 5 sc around the first leg, 2 sc around the chain, 5 sc around the second leg, and 2 sc around the back of the chain. (30)
- (3 sc, inc) * 6. (30)
- Work 30 sc for 6 rows (Rows 6-11). (30)
- (3 sc, dec) * 6. (24)
- (2 sc, dec) * 6. (18)
Attaching the Arms to the Body
In the next round, we will join the arms directly to the body.
- 4 sc, 2 sc with the arm, 6 sc, 2 sc with the arm, 4 sc. (18)
- (1 sc, dec) * 6. (12)
Do not fasten off yet! We will continue working directly into this piece to create the head.
The Head
Pro Tip: Always keep your stitch marker at the center of the back to ensure your increases and decreases stay symmetrical.
- 12 inc. (24)
- 9 sc, 6 inc, 9 sc. (30)
- Rows 3-4: Work 30 sc. (30)
- 9 sc, 6 dec, 9 sc. (24)
- Work 24 sc. (24)
Eye Placement: Before proceeding, insert your safety eyes between rows 5 and 6. Make sure they are spaced about 4 sc apart.
Ears and the Unicorn Horn
In this round, we will create the ears and the iconic horn. For the horn, switch to your yellow yarn.
- 6 sc, a bobble stitch (3 sc in one st), 5 sc, a yellow bobble stitch (3 hdc in one st), 5 sc, a bobble stitch (3 hdc in one st), 5 sc. (24)
- (2 sc, dec) * 6. (18)
- (1 sc, dec) * 6. (12)
- 6 dec. (6)
Fasten off, pull the hole tight, and weave the tail of the yarn into the body.
Finishing
Face Sculpting (The Secret Step!)
To give your unicorn that adorable “snout,” you will use the sculpting technique. Take your white yarn and a long needle. Insert the needle into the area between the eyes, pull it through the head to create a slight indentation, and then pull it back out. This pulls the stuffing forward, creating a little nose. Repeat this on both sides to define the muzzle. This step is what transforms a simple ball into a character!
Decoration and Details
Once the shape is set, it’s time for the fine details. Use your black embroidery thread to carefully stitch two small lines for eyebrows and two tiny dots for nostrils. This adds instant personality to your unicorn.
Adding the Magical Curls (Mane and Tail)
The curls are what make this unicorn look so whimsical. You can adjust the number of curls to your liking, but here is the pattern used for the model:
- Back Curls (3 pieces): Chain 21. Starting from the second chain from your hook, work 3 sc into every chain. Leave long ends to sew to the head.
- Front Curls (2 pieces): Chain 19. Starting from the second chain from your hook, work 2 sc into every chain. Leave long ends to sew to the head.
- Front/Tail Curls (2 pieces): Chain 11. Starting from the second chain from your hook, work 2 sc into every chain.
Tips for Success
Working with velvet or chenille yarn can be a little tricky if you are a beginner. Here are a few tips to help you get a professional finish:
- Watch your tension: Velvet yarn can be slippery. Try to keep your tension consistent so the stuffing doesn’t peek through the stitches.
- Use stitch markers: Because the fibers of velvet yarn can “hide” the top of the stitches, it is very easy to lose count. Always use a marker to identify your starting point.
- Don’t overstuff: While you want a firm toy, overstuffing can cause the seams to bulge or the face sculpting to lose its shape.
- Embrace the fuzz: If you find it hard to see the stitches, don’t panic! Gently brush the yarn with your fingers to separate the fibers so you can see the holes clearly.
Happy crocheting! Your magical little unicorn is ready to bring a bit of sparkle to the world!