DIY Crochet Giraffe Amigurumi Pattern: A Beginner-Friendly Tutorial
Introduction
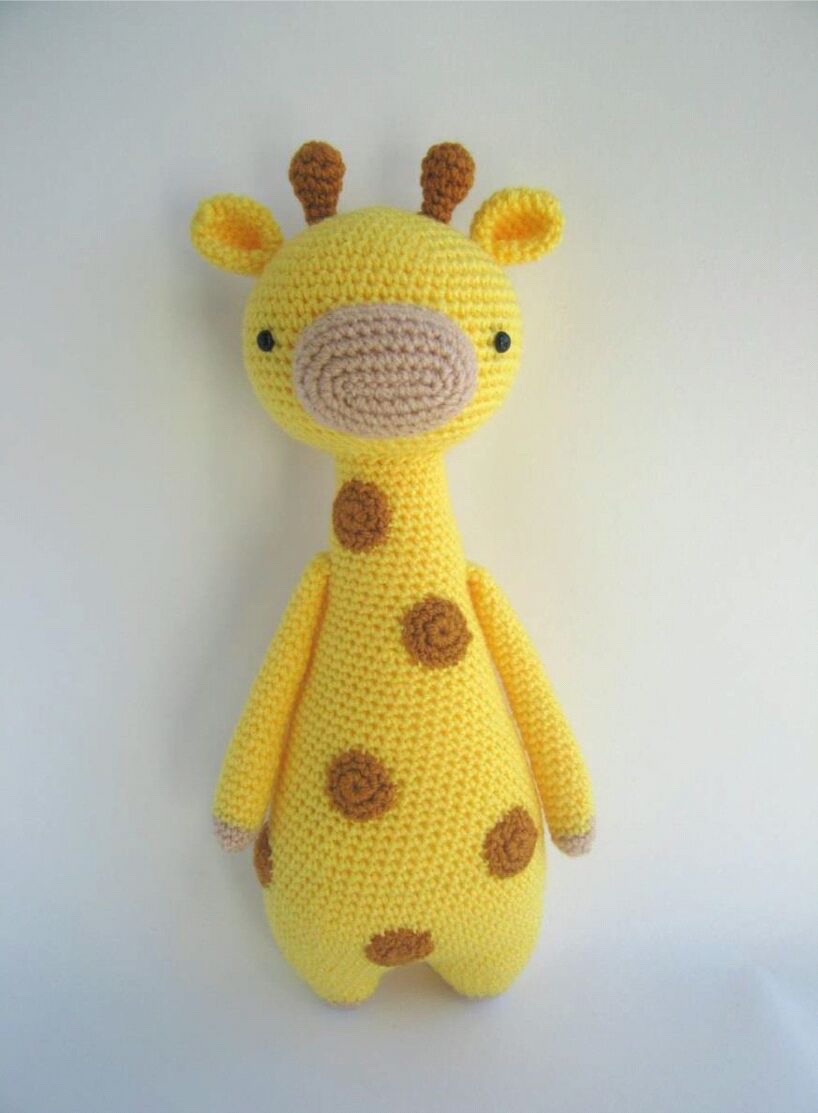
Are you looking for a charming new project to add to your crochet collection? There is nothing quite as delightful as a miniature safari animal, and this adorable crochet giraffe is the perfect companion for a nursery, a bookshelf, or a thoughtful handmade gift. This amigurumi giraffe features a classic yellow body with sweet brown spots, a soft beige muzzle, and those iconic little horns that make it instantly recognizable.
Whether you are a seasoned amigurumi artist or a beginner looking to practice your shaping techniques, this pattern is designed to be accessible and fun. We will walk you through creating every piece—from the long neck to the tiny ears—and show you how to assemble them into one cohesive, huggable friend. Grab your favorite yellow yarn and let’s get started on this safari adventure!
Materials and Abbreviations
To ensure your giraffe turns out looking just like the photos, please gather the following supplies before you begin:
- Yarn: Medium weight yarn in Yellow, Beige (or cream), and Brown.
- Crochet Hook: 2.75 mm (or a size that produces tight, dense stitches to prevent stuffing from showing through).
- Safety Eyes: 6 mm black safety eyes.
- Stuffing: Polyester fiberfill.
- Tools: A yarn needle for sewing and scissors.
Abbreviations (US Terms)
This pattern uses standard US crochet terminology. Please ensure you are using US terms to avoid confusion with stitch heights.
- MR: Magic Ring
- sc: Single crochet
- inc: Increase (2 sc in the same stitch)
- dec: Decrease (invisible decrease is recommended for amigurumi)
- ch: Chain
- st(s): Stitch(es)
- rnd: Round
Step-by-Step Instructions
The Head
We will begin with the head using your yellow yarn. Remember to work in a continuous spiral for amigurumi.
- Rnd 1: 6 sc in a magic ring (6)
- Rnd 2: inc in each st around (12)
- Rnd 3: (1 sc, inc) x6 (18)
- Rnd 4: (2 sc, inc) x6 (24)
- Rnd 5: (3 sc, inc) x6 (30)
- Rnd 6: (4 sc, inc) x6 (36)
- Rnd 7: (5 sc, inc) x6 (42)
- Rnd 8: (6 sc, inc) x6 (48)
- Rnd 9: (7 sc, inc) x6 (54)
- Rnds 10–20: sc in each st around (54)
Eye Placement: Before finishing the head, insert your 6 mm safety eyes between rounds 15 and 16. Make sure they are spaced 13 stitches apart.
- Rnd 21: (7 sc, dec) x6 (48)
- Rnd 22: (6 sc, dec) x6 (42)
- Rnd 23: (5 sc, dec) x6 (36)
- Rnd 24: (4 sc, dec) x6 (30)
- Rnd 25: (3 sc, dec) x6 (24)
- Rnd 26: (2 sc, dec) x6 (18)
- Rnd 27: (1 sc, dec) x6 (12)
- Rnd 28: dec x6 (6)
Stuff the head firmly with fiberfill, fasten off, and leave a long tail for sewing to the body later.
The Muzzle
Switch to your beige yarn to create the soft snout of the giraffe.
- Rnd 1: Ch 8. Starting in the 2nd chain from the hook, work sc on both sides of the chain to create an oval shape (8)
- Rnd 2: 6 sc, 3 sc in the next st, 6 sc, 3 sc in the next st (18)
- Rnd 3: 6 sc, inc 3 times, 6 sc, inc 3 times (24)
- Rnd 4: 7 sc, inc, sc, inc, sc, inc, 7 sc, inc, sc, inc, sc, inc (30)
- Rnd 5: 8 sc, inc, 2 sc, inc, 2 sc, inc, 8 sc, inc, 2 sc, inc, 2 sc, inc (36)
- Rnds 6–10: sc in each st around (36)
Fasten off, leaving a long tail for sewing. Stuff the muzzle lightly before attaching it to the face.
The Horns
Use your brown yarn for these tiny details.
- Rnd 1: 6 sc in a magic ring (6)
- Rnd 2: inc in each st around (12)
- Rnd 3: (1 sc, inc) x6 (18)
- Rnd 4: dec x6 (6)
Stuff very lightly, fasten off, and leave a tail for sewing to the top of the head.
The Ears
Using yellow yarn, we will make two ears.
- Rnd 1: 6 sc in a magic ring (6)
- Rnd 2: inc in each st around (12)
- Rnd 3: (1 sc, inc) x6 (18)
- Rnds 4–8: sc in each st around (18)
Fasten off, leaving a long tail. To give them shape, fold the ears in half and sew them to the sides of the head.
The Spots
These small brown details add character!
- Rnd 1: 6 sc in a magic ring (6)
- Rnd 2: inc in each st around (12)
Fasten off and leave a long tail. Set these aside; you will sew them onto the body once the giraffe is assembled.
The Legs and Body
This section is unique because we will crochet the legs and then join them to continue working the body in one continuous piece.
The Legs (Make 2)
Start with beige yarn.
- Rnd 1: 6 sc in a magic ring (6)
- Rnd 2: inc in each st around (12)
- Rnd 3: (3 sc, inc) x3 (15)
Switch to yellow yarn.
- Rnd 4: (4 sc, inc) x3 (18)
- Rnd 5: (5 sc, inc) x3 (21)
- Rnd 6: sc in each st around (21)
- Rnd 7: (6 sc, inc) x3 (24)
- Rnd 8: (7 sc, inc) x3 (27)
- Rnd 9: sc in each st around (27)
Fasten off on the first leg, but do not fasten off on the second leg. To join them, place the two legs together and work 27 sc through the stitches of the first leg and immediately into the 27 stitches of the second leg. You should now have 54 stitches total.
The Body
Continue working with yellow yarn from the joined legs.
- Rnds 1–2: sc in each st around (54)
- Rnd 3: (17 sc, inc) x3 (57)
- Rnds 4–5: sc in each st around (57)
- Rnd 6: (18 sc, inc) x3 (60)
- Rnds 7–9: sc in each st around (60)
- Rnd 10: (18 sc, dec) x3 (57)
- Rnds 11–12: sc in each st around (57)
- Rnd 13: (17 sc, dec) x3 (54)
- Rnds 14–15: sc in each st around (54)
- Rnd 16: (16 sc, dec) x3 (51)
- Rnds 17–18: sc in each st around (51)
- Rnd 19: (15 sc, dec) x3 (48)
- Rnds 20–21: sc in each st around (48)
- Rnd 22: (14 sc, dec) x3 (45)
- Rnds 23–24: sc in each st around (45)
- Rnd 25: (13 sc, dec) x3 (42)
- Rnds 26–27: sc in each st around (42)
- Rnd 28: (12 sc, dec) x3 (39)
- Rnds 29–30: sc in each st around (39)
- Rnd 31: (11 sc, dec) x3 (36)
- Rnds 32–33: sc in each st around (36)
- Rnd 34: (10 sc, dec) x3 (33)
- Rnds 35–36: sc in each st around (33)
- Rnd 37: (9 sc, dec) x3 (30)
- Rnds 38–39: sc in each st around (30)
- Rnd 40: (8 sc, dec) x3 (27)
- Rnds 41–42: sc in each st around (27)
Stuff the body firmly, fasten off, and leave a long tail for sewing to the head.
The Arms (Make 2)
Start with beige yarn.
- Rnd 1: 6 sc in a magic ring (6)
- Rnd 2: inc in each st around (12)
- Rnd 3: sc in each st around (12)
Switch to yellow yarn and begin stuffing as you go.
- Rnds 4–10: sc in each st around (12)
- Rnd 11: (4 sc, dec) (10)
- Rnds 12–15: sc in each st around (10)
- Rnd 16: 8 sc, dec (9)
- Rnds 17–20: sc in each st around (9)
- Rnd 21: 7 sc, dec (8)
- Rnds 22–25: sc in each st around (8)
- Rnd 26: 6 sc, dec (7)
- Rnds 27–28: sc in each st around (7)
Flatten the top of the arm and close it using 2 sc. Fasten off and leave a long tail for sewing.
The Tail
Using yellow yarn, ch 8 and fasten off. To create the tassel, attach brown yarn to the last stitch and pull several strands through to create a small, fluffy brush effect.
Finishing
Now for the best part—assembly! Take your time with this stage to ensure your giraffe stands tall and looks balanced.
- Attach the Head: Sew the head onto the top of the body.
- Attach the Arms: Sew the arms to the sides of the body, approximately between rounds 41 and 42.
- Attach Ears and Horns: Secure the ears to the sides of the head and the horns to the top.
- Add Details: Sew the beige muzzle to the front of the head. Finally, sew the brown spots onto the body and the tail to the back.
Tips
To make your amigurumi look professional, keep these tips in mind:
- Tension is Key: Amigurumi requires tight tension so that the stuffing doesn’t peek through the stitches. If your stitches feel loose, try using a smaller hook.
- Use Invisible Decreases: Instead of a standard decrease, use the invisible decrease method (inserting the hook into the front loops only of the next two stitches) to avoid gaps in your work.
- Stuffing Strategy: When stuffing the long neck, use small pieces of fiberfill at a time. This helps prevent lumps and ensures the neck stays sturdy.
- Symmetry: Before sewing everything on, use sewing pins to hold the parts in place. This allows you to check the symmetry of the eyes, ears, and arms before making a permanent stitch.