How to Crochet a Cute Amigurumi Monkey in a Rainbow Sweater
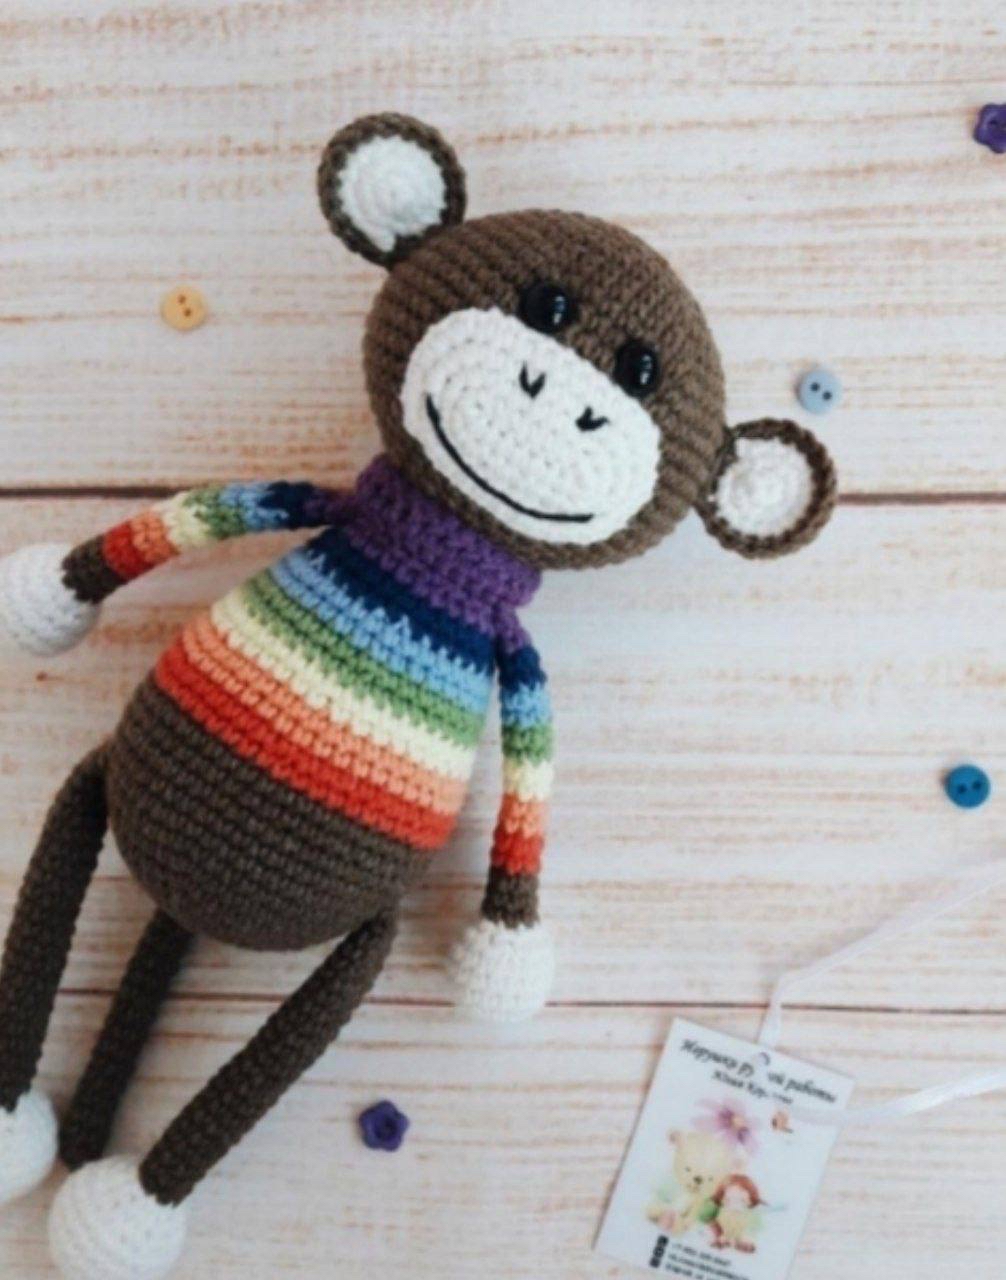
Are you looking for your next adorable crochet project? Whether you want to clear out your yarn stash or make a handmade gift that will bring instant smiles, this delightful amigurumi monkey is the perfect project. Dressed in a cozy, vibrant rainbow sweater, this little monkey stands about 10 inches tall when finished and is packed with personality.
In this beginner-friendly tutorial, we will walk you through every step of creating your own monkey. Using simple stitches and standard techniques, even advanced beginners can confidently tackle this pattern. Grab your hooks, find your favorite scrap yarn colors, and let’s get crocheting!
Materials & Abbreviations
Materials Needed
- Yarn: Sport-weight cotton blend yarn (such as YarnArt Jeans or similar). You will need:
- Brown (main body color) – approx. 80 yards
- White or Cream (muzzle, hands, feet, inner ears) – approx. 40 yards
- Rainbow sweater colors: Red, Orange, Yellow, Green, Light Blue, Dark Blue, and Purple – small scrap amounts (approx. 10 yards each)
- Hook Size: 2.0 mm (US B-1) or 2.25 mm (US C-2) crochet hook
- Stuffing: High-quality polyester fiberfill
- Eyes: 6 mm or 8 mm safety eyes (or sew-on black beads/embroidery floss)
- Tools: Yarn needle, embroidery needle, scissors, stitch markers, and optional jewelry wire for poseable arms and legs
Abbreviations (US Terms)
- MR: Magic Ring
- ch: Chain
- sc: Single crochet
- inc: Increase (2 single crochets in the same stitch)
- dec: Decrease (invisible single crochet decrease recommended)
- dc: Double crochet
- sl st: Slip stitch
- BLO: Back loops only
- FLO: Front loops only
- st(s): Stitch(es)
- ( ): Repeat instructions inside parentheses the indicated number of times
Step-by-Step Instructions
The Head
The head is worked in continuous rounds from the top down using brown yarn. Stuff the head firmly as you work.
- Round 1: Start with 6 sc in a MR (6 sts)
- Round 2: (inc) x 6 (12 sts)
- Round 3: (1 sc, inc) x 6 (18 sts)
- Round 4: (2 sc, inc) x 6 (24 sts)
- Round 5: (3 sc, inc) x 6 (30 sts)
- Round 6: (4 sc, inc) x 6 (36 sts)
- Round 7: (5 sc, inc) x 6 (42 sts)
- Round 8: Sc in each st around (42 sts)
- Round 9: (6 sc, inc) x 6 (48 sts)
- Round 10: (7 sc, inc) x 6 (54 sts)
- Round 11: (8 sc, inc) x 6 (60 sts)
- Rounds 12–18: Sc in each st around (60 sts for 7 rounds)
- Note: If you are using plastic safety eyes, insert them between Rounds 14 and 15, leaving about 7 to 8 stitches open between them.
- Round 19: (8 sc, dec) x 6 (54 sts)
- Round 20: (7 sc, dec) x 6 (48 sts)
- Round 21: (6 sc, dec) x 6 (42 sts)
- Round 22: (5 sc, dec) x 6 (36 sts)
- Round 23: (4 sc, dec) x 6 (30 sts)
- Round 24: (3 sc, dec) x 6 (24 sts)
Fasten off, weave in your start end, and leave the neck opening open. Set the head aside.
The Body & Rainbow Sweater
The body begins at the bottom with brown yarn, then shifts into a colorful striped sweater. To keep the stripes looking crisp, change colors on the final pull-through of the last stitch of the previous round.
- Round 1: Work 6 sc in a MR using brown yarn (6 sts)
- Round 2: (inc) x 6 (12 sts)
- Round 3: (1 sc, inc) x 6 (18 sts)
- Round 4: (2 sc, inc) x 6 (24 sts)
- Round 5: (3 sc, inc) x 6 (30 sts)
- Round 6: (4 sc, inc) x 6 (36 sts)
- Round 7: (5 sc, inc) x 6 (42 sts)
- Round 8: (6 sc, inc) x 6 (48 sts)
- Round 9: (7 sc, inc) x 6 (54 sts)
- Rounds 10–15: Sc in each st around (54 sts). On the last stitch of Round 15, change to Red yarn.
- Round 16: Sc in each st around (54 sts in Red)
- Round 17: (7 sc, dec) x 6 (48 sts in Red). Change to Orange on the last stitch.
- Round 18: Sc in each st around (48 sts in Orange)
- Round 19: Sc in each st around (48 sts in Orange). Change to Yellow on the last stitch.
- Round 20: (6 sc, dec) x 6 (42 sts in Yellow)
- Round 21: Sc in each st around (42 sts in Yellow). Change to Green on the last stitch.
- Round 22: Sc in each st around (42 sts in Green)
- Round 23: (5 sc, dec) x 6 (36 sts in Green). Change to Light Blue on the last stitch.
- Rounds 24–25: Sc in each st around (36 sts in Light Blue for 2 rounds). Change to Dark Blue on the last stitch of Round 25.
- Round 26: (4 sc, dec) x 6 (30 sts in Dark Blue)
- Round 27: Sc in each st around (30 sts in Dark Blue). Change to Purple on the last stitch.
- Round 28: Sc in each st around (30 sts in Purple)
- Round 29: (3 sc, dec) x 6 (24 sts in Purple). Change to Brown on the last stitch.
- Round 30: Working in BLO, sc in each st around (24 sts in Brown).
Fasten off, leaving a long tail for sewing. Stuff the body firmly.
The Arms (Make 2)
Start with white yarn to create the hands, then switch to brown, and finally transition through the sweater striped colors.
- Round 1: Work 6 sc in a MR using white yarn (6 sts)
- Round 2: (inc) x 6 (12 sts)
- Round 3: (1 sc, inc) x 6 (18 sts)
- Rounds 4–6: Sc in each st around (18 sts)
- Round 7: (1 sc, dec) x 6 (12 sts)
- Round 8: (1 sc, dec) x 4 (8 sts)
- Rounds 9–10: Change to brown yarn. Sc in each st around (8 sts). Stuff the white hand section firmly. Do not stuff the rest of the arm.
- Rounds 11–24: Change yarn color every two rounds to match the sweater pattern (Red, Orange, Yellow, Green, Light Blue, Dark Blue, and Purple). Work 8 sc in each round.
Fasten off, leaving a tail for sewing. Press the top of the arm flat and sew the opening closed.
The Legs (Make 2)
Start with white yarn for the feet, then switch to brown for the legs.
- Round 1: Work 6 sc in a MR using white yarn (6 sts)
- Round 2: (inc) x 6 (12 sts)
- Round 3: (1 sc, inc) x 6 (18 sts)
- Round 4: (2 sc, inc) x 6 (24 sts)
- Rounds 5–7: Sc in each st around (24 sts)
- Round 8: (2 sc, dec) x 6 (18 sts)
- Round 9: (1 sc, dec) x 6 (12 sts)
- Round 10: (4 sc, dec) x 2 (10 sts). Stuff the foot firmly.
- Rounds 11–30: Change to brown yarn. Sc in each st around (10 sts for 20 rounds). Stuff the lower leg lightly; leave the upper leg unstuffed so it sits nicely.
Fasten off, leaving a tail for sewing. Press the top opening flat and sew shut.
The Ears (Make 2 Outer & 2 Inner pieces)
We will make two white inner ear pieces, two brown outer ear pieces, and join them together for a sturdy, double-thick ear.
Inner Ear (Make 2 in White):
- Round 1: Work 6 sc in a MR (6 sts)
- Round 2: (inc) x 6 (12 sts)
- Round 3: (1 sc, inc) x 6 (18 sts)
- Fasten off with a sl st and cut the yarn.
Outer Ear (Make 2 in Brown):
- Round 1: Work 6 sc in a MR (6 sts)
- Round 2: (inc) x 6 (12 sts)
- Round 3: (1 sc, inc) x 6 (18 sts)
- Do not cut the yarn!
Joining: Place one white inner piece and one brown outer piece wrong sides together. Insert your hook through both loops of the next stitch on the brown piece AND the matching stitch on the white piece. Single crochet through both layers all the way around (18 sc total). Slip stitch to join, and fasten off, leaving a long tail for sewing.
The Tail
Using brown yarn:
- Round 1: Work 7 sc in a MR (7 sts)
- Rounds 2–15: Sc in each st around (7 sts for 14 rounds)
Fasten off, leaving a tail for sewing. The tail does not require stuffing.
The Muzzle
The muzzle is worked in rounds around a starting chain to create an oval shape. Use white or cream yarn.
- Ch 9. Turn and work into the second chain from your hook.
- Round 1: Work 7 sc along the chain, then work 3 sc in the very last chain stitch. Turn your work to crochet along the opposite side of the foundation chain: work 6 sc, and finish with an increase (2 sc) in the starting chain space (18 sts)
- Round 2: inc, 6 sc, (inc) x 3, 6 sc, (inc) x 2 (24 sts)
- Round 3: 1 sc, inc, 7 sc, inc, 1 sc, inc, 1 sc, inc, 7 sc, inc, 1 sc, inc (30 sts)
- Round 4: 2 sc, inc, 8 sc, inc, 2 sc, inc, 2 sc, inc, 8 sc, inc, 2 sc, inc (36 sts)
Fasten off with a sl st, leaving a long tail for sewing.
Finishing & Assembly
Adding the Collar
Before sewing the head on, let’s add a cozy folded collar to the sweater!
- Hold the stuffed body upside down (legs facing up). Locate the exposed front loops of Round 30 on the body.
- Attach Purple yarn into the first front loop with a slip stitch, and chain 1.
- Row 1: Single crochet into each front loop around, adding 4 increases spaced out evenly as you go (28 sts). Slip stitch to the first stitch to join.
- Row 2: Ch 2 (does not count as a stitch), double crochet (dc) in each stitch around (28 sts).
- Fasten off, weave in your ends, and fold the collar down over the sweater.
Putting It All Together
- Head to Body: Align the neck opening of the head with the top opening of the body. Sew them securely together using the long yarn tail left from the body. Add extra stuffing to the neck area right before closing to keep the head from wobbling.
- Muzzle: Position the muzzle onto the lower center of the face (roughly between Rounds 13 and 21). Pin it in place, then sew it on. Stuff it lightly with fiberfill right before finishing your sewing.
- Face details: If you did not use safety eyes, sew on your black beads or embroider your eyes now. Using thin black embroidery floss or Iris thread, stitch a cute vertical nose line and a wide happy smile onto the muzzle.
- Ears: Pin the joined ears to the sides of the head (aligning them with the eye level, around Rounds 11 to 15). Sew them in place.
- Limbs: Sew the arms to the sides of the body, just below the collar. Sew the legs to the bottom of the body so your monkey can sit comfortably. Finally, sew the tail to the back of the body at the base.
Pro Crochet Tips
- Clean Color Transitions: For neat stripes, always make your color change on the last step of the stitch before the new color round starts. Pull the new color yarn through the last two loops on your hook to finish the stitch.
- Invisible Decreases: When decreasing in amigurumi, insert your hook into the front loops only of the next two stitches, yarn over, pull through, yarn over, and pull through both loops. This makes your decreases virtually invisible and prevents stuffing from peeking out.
- Perfect Stuffing: Tear your fiberfill stuffing into small tufts and fluff them up before stuffing. This prevents lumpy sections and keeps your monkey soft yet firmly shaped.