How to Crochet a Sunny Sunflower Amigurumi in a Pot
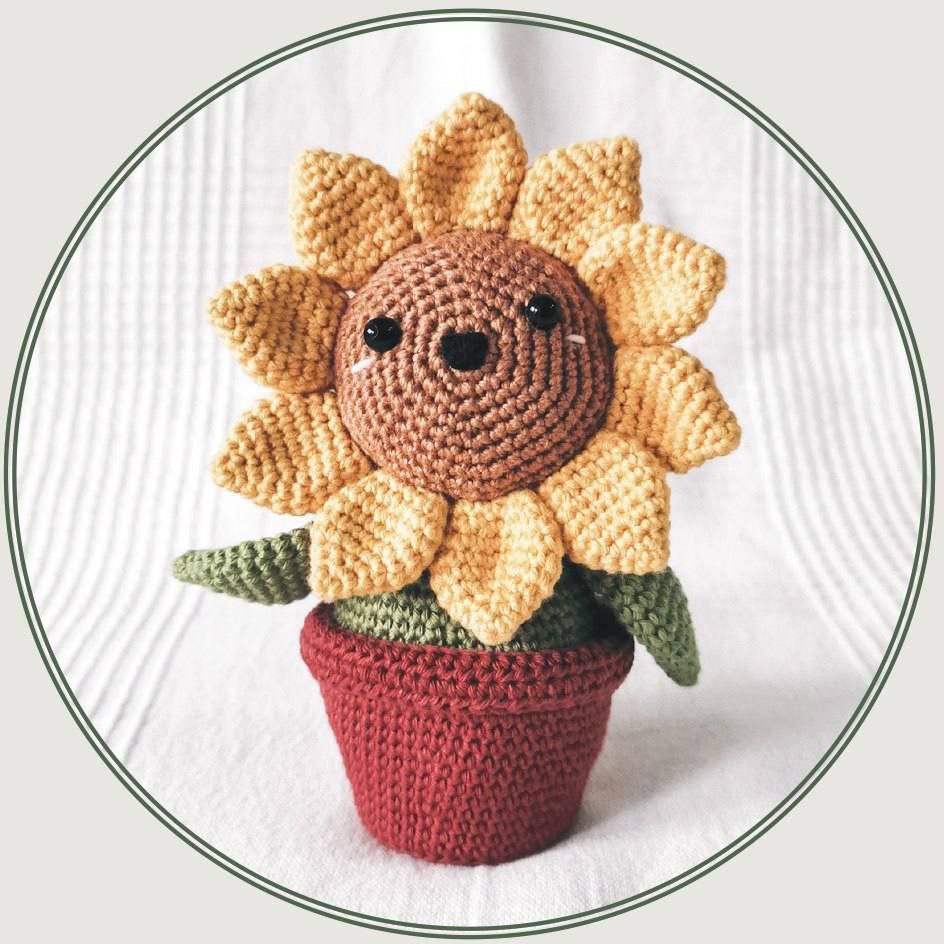
Are you looking to add a splash of permanent sunshine to your home or a friend’s desk? This adorable amigurumi sunflower is the perfect project! Unlike real flowers, this little crochet companion never wilts, making it a wonderful gift, a bright nursery decoration, or a cheerful addition to your own crochet collection. This tutorial is designed to be beginner-friendly, guiding you through every stitch to create a charming sunflower sitting snugly in its own tiny terracotta pot.
By the end of this guide, you will have a finished sunflower standing approximately 6.5 inches tall. Whether you are a seasoned pro or just picking up a crochet hook for the first time, this project is a rewarding way to practice your amigurumi skills.
Materials and Abbreviations
Before we dive into the stitches, let’s make sure you have everything you need on your craft table. To achieve the look seen in the photos, I recommend using a cotton yarn, which provides excellent stitch definition for amigurumi.
What You’ll Need
- Crochet Hook: 2.5 mm (B-1)
- Yarn: Medium weight (8-ply) cotton yarn in the following colors:
- Terracotta (for the pot)
- Green (for the stem/body and leaves)
- Mustard/Golden Yellow (for the petals)
- Light Brown (for the sunflower center)
- Pink (for the cute cheek details)
- Safety Eyes: 7 mm
- Felt/Felt Fabric: Black and White
- Cardboard: Thick cardboard for the pot base
- Stuffing: Polyfill or toy stuffing
- Tools: Fabric glue, stitch markers, tapestry needle, and embroidery needle
Pattern Abbreviations
This pattern uses standard US crochet terms. Please ensure you are using US terminology to avoid confusion.
- MR: Magic Ring
- sc: Single crochet
- inc: Increase (2 sc in the same stitch)
- dec: Decrease (sc 2 together)
- sl st: Slip stitch
- ch: Chain
- hdc: Half double crochet
- hdc dec: Half double crochet decrease
- dc: Double crochet
- BLO: Back loops only
- FLO: Front loops only
- [ ]: Number of stitches in the round
Step-by-Step Instructions
The Sunflower Head
We begin with the center of the flower using Light Brown yarn. We will work in continuous rounds.
Round 1: 6 sc in MR [6]
Round 2: 6 inc [12]
Round 3: (1 sc, inc) x 6 [18]
Round 4: (2 sc, inc) x 6 [24]
Round 5: (3 sc, inc) x 6 [30]
Round 6: (4 sc, inc) x 6 [36]
Round 7: (5 sc, inc) x 6 [42]
Round 8: (6 sc, inc) x 6 [48]
Rounds 9-11: 48 sc [48]
Switch to Green yarn.
Rounds 12-19: 48 sc [48]
Round 20: (6 sc, dec) x 6 [42]
Round 21: (5 sc, dec) x 6 [36]
Round 22: (4 sc, dec) x 6 [30]
Note: Insert the 7 mm safety eyes between Rounds 4 and 5. Place them approximately 10 stitches apart. Begin stuffing the head firmly with polyfill.
Round 23: (3 sc, dec) x 6 [24]
Round 24: (2 sc, dec) x 6 [18]
Round 25: (1 sc, dec) x 6 [12]
Round 26: 6 dec [6]
Fasten off, leaving a long tail. Use your needle to weave the tail through the front loops of the last round and pull tight to close the hole.
The Sunny Petals (Make 10)
Using Mustard yarn, work in continuous rounds.
Round 1: 4 sc in MR [4]
Round 2: (1 sc, inc) x 2 [6]
Round 3: (1 sc, inc) x 3 [9]
Round 4: (2 sc, inc) x 3 [12]
Round 5: (1 sc, inc) x 6 [18]
Rounds 6-8: 18 sc [18]
Round 9: (1 sc, dec) x 6 [12]
Round 10: 12 sc, sl st [12]
Fasten off, leaving a long tail for sewing to the head. Do not stuff the petals.
The Legs and Body
First, we create the two small legs using Light Brown yarn.
Legs (Make 2):
Round 1: 6 sc in MR [6]
Round 2: (1 sc, inc) x 3 [9]
Round 3: (2 sc, inc) x 3 [12]
Round 4: 12 sc [12]
Round 5: (3 sc, inc) x 3 [15]
Fasten off the first leg. For the second leg, do not fasten off; we will join them to create the body.
The Body:
Switch to Green yarn. Ch 3 and join to the first leg with a sc.
Round 1 (Body): 15 sc around the first leg, 3 sc in the chain, 15 sc around the second leg, 3 sc in the remaining chain [36]
Round 2: (5 sc, inc) x 6 [42]
Rounds 3-4: 42 sc [42]
Round 5: (6 sc, inc) x 6 [48]
Rounds 6-10: 48 sc [48]
Round 11: (6 sc, dec) x 6 [42]
Rounds 12-13: 42 sc [42]
Round 14: (5 sc, dec) x 6 [36]
Round 15: 36 sc [36]
Round 16: (4 sc, dec) x 6 [30]
Round 17: 30 sc [30]
Start stuffing the body firmly.
Round 18: (3 sc, dec) x 6, sl st [24]
Fasten off and leave a long tail for sewing.
The Leaves (Make 2)
Using Green yarn, work in continuous rounds.
Round 1: 4 sc in MR [4]
Round 2: (1 sc, inc) x 2 [6]
Round 3: (1 sc, inc) x 3 [9]
Round 4: (2 sc, inc) x 3 [12]
Round 5: (1 sc, inc) x 6 [18]
Round 6: 18 sc [18]
Round 7: (2 sc, inc) x 6 [24]
Rounds 8-11: 24 sc [24]
Round 12: (2 sc, dec) x 6 [18]
Round 13: 18 sc [18]
Round 14: (1 sc, dec) x 6 [12]
Round 15: 12 sc [12]
Round 16: (1 sc, dec) x 4 [8]
Do not stuff the leaves. Fold the leaf in half lengthwise and crochet 4 sc through both sides to close the opening.
The Terracotta Pot
Using Terracotta yarn, work in continuous rounds. (Note: ch 1 at the start of rounds is not counted as a stitch).
Round 1: 6 sc in MR [6]
Round 2: 6 inc [12]
Round 3: (1 sc, inc) x 6 [18]
Round 4: (1 sc, inc, 1 sc) x 6 [24]
Round 5: (3 sc, inc) x 6 [30]
Round 6: (2 sc, inc, 2 sc) x 6 [36]
Round 7: (5 sc, inc) x 6, sl st [42]
Round 8: In BLO, ch 1, 42 sc, sl st [42]
Rounds 9-10: ch 1, 42 sc, sl st [42]
Round 11: ch 1, (6 sc, inc) x 6, sl st [48]
Rounds 12-14: ch 1, 48 sc, sl st [48]
Round 15: ch 1, (7 sc, inc) x 6, sl st [54]
Rounds 16-21: ch 1, 54 sc, sl st [54]
Round 22: In FLO, ch 1, 54 hdc, sl st [54]
Round 23: ch 1, 54 hdc, sl st [54]
Fasten off, leaving a long tail for sewing.
Finishing and Assembly
Preparing the Pot Base
To give your pot stability, cut two circles out of thick cardboard and felt, each approximately 1.75 inches in diameter. Place the cardboard circle into the bottom of the pot first, followed by the felt circle. Fold the last two rounds of the pot inward to create a finished rim and secure the edge with your yarn.
Assembling the Sunflower
Now for the fun part—bringing your sunflower to life!
- Attach Petals: Use sewing pins to position the 10 petals around the head. Sew them between Rounds 11 and 12 (the color change area).
- Attach Head: Sew the head to the body between Rounds 12 and 20. Give the head a slight tilt for extra personality!
- Attach Leaves: Sew the leaves to the body between Rounds 21 and 22.
- Face Details: Using pink yarn, embroider two small lines under the eyes for cute cheeks. Cut a small U-shape from black felt and use fabric glue to attach it to the center of the head as a mouth.
- Final Step: Place your completed sunflower into its terracotta pot.
Tips for Success
- Use Stitch Markers: Amigurumi is worked in continuous rounds. Always use a marker to keep track of your starting stitch so you don’t lose your place.
- Tension is Key: Keep your stitches tight. This ensures that the stuffing doesn’t peek through the gaps in your work.
- Safety First: When using safety eyes, make sure the backing is pushed on very firmly before you stuff the head.
- Customization: Feel free to play with colors! A purple sunflower or a pink pot can make this pattern uniquely yours.