Adorable Fluffy Little Crow Crochet Pattern: A Step-by-Step Amigurumi Tutorial
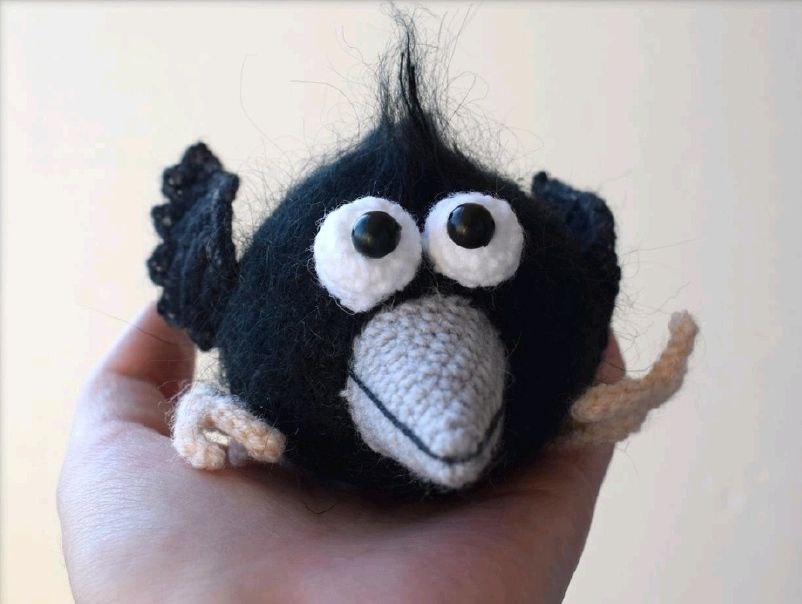
Looking for a project that is equal parts cute and whimsical? This little crochet crow is the perfect addition to your amigurumi collection. With its oversized eyes, tiny legs, and incredibly soft, fuzzy texture, this little bird is sure to bring a smile to anyone’s face. Whether you are looking to create a unique desk companion or a special gift for a bird lover, this pattern offers a delightful crafting experience.
This pattern is specifically designed to take advantage of the unique texture of mohair yarn. The result is a “fluffy” effect that makes the crow look like a real, downy little fledgling. While the shapes are relatively simple, making this an excellent project for intermediate beginners, the texture adds a professional and high-end feel to the finished toy.
Materials and Tools
To ensure your little crow turns out looking just like the photos, I recommend gathering the following supplies before you begin. Using a combination of mohair and acrylic yarn is the “secret sauce” for achieving that signature fuzzy look.
- Black Mohair Yarn: This is used for the main body to provide that soft, brushed texture.
- Black Acrylic Yarn: This will be used for the wings, tail, and beak to provide a more defined stitch structure.
- White Yarn: A small amount is needed for the eyes.
- Grey Acrylic Yarn: Perfect for the beak.
- Flesh or Grey Yarn: A small amount for the tiny legs.
- Safety Eyes (or Half-Beads): 5mm to 6mm size.
- Embroidery Thread: Black thread for detailing the beak.
- Crochet Hook: 2mm (or a size that creates tight, even stitches for your yarn weight).
- Stuffing: Polyester fiberfill to bring your crow to life.
- Needle: A tapestry needle for sewing pieces together and embroidery.
- Scissors: For trimming yarn.
- Glue: A strong adhesive (like super glue) for attaching the pupils.
- White Chalk or Pastel: To add subtle highlights and shading to the wings and tail.
- Carding Tool or Small Brush: Essential for brushing out the mohair body!
Abbreviations
This pattern uses standard US crochet terms. Please ensure you are using US terminology to avoid confusion with stitch heights.
- MR: Magic Ring
- sc: Single crochet
- inc: Increase (2 sc in the same stitch)
- dec: Decrease (sc 2 together)
- ch: Chain
- hdc: Half double crochet
- sl st: Slip stitch
Step-by-Step Instructions
The Body
Worked in Black Mohair Yarn
We begin by creating the main body. Because we are using mohair, your stitches might be harder to see; don’t worry, just keep a steady tension!
- Rnd 1: 6 sc in a MR (6)
- Rnd 2: 6 inc (12)
- Rnd 3: (1 sc, inc) x 6 (18)
- Rnd 4: (2 sc, inc) x 6 (24)
- Rnd 5: (3 sc, inc) x 6 (30)
- Rnd 6: (4 sc, inc) x 6 (36)
- Rnd 7: (5 sc, inc) x 6 (42)
- Rnds 8-15: 42 sc (8 rows total)
- Rnd 16: (5 sc, dec) x 6 (36)
- Rnd 17: (4 sc, dec) x 6 (30)
- Rnd 18: (3 sc, dec) x 6 (24)
- Rnd 19: 24 sc (24)
- Rnd 20: (2 sc, dec) x 6 (18)
- Rnd 21: (1 sc, dec) x 6 (12)
Stuff the body firmly with fiberfill. For Rnd 22, perform 6 decreases (6) to close the hole completely. Fasten off, leaving a long tail for assembly. Once finished, use your brush or carding tool to gently brush the mohair fibers outward to create a fuzzy appearance.
The Legs (Make 2)
Worked in Flesh or Grey Yarn
- Ch 16.
- In the 2nd ch from the hook, work the following: 5 sl st, 5 ch, 5 sl st, 5 ch, 5 sl st.
- Work 10 sc all the way around the chain.
Fasten off, leaving a long tail for sewing the legs to the bottom of the body.
The Wings (Make 2)
Worked in Black Acrylic Yarn
- Rnd 1: Ch 6. In the 2nd ch from hook, work 5 sc, ch, turn.
- Rnd 2: 1 sc, inc, 1 sc, inc, 1 sc, ch, turn.
- Rnd 3: 1 sc, inc, 3 sc, inc, 1 sc, ch, turn.
- Rnd 4: 9 sc, ch, turn.
- Rnd 5: 8 sc, ch, turn.
- Rnd 6: 8 sc, ch, turn.
- Rnd 7: 7 sc, ch, turn.
- Rnd 8: 5 sc, dec, ch, turn.
- Rnd 9: 5 sc, ch, turn.
- Rnd 10: 3 sc, dec, ch, turn.
- Rnd 11: 3 sc, ch, turn.
- Rnd 12: 1 sc, dec, ch, turn.
- Rnd 13: 1 sc.
Fasten off, leaving a long tail. Use pins to mark the placement on the sides of the body before sewing them on securely.
The Tail
Worked in Black Acrylic Yarn
- Rnd 1: 13 sc. In the 2nd ch from hook, work: 4 hdc, 7 sc, ch, turn.
- Rnd 2: 7 sc, 4 hdc, ch, turn.
- Rnd 3: 4 hdc, 7 sc.
Fasten off, leaving a long tail for sewing. Once the tail is attached, use white pastel to lightly shade the edges for a soft, realistic look.
The Beak
Worked in Grey Acrylic Yarn
- Rnd 1: 6 sc in a MR (6)
- Rnd 2: 6 sc (6)
- Rnd 3: (1 sc, inc) x 3 (9)
- Rnd 4: 9 sc (9)
- Rnd 5: (2 sc, inc) x 3 (12)
- Rnd 6: 12 sc (12)
- Rnd 7: (3 sc, inc) x 3 (15)
- Rnd 8: 15 sc (15)
- Rnd 9: (4 sc, inc) x 3 (18)
- Rnd 10: 18 sc (18)
- Rnd 11: (5 sc, inc) x 3 (21)
- Rnd 12: 21 sc (21)
Stuff the beak lightly with fiberfill. Sew it to the center of the face. Use black embroidery thread to stitch a line across the bottom to create the mouth detail.
The Eyes (Make 2)
Worked in White Yarn
- Rnd 1: 6 sc in a MR (6)
- Rnd 2: 6 inc (12)
- Rnd 3: 12 sc (12)
- Rnd 4: (1 sc, dec) x 4 (8)
Stuff the eyes very lightly. Sew them onto the body. Finally, glue your small black pupils onto the center of the white eye pieces to give your crow its expressive look.
Finishing
Now comes the best part—bringing it all together! Assembly is key to a professional-looking amigurumi. Follow these steps to ensure your crow looks perfectly balanced:
- Attach the Beak: Find the center of your body and sew the beak in place. Don’t forget to embroider the mouth line.
- Attach the Eyes: Position the eyes slightly above the beak. They should be wide apart to enhance the “cute” factor.
- Attach the Wings and Tail: Use pins to ensure they are symmetrical. The wings should sit on the sides, and the tail should be centered at the back.
- Attach the Legs: Sew the legs to the bottom of the body so the crow can “sit” upright.
- Final Touches: Use your white pastel to add some soft shading to the wings and tail. This adds depth and makes the black yarn look more dimensional.
Tips for Success
To make your crochet crow truly stand out, keep these expert tips in mind:
Mastering the Mohair Texture
Working with mohair can be tricky because the fibers can obscure your stitches. If you are struggling to see where to insert your hook, try using a slightly smaller hook than recommended to keep the tension tight, or use a stitch marker to keep track of your rounds. The most important step is the brushing—don’t be afraid to brush the body quite vigorously with a clean pet brush or a specialized carding tool. This is what creates that adorable, fluffy silhouette.
Shading for Realism
Using dry pastels is a wonderful way to add “life” to amigurumi. Instead of applying the pastel directly, use a soft brush to dab the color onto the edges of your black acrylic pieces. This mimics how light hits real feathers and prevents the toy from looking like a solid black mass.
Tension and Stuffing
Since this is an amigurumi project, ensure your tension is tight enough that the stuffing does not show through the stitches. If you see gaps, especially in the beak or eyes, you may want to go back and work a tighter round or add a bit more stuffing to provide structure.