Cute Crochet Snail Pattern: A Step-by-Step Amigurumi Tutorial
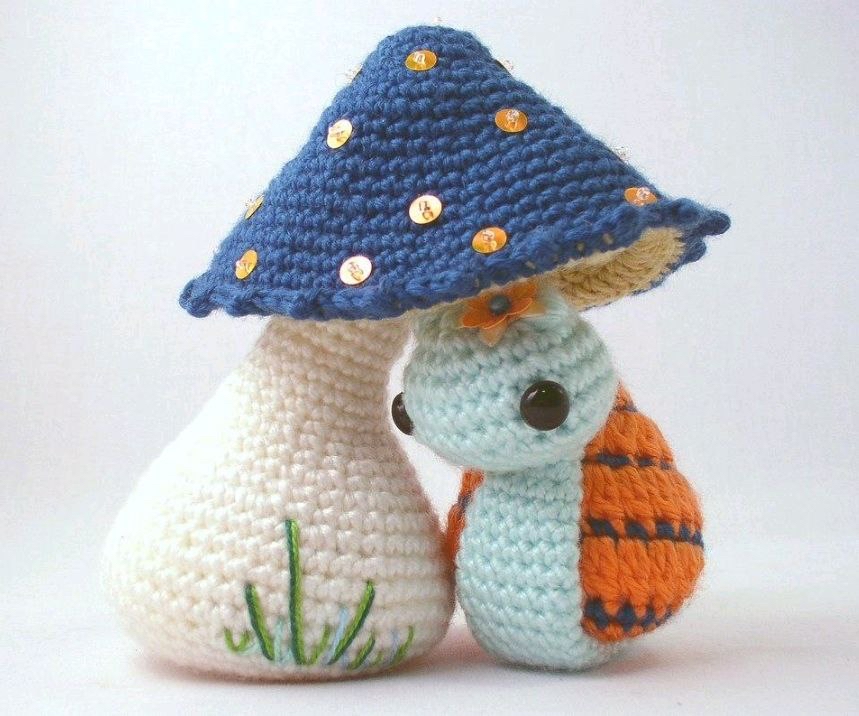
Are you looking for a whimsical, adorable project to add to your crochet collection? This crochet snail is the perfect blend of texture, color, and charm. Whether you are looking to create a unique nursery decoration, a sweet gift for a friend, or a tiny companion for your desk, this amigurumi snail is sure to bring a smile to everyone’s face. This pattern is designed to be beginner-friendly, focusing on basic stitches while incorporating some fun textural elements that make the snail pop!
In this tutorial, we will walk through the process of creating a highly textured, colorful shell and a soft, rounded body. We will also cover a professional secret for making your amigurumi stand upright and feel high-quality using weighted pellets. Grab your hooks and let’s get started on this tiny garden friend!
Materials & Abbreviations
Before you dive into the stitches, make sure you have all your supplies ready. Having everything within reach will make your crochet journey much smoother.
Materials Needed
- Crochet Hooks: You will need two different sizes: a 3mm hook and a 3.5mm hook.
- Yarn: You will need three different colors of medium-weight yarn. For this pattern, we will call them Color A, Color B, and Color C. (For example, you might choose a bright red for the shell, a soft pink for accents, and a leafy green for the body).
- Stuffing: Polyfill or similar fiberfill stuffing.
- Weighting Material: To give your snail stability, I highly recommend using plastic pellets or poly-pellets. You will also need a small piece of an old nylon stocking to hold the pellets in place.
- Safety Eyes: 9mm safety eyes.
- Embellishments: One 18mm flower-shaped bead and two additional small beads for decorative accents.
- Tapestry Needle: For sewing the pieces together and weaving in ends.
Abbreviations (US Terms)
Please ensure you are using US crochet terminology to follow this pattern accurately:
- ch: chain
- sl st: slip stitch
- sc: single crochet
- hdc: half double crochet
- dc: double crochet
- inc: increase (2 sc in the same stitch)
- dec: decrease (sc2tog)
- Puff Stitch: Yarn over, insert hook, pull up a loop. Repeat this 2 more times in the same stitch. Yarn over and pull through all loops on the hook.
- Cluster Stitch: A variation of the puff stitch (specifically 2 dc worked into one stitch for certain sections).
- st: stitch
Step-by-Step Instructions
The Colorful Textured Shell
The shell is the star of the show! This piece is worked using two colors simultaneously in a spiral. You will be “carrying” your yarn as you work. Do not join the rounds; work in a continuous spiral and use a stitch marker to keep track of the beginning of each round.
Starting with Color A using a 3.5mm hook:
- Round 1: Ch 2. Work 6 puff stitches into the 2nd ch from the hook. Do not break the yarn.
- Round 2: Join Color B by pulling the loop through the 2nd ch of the starting chain. Now, working with both colors, (inc, 1 sc) 3 times (9 sc total).
- Round 3 (Color A): (2 puff stitches, 2 puff stitches in the next st) 3 times (12 puff stitches total). Note: As you work this round, the piece will begin to take a cone shape. To keep the shape tight, gently pinch the gap between rounds 2 and 3 while working the first puff stitch.
- Round 4 (Color B): 1 sc, (inc, 3 sc) 2 times, inc, 2 sc (15 sc total).
- Round 5 (Color A): (4 puff stitches, 2 puff stitches in the next st) 3 times (18 puff stitches total).
- Round 6 (Color B): 2 sc, (inc, 3 sc) 2 times, inc, 3 sc (21 sc total).
- Round 7 (Color A): (5 puff stitches, 2 puff stitches in the next st, 1 puff stitch) 3 times (24 puff stitches total).
- Round 8 (Color B): (inc, 7 sc) 3 times (27 sc total).
Fasten off Color B and continue working only with Color A.
- Round 9 (Color A): (2 hdc clusters, 7 hdc) 3 times (24 hdc total). Switch to a 3mm hook now.
- Round 10: (dec, 2 sc) 6 times (18 sc total). Hide the tail of Color B inside the stitches.
- Round 11: (dec, 1 sc) 6 times (12 sc total).
Stuffing the Shell: Stuff the shell firmly with polyfill. If you want your snail to be extra stable, use the pellet method: Place your pellets inside a small piece of nylon stocking, tie it off, and place that “pellet pouch” inside the shell before filling the rest with polyfill.
- Round 12: (dec, 1 sc) 3 times (9 sc total). Fasten off and weave in the end.
The Head and Body
The head and body are worked in a spiral. Start with Color C using a 3.5mm hook.
- Round 1: Ch 2, 6 sc in the 2nd ch from the hook.
- Round 2: (inc) 6 times (12 sc total).
- Round 3: 1 sc, (inc) 2 times, work a 6-dc cluster (6 dc all worked into the same stitch to create the antenna/horn), inc, (1 sc, inc) 2 times (18 st total).
- Round 4: (inc, 2 sc) 6 times (24 sc total).
- Round 5: (inc, 3 sc) 6 times (30 sc total).
- Rounds 6-7: 30 sc.
Switch to a 3mm hook.
- Round 8: (dec, 3 sc) 6 times (24 sc total).
- Round 9: (dec, 2 sc) 6 times (18 sc total).
- Round 10: (dec) 3 times, 1 sc, (dec) 4 times, 1 sc, dec (10 sc total).
Eye Placement: Before stuffing, attach your 9mm safety eyes between rounds 6 and 7. Place them approximately 8 stitches apart. Use a tapestry needle or a small skewer to create a tiny hole if needed, then secure the eyes from the inside with the washer.
Stuff the head very firmly with polyfill.
- Round 11 (Switch back to 3.5mm hook): 10 sc.
- Round 12: 3 sc, inc, 6 sc (11 sc total).
- Round 13: 11 sc.
- Round 14: 9 sc, inc, 1 sc (12 sc total).
- Rounds 15-30: 12 sc.
Switch back to a 3mm hook.
- Round 31: 1 sc, dec, 4 sc, dec, 3 sc (10 sc total).
- Round 32: 1 sc, dec, 3 sc, dec, 2 sc (8 sc total).
- Round 33: dec, 2 sc, dec, 2 sc (6 sc total).
Fasten off, leaving a long tail (about 18 inches) for sewing. Important: Do not stuff the very bottom of the body; leave it slightly empty so it sits flat.
Finishing
Now comes the fun part: assembly! This is where your snail truly comes to life.
Assembly Steps
- Attach Body to Shell: Use a tapestry needle and Color C to sew the body to the underside of the shell. Pin it in place first to ensure it is centered and looks natural. Use about 24 inches of yarn for a secure hold.
- Attach the Head: Once the body is secure, sew the head onto the body. For a cute, personality-filled look, tilt the head slightly to one side.
- Decorate: Sew the 18mm flower bead onto the head near the antenna. Use the remaining small beads to add decorative touches to the shell or head as desired.
- Clean Up: Weave in all remaining yarn tails thoroughly so they are hidden inside the body.
Tips for Success
To make your crochet snail look professional, keep these tips in mind:
- Tension Matters: Especially when working the shell, try to maintain consistent tension. If your stitches are too loose, the stuffing might show through.
- Pinching the Cone: Don’t forget the instruction in Round 3 of the shell! Pinching the stitches helps create that beautiful, structured conical shape that makes the shell look realistic.
- The Weight Trick: If your snail feels “top-heavy” and keeps tipping over, add a little more weight (in a nylon stocking) to the very bottom of the body. This lowers the center of gravity.
- Carrying Yarn: When working with two colors in the shell, pull the “inactive” color along the inside of your stitches. This keeps the exterior looking clean and prevents the extra yarn from showing.