Crochet Night Fury Dragon Amigurumi Pattern: A Step-by-Step Tutorial
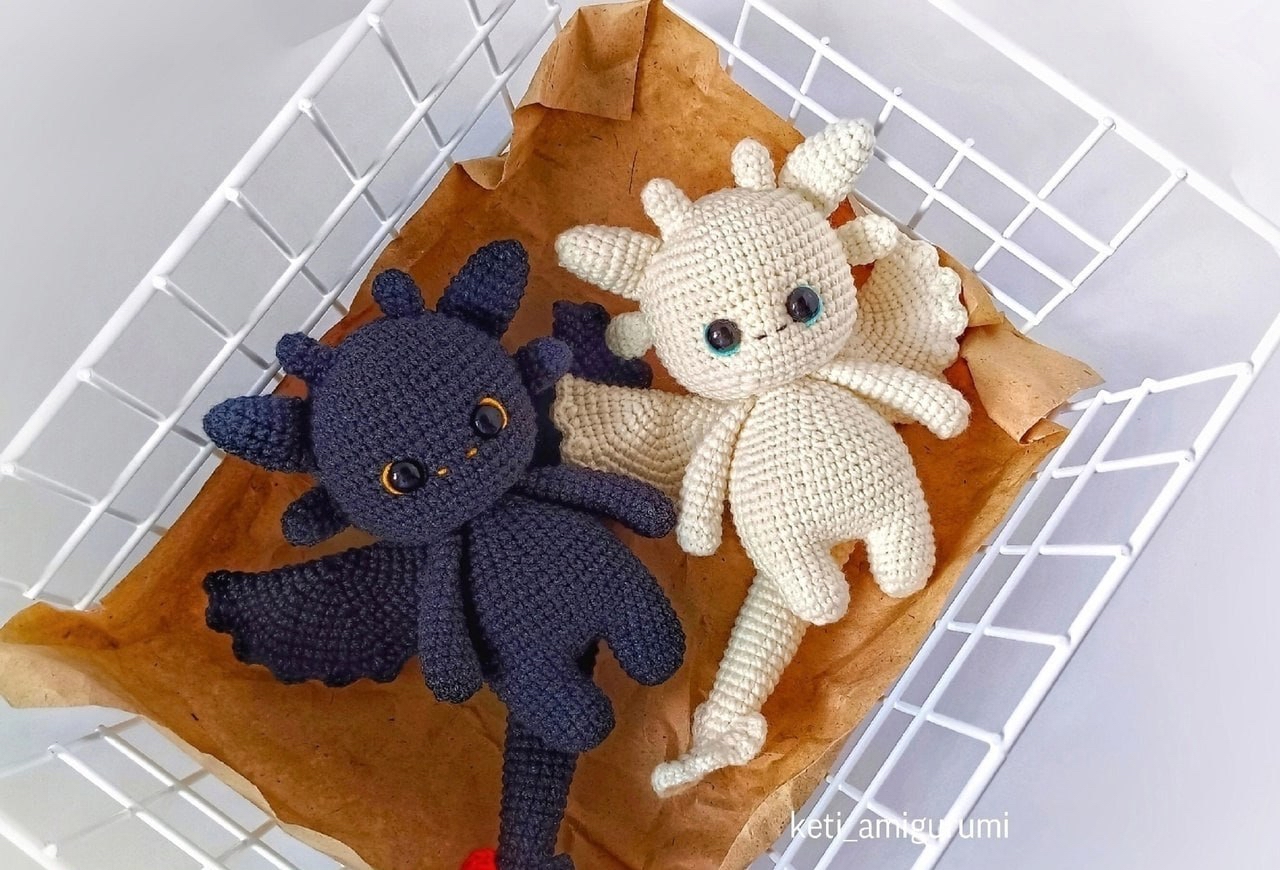
Are you looking for your next adorable crochet project? This little black dragon—inspired by everyone’s favorite nocturnal flying friend—is the perfect addition to your amigurumi collection. This pattern is designed to be beginner-friendly, resulting in a small, expressive dragon that is perfect for nursery decor, a desk companion, or a unique gift for fantasy lovers.
This tutorial will guide you through every single stitch, from the tiny horns to the iconic scalloped wings. By the end of this guide, you will have a charming, handmade dragon that looks almost ready to take flight!
Materials & Abbreviations
Before you pick up your hook, make sure you have all your supplies ready. For the best results, use a tight tension to ensure the stuffing doesn’t peek through your stitches.
Required Materials
- Yarn: Medium weight (DK/Worsted) yarn in Black and Red. (Recommended: YarnArt or Gazzal Jeans style cotton/acrylic blends).
- Crochet Hook: 2.0 mm or 2.25 mm (approx. 0.08 inches). Using a smaller hook than usual helps keep the amigurumi stitches dense.
- Eyes: 10 mm safety eyes.
- Stuffing: Polyester fiberfill.
- Extras: A tapestry needle for sewing and embroidery thread (black or dark grey) for the nose and eyebrows.
Abbreviations (US Terms)
- MR: Magic Ring
- sc: Single crochet
- inc: Increase (2 sc in one stitch)
- dec: Decrease (sc 2 together)
- ch: Chain
- sl st: Slip stitch
- hdc: Half double crochet
- dc: Double crochet
- st(s): Stitch(es)
- BLO: Back loop only
Step-by-Step Instructions
The Head
The head is the most expressive part of your dragon. Pay close attention to the eye placement to give your dragon that “soulful” look.
Round 1: 7 sc in a Magic Ring (7)
Round 2: 14 sc (inc in each st) (14)
Round 3: (1 sc, inc) repeat 7 times (21)
Round 4: (2 sc, inc) repeat 7 times (28)
Round 5: (3 sc, inc) repeat 7 times (35)
Round 6: (4 sc, inc) repeat 7 times (42)
Round 7: (5 sc, inc) repeat 7 times (49)
Rounds 8-18: Sc in each st around (49)
Round 19: (5 sc, dec) repeat 7 times (42)
Round 20: (4 sc, dec) repeat 7 times (35)
Round 21: (3 sc, dec) repeat 7 times (28)
Round 22: (2 sc, dec) repeat 7 times (21)
Round 23: Sc in each st around (18). On this round, you may choose to create a small “tooth” or bump by working extra stitches in one spot to add character.
Note: Place the safety eyes between rounds 14 and 15. Space them approximately 7 stitches apart.
The Body and Legs
We will first create the legs, then join them together to form the body.
The Legs (Make 2)
Round 1: 6 sc in a Magic Ring (6)
Round 2: 12 sc (inc in each st) (12)
Round 3: (1 sc, inc) repeat 3 times, then 6 sc (15)
Rounds 4-7: Sc in each st around (15)
Fasten off the first leg. For the second leg, do not fasten off, as we will join it to the first.
The Body
Round 1: Chain 4. Join to the second leg with a sc. This creates a loop that connects the legs. You should now have 38 stitches total around the base (including the chains and the legs). (38)
Round 2: 4 sc, inc, 2 sc, inc, 16 sc, inc, 2 sc, inc, 10 sc (42)
Rounds 3-8: Sc in each st around (42)
Round 9: (5 sc, dec) repeat 6 times (36)
Round 10: Sc in each st around (36)
Round 11: (4 sc, dec) repeat 6 times (30)
Rounds 12-13: Sc in each st around (30)
Round 14: (3 sc, dec) repeat 6 times (24)
Round 15: Sc in each st around (24)
Round 16: (2 sc, dec) repeat 6 times (18)
Rounds 17-18: Sc in each st around. Crochet the arms onto the sides during these rounds.
Leave a long tail for sewing the head to the body.
The Arms (Make 2)
Round 1: 6 sc in a Magic Ring (6)
Round 2: 12 sc (inc in each st) (12)
Rounds 3-4: Sc in each st around (12)
Round 5: 2 dec, 8 sc (10)
Rounds 6-14: Sc in each st around (10)
Stuff the arms about halfway before closing.
The Ears and Horns
These small details add the perfect dragon silhouette.
The Ears (Make 2)
Round 1: 6 sc in a Magic Ring (6)
Round 2: (1 sc, inc) repeat 3 times (9)
Round 3: (2 sc, inc) repeat 3 times (12)
Round 4: Sc in each st around (12)
Round 5: (3 sc, inc) repeat 3 times (15)
Round 6: Sc in each st around (15)
Round 7: (3 sc, dec) repeat 3 times (12)
Round 8: Sc in each st around (12)
Join the sides with a slip stitch and leave a tail for sewing.
The Horns/Nubs (Make 4)
Round 1: 8 sc in a Magic Ring (8)
Rounds 2-4: Sc in each st around (8)
Leave a tail for sewing.
The Tail (with Red Tip)
The tail is long and features a striking red color at the very end.
Round 1: 6 sc in a Magic Ring (6)
Round 2: (1 sc, inc) repeat 3 times (9)
Rounds 3-5: Sc in each st around (9)
Round 6: 4 sc, inc, 4 sc (10)
Round 7: Sc in each st around (10)
Round 8: (3 sc, inc) repeat 2 times, then 2 sc (12)
Rounds 9-10: Sc in each st around (12)
Round 11: (5 sc, inc) repeat 2 times (14)
Rounds 12-14: Sc in each st around (14)
Round 15: (6 sc, inc) repeat 2 times (16)
Rounds 17-30: Sc in each st around (16)
Stuff the tail very lightly. Join the sides with a slip stitch and leave a tail for sewing.
The Decorative Tail Tip
This is worked in two sides: one side in Black and one side in Red.
Insert your hook into Round 7 of the tail and work outwards towards the tip:
Rows 1-3: 3 dc in each row
Rows 4-5: 3 hdc in each row
Row 6: 2 sc
Row 7: 1 sc, fasten off. Repeat this process on the other side using the red yarn.
The Wings (Make 2)
The wings are worked as a flat piece and then folded.
Round 1: 7 sc in a Magic Ring (7)
Round 2: 14 sc (inc in each st) (14)
Round 3: (1 sc, inc) repeat 7 times (21)
Round 4: (2 sc, inc) repeat 7 times (28)
Round 5: (3 sc, inc) repeat 7 times (35)
Round 6: (4 sc, inc) repeat 7 times (42)
Round 7: (5 sc, inc) repeat 7 times (49)
Round 8: (6 sc, inc) repeat 7 times (56)
Round 9: (7 sc, inc) repeat 7 times (63)
Fold the piece in half. To create the scalloped edge, work the following around the edge: 3 sc, then (1 dc, 2 ch, 1 dc in the same stitch) repeat this pattern until the end of the round. Leave a tail for sewing.
Finishing & Assembly
Now it is time to bring your dragon to life! Assembly requires patience, but it is where the magic happens.
Step 1: Sewing the Body
Carefully sew the head, tail, arms, legs, and ears onto the body. Ensure the head is centered and the tail is attached firmly at the base. Refer to your finished dragon concept to get the proportions just right.
Step 2: Expressive Eyes
To give your dragon that cute, slightly “squished” face, take your safety eyes and slightly pull the fabric inward on the back of the head. This creates a small indentation that makes the eyes look more recessed and expressive.
Step 3: Final Details
Using a needle and dark embroidery thread, stitch a small nose and thin, delicate eyebrows. This final touch adds a massive amount of personality to your amigurumi.
Tips for Success
- Tension is Key: If you see stuffing through your stitches, switch to a smaller hook. Amigurumi should be tight!
- Stitch Markers: Always use a stitch marker at the beginning of your rounds. In amigurumi, it is very easy to lose count.
- Stuffing: When stuffing the head and body, work in small clumps of fiberfill to avoid lumps. For the tail, stuff very lightly so it remains flexible.
- Eye Placement: Don’t rush the eye placement. Once you sew the head on, it’s hard to move them!