DIY Mini Crochet Giraffe Pattern: An Easy Amigurumi Tutorial for Beginners
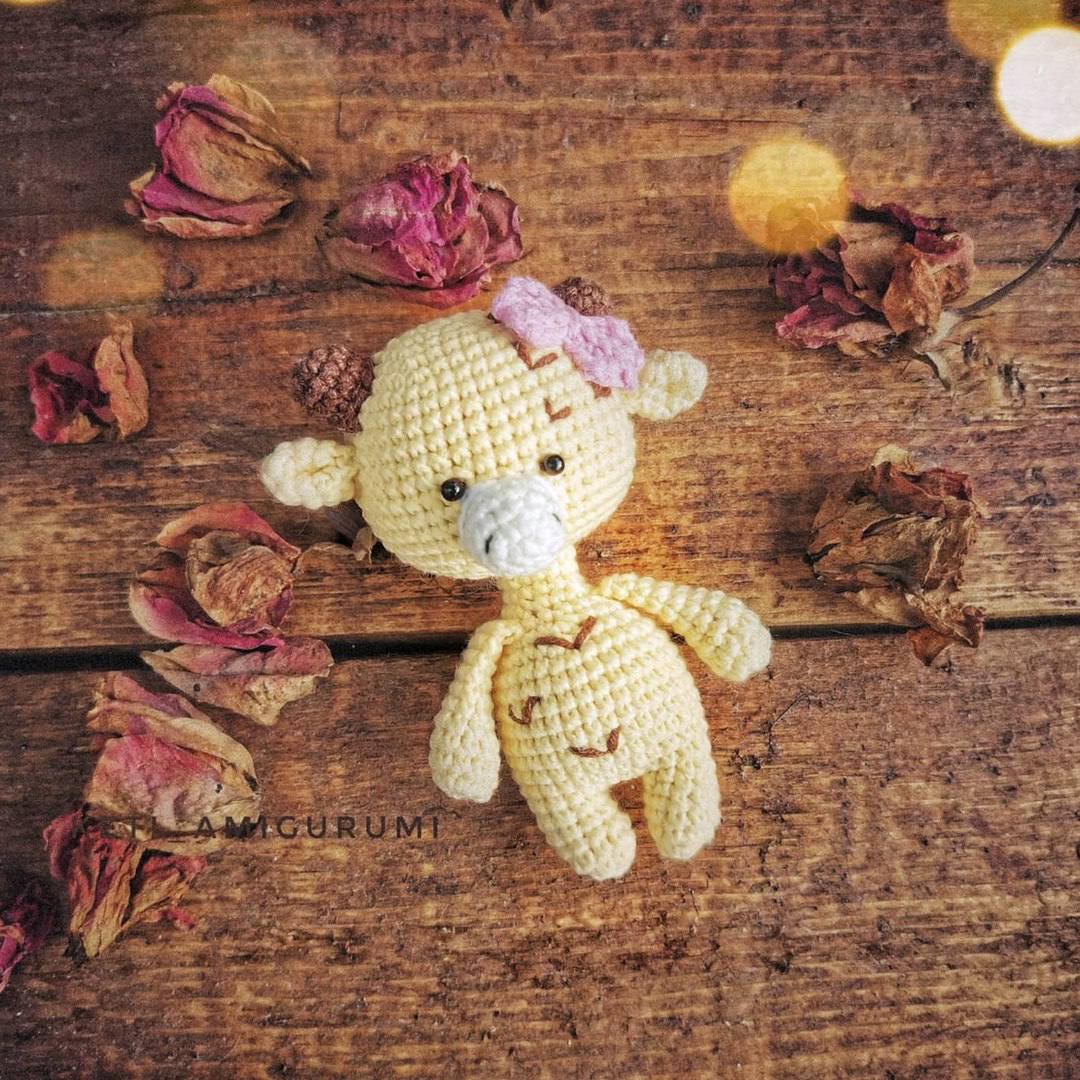
Are you looking for your next adorable amigurumi project? This mini crochet giraffe is the perfect addition to your collection! Whether you want to create a tiny companion for a nursery, a cute keychain, or a unique gift for a friend, this little giraffe is designed to be quick, charming, and beginner-friendly. Its compact size makes it a wonderful “stash-buster” project, allowing you to use up those leftover scraps of cotton yarn sitting in your craft bin.
In this tutorial, I will walk you through every single step, from creating the tiny legs to assembling the sweet little face. This pattern uses basic stitches, making it an excellent way for intermediate beginners to practice their tension and shaping skills. Let’s grab our hooks and get started on this safari adventure!
Materials & Abbreviations
Before we dive into the stitches, let’s make sure you have everything you need. Because this is a small project, using a slightly smaller hook than recommended for your yarn will help ensure your stuffing doesn’t peek through the stitches.
Materials Needed
- Yarn: A cotton or cotton-blend yarn (often called “half-cotton”). For this project, a medium weight (worsted) or light worsted weight in yellow or cream works best. You will also need a small amount of brown yarn for the spots and horns.
- Crochet Hook: A 2.0mm to 2.5mm crochet hook. (The pattern suggests a 1.75mm-1.9mm hook, which is quite small, so a standard US size 1 or B hook is a great equivalent).
- Eyes: 10mm safety eyes (Size #5) or small black beads.
- Stuffing: Polyester fiberfill.
- Tools: A tapestry needle, sharp scissors, and a stitch marker.
Abbreviations (US Terms)
Please note that this pattern uses standard US crochet terminology. If you are used to UK terms, be sure to double-check your stitch definitions!
- MR: Magic Ring
- sc: Single crochet
- inc: Increase (2 sc in the same stitch)
- dec: Decrease (sc 2 together)
- ch: Chain
- sl st: Slip stitch
- st(s): Stitch(es)
- R: Round/Row
Step-by-Step Instructions
The Head
The head is quite round and substantial, providing a perfect base for those big, cute eyes.
- R1: 7 sc in a magic ring (7)
- R2: 14 sc (inc in every stitch) (14)
- R3: (1 sc, inc) repeat 7 times (21)
- R4: (2 sc, inc) repeat 7 times (28)
- R5: (3 sc, inc) repeat 7 times (35)
- R6: (4 sc, inc) repeat 7 times (42)
- R7-15: sc in each stitch around (42)
- R16: (4 sc, dec) repeat 7 times (35)
- R17: (3 sc, dec) repeat 7 times (28)
- R18: (2 sc, dec) repeat 7 times (21)
- R19: 5 dec, worked somewhat randomly to shape the chin (16)
Fasten off, leaving a long tail for sewing. Eye Placement: Insert your safety eyes between rounds 11 and 12, spaced about 4 sc apart. If using beads, sew them on at this stage.
The Legs
You will need to make two identical legs.
- R1: 5 sc in a magic ring (5)
- R2: 10 sc (inc in every stitch) (10)
- R3-5: sc in each stitch around (10)
Fasten off and leave a long tail for sewing. Do not stuff the legs yet; they will be joined to the body later.
The Body (Connecting the Legs)
This part is a bit different as we will be crocheting directly into the legs to create the torso.
- Joining: Ch 4. Join the chain to the first leg with a sc.
- R1: Work around the first leg (10 sc), then work into the 4 chains (4 sc), then work around the second leg (10 sc), and finally work into the other side of the 4 chains (4 sc). You should have a total of 28 sc (28).
- R2: inc, 23 sc, inc, 3 sc (30)
- R3-9: sc in each stitch around (30)
- R10: (3 sc, dec) repeat 6 times (24)
- R11: (2 sc, dec) repeat 6 times (18)
- R12: sc in each stitch around (18)
Before closing the body, attach the arms to the sides and stuff the entire body firmly with polyester fiberfill.
- R13: 4 dec, worked randomly to narrow the neck (14)
- R14-17: sc in each stitch around (14)
Fasten off, leaving a long tail for sewing.
The Horns
Make two small horns using brown yarn.
- R1: 5 sc in a magic ring (5)
- R2: 10 sc (inc in every stitch) (10)
- R3-4: sc in each stitch around (10)
Fasten off, leaving a long tail for sewing to the top of the head.
The Ears
Make two ears.
- R1: 6 sc in a magic ring (6)
- R2: (1 sc, inc) repeat 3 times (9)
- R3: (2 sc, inc) repeat 3 times (12)
- R4-5: sc in each stitch around (12)
Fasten off. To create the ear shape, fold the ear in half and sew the tip shut. Leave a tail for sewing to the head.
The Arms
Make two arms.
- R1: 5 sc in a magic ring (5)
- R2: 10 sc (inc in every stitch) (10)
- R3-4: sc in each stitch around (10)
- R5: 2 dec, 6 sc (8)
- R6-10: sc in each stitch around (8)
Stuff the arms only slightly at the very beginning (the bottom part) to give them shape, then fasten off, leaving a tail for sewing.
The Muzzle
The muzzle adds that cute, protruding snout look.
- R1: 5 sc in a magic ring (5)
- R2: 10 sc (inc in every stitch) (10)
- R3: (1 sc, inc) repeat 5 times (15)
- R4-5: sc in each stitch around (15)
Fasten off, leaving a long tail for sewing to the face.
The Tail
A simple, whimsical tail to finish the look.
- Ch 6.
- At the end of the chain, create a small tassel by wrapping yarn around your fingers and tying it to the end of the chain.
Fasten off and prepare to sew it to the back of the body.
Finishing
Now comes the best part: bringing your giraffe to life! Assembly is key to getting that adorable expression.
- Attach the Muzzle: Sew the muzzle onto the face, centered between the eyes.
- Attach the Ears and Horns: Sew the ears to the sides of the head and the horns to the very top.
- Attach the Limbs: Sew the legs to the bottom of the body, the arms to the sides, and the tail to the rear.
- Attach the Head: Sew the head onto the neck opening of the body. Make sure it is centered and secure.
- Add the Spots: Using brown yarn and a tapestry needle, embroider small, irregular spots randomly across the body and the head. This gives your giraffe its signature look!
Tips
To make your giraffe look professional, keep these tips in mind:
- Tension is everything: Try to keep your stitches tight. If your stitches are too loose, the stuffing will show through, especially in the head and body.
- Use a Stitch Marker: Amigurumi is worked in continuous spirals. Always use a stitch marker to keep track of your first stitch in every round so you don’t lose count.
- Stuffing Technique: When stuffing, push the fiberfill into the corners of the head and body using your crochet hook to ensure there are no lumps or empty gaps.
- Sculpting: When sewing the muzzle or ears, don’t be afraid to pull the stitches slightly to help shape the features.