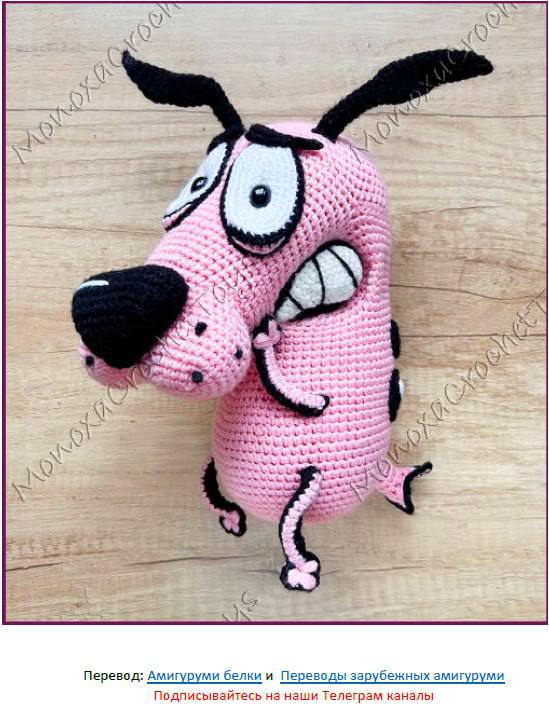
How to Crochet a Courage the Cowardly Dog Amigurumi: A Detailed Tutorial
Are you a fan of nostalgic 90s cartoons and love bringing your favorite characters to life with a crochet hook? If so, you are in for a treat! In this detailed tutorial, we are going to walk through the process of creating a custom amigurumi version of the iconic, pink, and slightly anxious Courage the Cowardly Dog. This project is perfect for intermediate crocheters or ambitious beginners who want to master complex shaping techniques like snout manipulation and facial feature placement.
By the end of this guide, you will have a lovable, expressive little dog ready to sit on your desk or shelf. Let’s grab our hooks and get started!
Materials and Abbreviations
To ensure your amigurumi looks professional and holds its shape, I recommend using a cotton or cotton-blend yarn. This provides better stitch definition, which is vital for the detailed facial features of this character.
Materials Needed
- Yarn (Medium/Worsted Weight): Pink (main body), Black (ears, nose, eyes, limbs), White (eyes, teeth), and a Yellow-White or Cream color (teeth details).
- Crochet Hook: A size suitable for your yarn (typically 3.5mm or 4.0mm) to ensure tight stitches so the stuffing doesn’t show.
- Safety Eyes: Standard size appropriate for your project (usually 10mm-12mm).
- Fiberfill Stuffing: High-quality polyester stuffing.
- Tapestry Needle: For sewing parts together and weaving in ends.
- Stitch Markers: Essential for keeping track of your rounds.
- Scissors.
US Crochet Abbreviations
- ch: chain
- sc: single crochet
- inc: increase (2 sc in the same stitch)
- dec: decrease (sc 2 stitches together)
- hdc: half double crochet
- sl st: slip stitch
- BLO: back loop only
- FLO: front loop only
- st(s): stitch(es)
- sp: space
Step-by-Step Instructions
Creating the Head and Snout
The head is the most complex part of this pattern because it requires creating two ovals and connecting them with a “bridge” to form a realistic snout. All work for the head is done in Pink yarn.
Oval 1 (The Nose Base)
Row 1: Ch 5. In the 2nd ch from the hook, work: inc, 2 sc, 3 sc in the next st, 3 sc (10).
Row 2: 2 inc, 2 sc, 3 inc, 2 sc, inc (16).
Row 3: (1 sc, inc) x2, 2 sc, (1 sc, inc) x3, 3 sc, inc (22).
Row 4: (2 sc, inc) x2, 2 sc, (2 sc, inc) x3, 4 sc, inc (28).
Rows 5-6: 28 sc (28).
Row 7: 6 sc, then sl st into the first st of the row to close the shape.
Oval 2 (The Head Base)
Row 1: Ch 6. In the 2nd ch from the hook, work: inc, 3 sc, 3 sc in the next st, 4 sc (12).
Row 2: 2 inc, 3 sc, 3 inc, 3 sc, inc (18).
Row 3: (1 sc, inc) x2, 3 sc, (1 sc, inc) x3, 4 sc, inc (24).
Row 4: (2 sc, inc) x2, 3 sc, (2 sc, inc) x3, 5 sc, inc (30).
The Bridge and Shaping
Now, you will create a “bridge” to join the two ovals. Work in rows (turn your work after every row).
Row 0: 1 sc, 5 sl st, turn (6).
Row 1: Ch 1, 5 sc. Leave one loop unworked, turn (5).
Row 2: Ch 1, 5 sc, turn (5).
Row 3: Ch 1, 5 sc, turn (5).
Sew the last row of the bridge to the last 5 sc of “Oval 1”. Attach your yarn to the middle stitch of the bridge so that “Oval 2” is on your right and “Oval 1” is on your left. Following the pattern’s specific instructions for continuous rounds, you will work around the joined pieces. Use “shift stitches” (placing increases/decreases at specific points) to create the snout’s curve. Use “reinforcing ribs” (working in BLO and FLO) to create the characteristic cheek folds of the character.
Crafting the Body
The body is worked in Pink. You will attach your yarn to the 29th row of the head piece to begin.
Row 1: 21 sc along the snout, 1 sc into the seam, 30 sc along the “bridge,” 1 sc (53).
Row 2: 32 sc, inc, 8 sc, inc, 11 sc (55).
Rows 3-6: 55 sc (55).
Row 7-11: Follow the pattern’s specialized instructions for “reinforcing ribs” to shape the cheeks. This involves working into the BLO and FLO to add texture and volume to the sides of the face.
After finishing the shaping, continue working in continuous rounds. Use the provided instructions to create the tapering toward the bottom. Before closing, stuff the body firmly. Tip: Place a bit of extra firm stuffing at the bottom of the body to help the toy balance, as the heavy head can make it tip over.
Closing the body: Work the decreasing rows as instructed until you have approximately 12 stitches left. Fasten off, leaving a long tail for sewing.
The Lower Jaw
The lower jaw is worked in Pink in rows.
Row 12: 22 sc, turn (22).
Rows 13-17: Ch 1, 22 sc, turn (22).
Row 18: Ch 1, skip 1 st, 19 sc, skip 1 st, 1 sc, turn (20).
Row 19: Ch 1, skip 1 st, 17 sc, skip 1 st, 1 sc, turn (18).
Row 20: Ch 1, skip 1 st, 15 sc, skip 1 st, 1 sc, turn (16).
Row 21: Ch 1, 1 sc, 1 sc, 1 sc, 1 sc (14).
Row 22-24: Continue following the decrease pattern until you reach 4 stitches, then close the opening.
Arms and Legs
The arms and legs are worked in Black, but for the legs/left arm, you will incorporate Pink to create a “tube” effect.
Arms (Black and Pink)
Start with a chain of 15. Work the first row in Black. In the second row, work in the BLO using Pink. In the third row, work in the BLO using Black. This creates the two-tone look. To finish the “paws,” use the “puff stitch” method described in the pattern, switching colors at specific points to create the rounded, colored ends.
Legs (Black and Pink)
The legs follow the same logic as the arms but with a slight variation in the third row. Work in rows to create the limb shape. You may want to insert a piece of craft wire inside the legs if you want them to be poseable!
The Nose and Teeth
The Nose (Black)
The nose is worked in rounds. Start with a chain of 18. Work the decreasing rows as indicated to create the tapered nose shape. Once finished, work the final rounds in a spiral to create the rounded tip. Remember to add a small white stitch with embroidery thread to mimic the light reflection on the nose.
The Teeth (Black and Yellow-White)
The teeth are made in three separate pieces. The main part is Black, and the “highlight” part is Yellow-White.
Work the Black piece in rows, then the White piece in rows. When assembling, sew the white pieces onto the black pieces using the BLO so they look like they are part of the mouth. This gives the teeth a 3D, expressive look.
Tail and Eyebrows
Tail (Pink and Black)
The tail starts with a magic ring of 9 sc. Work several rounds of even sc, then add increases to widen it. Use the specified color changes to add the black tip. The pattern uses a mix of rounds and rows to achieve the tapered shape.
Eyebrows (Black)
The eyebrows are simple but crucial for the character’s expression. Work two small pieces in rows using Black yarn. Ensure they are long enough to give that classic “worried” look.
The Iconic Eyes
The eyes are the soul of this amigurumi. They consist of several layers.
The White Base
Work two identical white pieces in rounds. Crucial Step: If you are using plastic safety eyes, insert them into the white pieces before you join the two halves of the eye together. Ensure the pupils are positioned slightly below the center for a more natural, “looking down” expression.
Eyelids and Pupils
Once the white eyes are stuffed and joined, crochet the pink eyelids using the BLO. Then, crochet the black lash/eyelid detail in the BLO. Finally, create the small black pupils and sew them onto the white part of the eye.
Finishing and Assembly
Now comes the most important part: bringing it all together! Use your tapestry needle and the long tails left from your pieces to sew the components onto the body.
- Attach the Eyes: Position the eyes on the head, ensuring they are symmetrical and at the correct height relative to the snout.
- Attach the Nose: Center the nose between the eyes.
- Attach the Mouth/Teeth: Sew the teeth into the mouth area.
- Attach Ears, Arms, and Legs: Use strong stitches to ensure the limbs are secure. If you used wire in the legs, make sure the ends are tucked safely inside the stuffing.
- Attach the Tail and Brows: Finish by adding the tail at the back and the eyebrows on the forehead to complete the expression.
Pro Crochet Tips
- Tension is Key: For amigurumi, your tension should be slightly tighter than usual to prevent stuffing from leaking through the stitches.
- Stuffing: Don’t be afraid to over-stuff the head and body, but be careful not to make the limbs too bulky.
- Symmetry: When working on facial features like eyes and eyebrows, use stitch markers to ensure they are placed at the exact same height on both sides.
- Balance: As mentioned, if your character has a heavy head, adding a bit of weight (like plastic pellets or heavier stuffing) to the bottom of the body will help it stand upright.
Congratulations! You have successfully crocheted a custom Courage the Cowardly Dog amigurumi. Happy crocheting!