Crochet Puppy Amigurumi Pattern: A Complete Beginner’s Guide
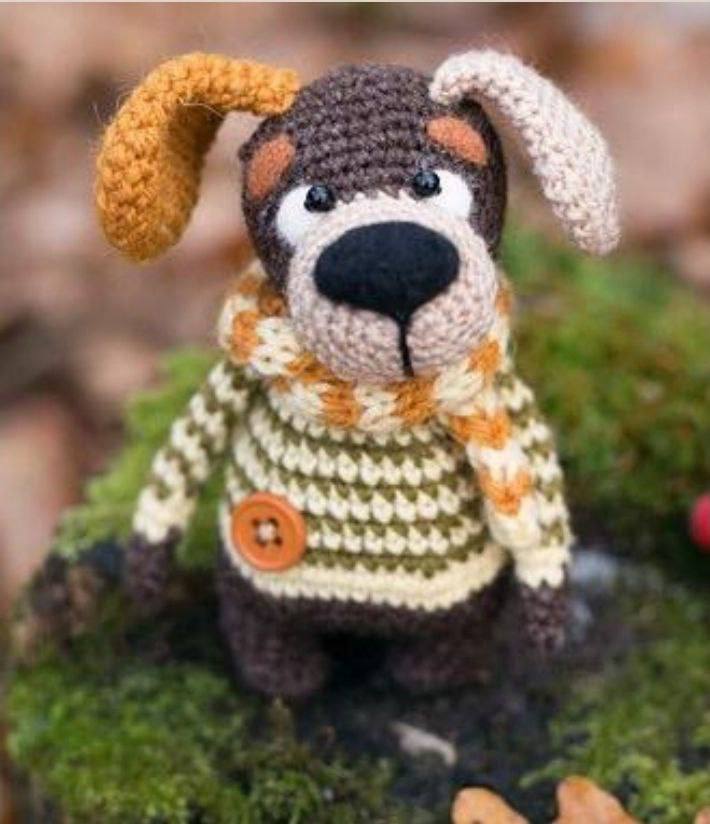
Are you looking for a heartwarming project to brighten your day or create a perfect handmade gift? This adorable crochet puppy amigurumi is the ideal project for crafters who want to practice color changes, shaping, and even basic needle felting. This little pup, with its cozy sweater and tiny bone, is full of personality and looks wonderful sitting on a shelf or a child’s bedside table.
In this tutorial, we will walk through every single stitch, from the tiny paws to the expressive face. Whether you are a seasoned amigurumi artist or a beginner looking to level up your skills, this pattern is designed to be accessible, fun, and incredibly rewarding. Grab your hook and let’s bring this little puppy to life!
Materials and Abbreviations
To ensure your puppy turns out just like the photos, it is important to use yarn of a consistent weight. For this project, we recommend a medium-weight yarn (often labeled as Worsted or Aran) and a small crochet hook to keep your stitches tight and prevent stuffing from showing through.
What You Will Need
- Yarn: You will need five colors to complete the full look: beige, dark brown, cream, green, and a brick/terracotta color. For the ears, you will also need a ginger or orange-toned yarn. For the bone, use white yarn. For the nose, use black yarn.
- Crochet Hook: A 1.25mm hook (or the size appropriate for your chosen yarn weight).
- Eyes: Two small black beads.
- Decoration: One small button for the sweater.
- Stuffing: Polyfill or similar soft toy stuffing.
- Felting Supplies: A fine felting needle and small amounts of white, ginger, and black wool roving (for the eyes and eyebrows).
- Sewing Supplies: A sewing needle and matching thread.
- Extras: Scissors.
Abbreviations (US Terms)
- MR: Magic Ring
- ch: Chain
- sc: Single crochet
- inc: Increase (2 sc in one stitch)
- dec: Decrease (sc 2 together)
- sl st: Slip stitch
- st(s): Stitch(es)
- R: Round
Step-by-Step Instructions
The Legs
We begin our puppy by crafting the legs. Use the dark brown yarn for this part.
R1: Make a magic ring and work 6 sc into it (6).
R2: 6 inc (12).
R3: (2 sc, 1 inc) repeat 4 times (16).
R4: 4 dec, 8 sc (12).
R5-7: 12 sc (12).
Complete the first leg, fasten off the yarn, and repeat the exact same steps for the second leg. Once both are finished, we will join them to create the body.
The Body
To start the body, we will join the legs together. On the second leg, work 3 sc to begin connecting to the first leg.
R8: 12 sc around the first leg, 6 ch, 12 sc around the second leg, 6 ch (36).
R9: 13 sc, 4 inc, 19 sc (40).
Now, we will begin alternating colors to create the striped sweater effect. Use beige and brown yarn, alternating every round. To make the color transitions look cleaner, change colors at the side of the piece.
R10: 6 sc, 1 inc, 21 sc, 1 inc, 11 sc (42).
R11-12: 42 sc (42).
R13: 1 sc in each st around (42).
R14 (Beige): 5 sc, 1 dec, 9 sc, 1 dec, 24 sc (40).
R15 (Brown): 5 sc, 1 dec, 7 sc, 1 dec, 24 sc (38).
R16 (Beige): 38 sc (38).
R17 (Brown): 4 sc, 1 dec, 7 sc, 1 dec, 23 sc (36).
R18 (Beige): 36 sc (36).
R19 (Brown): 1 dec, 15 sc, 1 dec, 17 sc (34).
R20 (Beige): 34 sc (34).
R21: 4 sc, 1 dec, 5 sc, 1 dec, 6 sc, 1 dec, 8 sc, 1 dec, 3 sc (30).
R22-23: 30 sc (30).
R24: 5 sc, 1 dec, 4 sc, 1 dec, 17 sc (28).
R25: 5 sc, 1 dec, 3 sc, 1 dec, 17 sc (26).
R26: 4 sc, 1 dec, 3 sc, 1 dec, 15 sc (24).
R27: (2 sc, 1 dec) repeat 6 times (18).
R28: 18 sc (18).
For the final widening rounds, switch back to beige. To hide the seam, work 7 sc in the previous color before starting the new color. Follow these rounds to expand the shape:
R29: 6 sc, 1 inc, 21 sc, 1 inc, 11 sc (42).
R30-31: 42 sc (42).
At this stage, you can begin stuffing the legs and the body firmly.
The Arms and Paws
Make two arms using a combination of brown and beige yarn.
R1 (Brown): 2 ch, 6 sc in the 2nd ch from the hook (6).
R2-4: 6 sc (6).
R5 (Beige): 2 sc, 1 inc, 3 sc (7).
R6 (Beige): 7 sc (7).
R7-17: Alternate colors every round (Brown, Beige, Brown…) working 7 sc each round.
R18: 3 dec (3).
The Head and Muzzle
The head and muzzle are worked as one single piece. Start with beige yarn.
R1: Ch 4. Working on both sides of the chain: 2 sc in the 2nd ch from hook, 3 sc in the last ch, 2 sc on the other side, 3 sc in the last ch (10).
R2: 2 sc, 1 inc, 1 sc, 1 inc, 2 sc, 1 inc, 1 sc, 1 inc (14).
R3: 4 sc, 1 inc, 1 sc, 1 inc, 4 sc, 1 inc, 1 sc, 1 inc (18).
R4: (2 sc, 1 inc) repeat 6 times (24).
R5: (3 sc, 1 inc) repeat 6 times (30).
R6-7: 30 sc (30).
R8: (3 sc, 1 dec) repeat 6 times (24).
R9: 24 sc (24).
Now, switch to dark brown yarn to create the muzzle portion.
R10: 2 sc, 2 inc, 5 sc, 2 inc, 13 sc (28).
R11: 2 sc, 4 inc, 5 sc, 4 inc, 13 sc (36).
R12: 36 sc (36).
R13: (5 sc, 1 inc) repeat 6 times (42).
R14: (6 sc, 1 inc) repeat 6 times (48).
R15: (7 sc, 1 inc) repeat 6 times (54).
R16: 54 sc (54).
R17: (7 sc, 1 dec) repeat 6 times (48).
R18: (6 sc, 1 dec) repeat 6 times (42).
R19: (5 sc, 1 dec) repeat 6 times (36).
R20: (4 sc, 1 dec) repeat 6 times (30).
R21: (3 sc, 1 dec) repeat 6 times (24).
R22: (2 sc, 1 dec) repeat 6 times (18).
R23: (1 sc, 1 dec) repeat 6 times (12).
R24: Dec until the hole is completely closed.
Stuff the head firmly before closing.
The Ears
Make two ears. One should be beige and the other ginger/orange. Use the same yarn weight for both.
R1: 6 sc in a magic ring (6).
R2: 6 inc (12).
R3: (1 inc, 1 sc) repeat 6 times (18).
R4: (1 inc, 2 sc) repeat 6 times (24).
R5-6: 24 sc (24).
R7: (10 sc, 1 dec) repeat 2 times (22).
R8: (9 sc, 1 dec) repeat 2 times (20).
R9: 20 sc (20).
R10: (8 sc, 1 dec) repeat 2 times (18).
R11: (7 sc, 1 dec) repeat 2 times (16).
R12: (6 sc, 1 dec) repeat 2 times (14).
R13: (5 sc, 1 dec) repeat 2 times (12).
R14-15: 12 sc (12).
Finish with a slip stitch. Do not stuff the ears.
The Tail
Using dark brown yarn:
R1: 6 sc in a magic ring (6).
R2: 6 inc (12).
R3-4: 12 sc (12).
The Tiny Bone
Use white yarn for this adorable accessory. This is worked in three “bumps” or segments.
Bump 1:
R1: 6 sc in a magic ring (6).
R2: 6 inc (12).
R3: (1 inc, 1 sc) repeat 6 times (18).
R4-6: 18 sc (18).
R7: (1 sc, 1 dec) repeat 6 times (12).
Bump 2:
Do not cut the yarn. Join the first bump to the second by working into the stitches. Without cutting the yarn, continue around the combined stitches.
R8: 24 sc (24).
R9: (6 sc, 1 dec) repeat 3 times (21).
R10: (5 sc, 1 dec) repeat 3 times (18).
R11-20: 18 sc (18).
R21: (5 sc, 1 inc) repeat 3 times (21).
R22: (6 sc, 1 inc) repeat 3 times (24).
Stuff the middle segment.
Bump 3:
Work from the center to the opposite side and start the third segment.
R23: 12 sc (12).
R24: (1 sc, 1 inc) repeat 6 times (18).
R25-27: 18 sc (18).
R28: (1 sc, 1 dec) repeat 6 times (12).
R29: Dec until closed.
The Nose
Use black yarn to create the nose.
R1: Ch 5. In the 2nd ch from hook, work 3 sc. In the last ch, work 5 sc. On the other side of the chain, work 3 sc and then 5 sc in the last ch (16).
R2: 3 sc, 5 inc, 3 sc, 5 inc (26).
R3: 1 sc in each st around (26).
Finishing
Assembly
Now comes the fun part! Use your sewing needle and thread to attach the pieces together. Start by sewing the legs to the bottom of the body, followed by the arms. Position the ears on top of the head and the tail at the back. Finally, sew the nose onto the muzzle.
Facial Details and Felting
To give your puppy its expressive look, you can use the dry felting technique. Take a tiny bit of white wool roving, tangle it slightly in your hands, and use your felting needle to repeatedly poke it into the crochet fabric where the eyes should be. This creates a soft, 3D eye effect. Do the same with ginger wool for the eyebrows. For a more traditional look, you can also use black beads for the eyes.
Don’t forget to sew the decorative button onto the front of the sweater to complete the outfit!
Tips for Success
- Tension is Key: If you find your stuffing peeking through the stitches, try using a slightly smaller hook or ensuring your tension is a bit tighter.
- Color Changes: When changing colors, always pull the new color through the final loop of the previous stitch to ensure a seamless transition.
- No Felting Needle? If you don’t have felting supplies, don’t worry! You can easily embroider the eyes, eyebrows, and nose using black and white thread for a very cute, classic look.
- Size Consistency: When making the ears, try to ensure the yarn thickness is the same, even if the colors differ, to prevent one ear from looking much larger than the other.